A Bit of History
I started working on UML in earnest in February 1999 after having the idea that porting Linux to itself might be practical. I tossed the idea around in the back of my head for a few months in late 1998 and early 1999. I was thinking about what facilities it would need from the host and whether the system call interface provided by Linux was rich enough to provide those facilities. Ultimately, I decided it probably was, and in the cases where I wasn't sure, I could think of workarounds.
So, around February, I pulled a copy of the 2.0.32 kernel tree off of a Linux CD (probably a Red Hat source CD) because it was too painful to try to download it through my dialup. Within the resulting kernel tree, I created the directories my new port was going to need without putting any files in them. This is the absolute minimum amount of infrastructure you need for a new port. With the directories present, the kernel build process can descend into them and try to build what's there.
Needless to say, with nothing in those directories, the build didn't even start to work. I needed to add the necessary build infrastructure, such as Makefiles. So, I added the minimal set of things needed to get the kernel build to continue and looked at what failed next. Missing were a number of header files used by the generic (hardware-independent) portions of the kernel that the port needs to provide. I created them as empty files, so that the #include preprocessor directives would at least succeed, and proceeded onward.
At this point, the kernel build started complaining about missing macros, variables, and functionsthe things that should have been present in my empty header files and nonexistent C source files. This told me what I needed to think about implementing. I did so in the same way as before: For the most part, I implemented the functions as stubs that didn't do anything except print an error message. I also started adding real headers, mostly by copying the x86 headers into my include directory and removing the things that had no chance of compiling.
After defining many of these useless procedures, I got the UML build to "succeed." It succeeded in the sense that it produced a program I could run. However, running it caused immediate failures due to the large number of procedures I defined that didn't do what they were supposed tothey did nothing at all except print errors. The utility of these errors is that they told me in what order I had to implement these things for real.
So, for the most part, I plodded along, implementing whatever function printed its name first, making small increments of progress through the boot process with each addition. In some cases, I needed to implement a subsystem, resulting in a related set of functions.
Implementation continued in this vein for a few months, interrupted by about a month of real, paying work. In early June, I got UML to boot a small filesystem up to a login prompt, at which point I could log in and run commands. This may sound impressive, but UML was still bug-ridden and full of design mistakes. These would be rooted out later, but at the time, UML was not much more than a proof of concept.
Because of design decisions made earlier, such fundamental things as shared libraries and the ability to log in on the main console didn't work. I worked around the first problem by compiling a minimal set of tools statically, so they didn't need shared libraries. This minimal set of tools was what I populated my first UML filesystem with. At the time of my announcement, I made this filesystem available for download since it was the only way anyone else was going to get UML to boot.
Because of another design decision, UML, in effect, put itself in the background, making it impossible for it to accept input from the terminal. This became a problem when you tried to log in. I worked around this by writing what amounted to a serial line driver, allowing me to attach to a virtual serial line on which I could log in.
These are two of the most glaring examples of what didn't work at that point. The full list was much longer and included other things such as signal delivery and process preemption. They didn't prevent UML from working convincingly, even though they were fairly fundamental problems, and they would get fixed later.
At the time, Linus was just starting the 2.3 development kernel series. My first "UML-ized" kernel was 2.0.32, which, even at the time, was fairly old. So, I bit the bullet and downloaded a "modern" kernel, which was 2.3.5 or so. This started the process, which continues to this day, of keeping in close touch with the current development kernels (and as of 2.4.0, the stable ones as well).
Development continued, with bugs being fixed, design mistakes rectified (and large pieces of code rewritten from scratch), and drivers and filesystems added. UML spent a longer than usual amount of time being developed out of pool, that is, not integrated into the mainline Linus' kernel tree. In part, this was due to laziness. I was comfortable with the development methodology I had fallen into and didn't see much point in changing it.
However, pressure mounted from various sources to get UML into the main kernel tree. Many people wanted to be able to build UML from the kernel tree they downloaded from http://www.kernel.org. or got with their distribution. Others, wanting the best for the UML project, saw inclusion in Linus' kernel as being a way of getting some public recognition or as a stamp of approval from Linus, thus attracting more users to UML. More pragmatically, some people, who were largely developers, noted that inclusion in the official kernel would cause updates and bug fixes to happen in UML "automatically." This would happen as someone made a pass over the kernel sources, for example, to change an interface or fix a family of bugs, and would cover UML as part of that pass. This would save me the effort of looking through the patch representing a new kernel release, finding those changes, figuring out the equivalent changes needed in UML, and making them. This had become my habit over the roughly four years of UML development before it was merged by Linus. It had become a routine part of UML development, so I didn't begrudge the time it took, but there is no denying that it did take time that would have been better spent on other things.
So, roughly in the spring of 2002, I started sending updated UML patches to Linus, requesting that they be merged. These were ignored for some months, and I was starting to feel a bit discouraged, when out of the blue, he merged my 2.5.34 patch on September 12, 2002. I had sent the patch earlier to Linus as well as the kernel mailing list and one of my own UML lists, as usual, and had not thought about it further. That day, I was idling on an Internet Relay Chat (IRC) channel where a good number of the kernel developers hang around and talk. Suddenly, Arnaldo Carvalho de Melo (a kernel contributor from Brazil and the CTO of Conectiva, the largest Linux distribution in South America) noticed that Linus had merged my patch into his tree.
The response to this from the other kernel hackers, and a little later, from the UML community and wider Linux community, was gratifying positive. A surprisingly (to me) large number of people were genuinely happy that UML had been merged, and, in doing so, got the recognition they thought it deserved.
At this writing, it is three years later, and UML is still under very active development. There have been ups and downs. Some months after UML was merged, I started finding it hard to get Linus to accept updated patches. After a number of ignored patches, I started maintaining UML out of tree again, with the effect that the in-tree version of UML started to bit-rot. It stopped compiling because no one was keeping it up to date with changes to internal kernel interfaces, and of course bugs stopped being fixed because my fixes weren't being merged by Linus.
Late in 2004, an energetic young Italian hacker named Paolo Giarrusso got Andrew Morton, Linus' second-in-command, to include UML in his tree. The so-called "-mm" tree is a sort of purgatory for kernel patches. Andrew merges patches that may or may not be suitable for Linus' kernel in order to give them some wider exposure and see if they are suitable. Andrew took patches representing the current UML at the time from Paolo, and I followed that up with some more patches. Presently, Andrew forwarded those patches, along with many others, to Linus, who included them in his tree. All of a sudden, UML was up to date in the official kernel tree, and I had a reliable conduit for UML updates.
I fed a steady stream of patches through this conduit, and by the time of the 2.6.9 release, you could build a working UML from the official tree, and it was reasonably up to date.
Throughout this period, I had been working on UML on a volunteer basis. I took enough contracting work to keep the bills paid and the cats fed. Primarily, this was spending a day a week at the Institute for Security Technology Studies at Dartmouth College, in northern New Hampshire, about an hour from my house. This changed around May and June of 2004, when, nearly simultaneously, I got job offers from Red Hat and Intel. Both were very generous, offering to have me spend my time on UML, with no requirements to move. I ultimately accepted Intel's offer and have been an Intel employee in the Linux OS group since.
Coincidentally, the job offers came on the fifth anniversary of UML's first public announcement. So, in five years, UML went from nothing to a fully supported part of the official Linux kernel.
What Is UML Used For?
During the five years since UML began, I have seen steady growth in the UML user base and in the number and variety of applications and uses for UML. My users have been nothing if not inventive, and I have seen uses for UML that I would never have thought of.
Server Consolidation
Naturally, the most common applications of UML are the obvious ones. Virtualization has become a hot area of the computer industry, and UML is being used for the same things as other virtualization technologies. Server consolidation is a major one, both internally within organizations and externally between them. Internal consolidation usually takes the form of moving several physical servers into the same number of virtual machines running on a single physical host. External consolidation is usually an ISP or hosting company offering to rent UML instances to the public just as they rent physical servers. Here, multiple organizations end up sharing physical hardware with each other.
The main attraction is cost savings. Computer hardware has become so powerful and so cheap that the old model of one service, or maybe two, per machine now results in hardware that is almost totally idle. There is no technical reason that many services, and their data and configurations, couldn't be copied onto a single server. However, it is easier in many cases to copy each entire server into a virtual machine and run them all unchanged on a single host. It is less risky since the configuration of each is the same as on the physical server, so moving it poses no chance of upsetting an already-debugged environment.
In other cases, virtual servers may offer organizational or political benefits. Different services may be run by different organizations, and putting them on a single physical server would require giving the root password to each organization. The owner of the hardware would naturally tend to feel queasy about this, as would any given organization with respect to the others. A virtual server neatly solves this by giving each service its own virtual machine with its own root password. Having root privileges in a virtual machine in no way requires root privileges on the host. Thus, the services are isolated from the physical host, as well as from each other. If one of them gets messed up, it won't affect the host or the other services.
Moving from production to development, UML virtual machines are commonly used to set up and test environments before they go live in production. Any type of environment from a single service running on a single machine to a network running many services can be tested on a single physical host. In the latter case, you would set up a virtual network of UMLs on the host, run the appropriate services on the virtual hosts, and test the network to see that it behaves properly.
In a complex situation like this, UML shines because of the ease of setting up and shutting down a virtual network. This is simply a matter of running a set of commands, which can be scripted. Doing this without using virtual machines would require setting up a network of physical machines, which is vastly more expensive in terms of time, effort, space, and hardware. You would have to find the hardware, from systems to network cables, find some space to put it in, hook it all together, install and configure software, and test it all. In addition to the extra time and other resources this takes, compared to a virtual test environment, none of this can be automated.
In contrast, with a UML testbed, this can be completely automated. It is possible, and fairly easy, to full automate the configuration and booting of a virtual network and the testing of services running on that network. With some work, this can be reduced to a single script that can be run with one command. In addition, you can make changes to the network configuration by changing the scripts that set it up, rather than rewiring and rearranging hardware. Different people can also work independently on different areas of the environment by booting virtual networks on their own workstations. Doing this in a physical environment would require separate physical testbeds for each person working on the project.
Implementing this sort of testbed using UML systems instead of physical ones results in the near-elimination of hardware requirements, much greater parallelism of development and testing, and greatly reduced turnaround time on configuration changes. This can reduce the time needed for testing and improve the quality of the subsequent deployment by increasing the amount and variety of testing that's possible in a virtual environment.
A number of open source projects, and certainly a much larger number of private projects, use UML in this way. Here are a couple that I am aware of.
Openswan (http://www.openswan.org), the open source IPSec project, uses a UML network for nightly regression testing and its kernel development. BusyBox (http://www.busybox.net), a small-footprint set of Linux utilities, uses UML for its testing.
Education
Consider moving the sort of UML setup I just described from a corporate environment to an educational one. Instead of having a temporary virtual staging environment, you would have a permanent virtual environment in which students will wreak havoc and, in doing so, hopefully learn something.
Now, the point of setting up a complicated network with interrelated services running on it is simply to get it working in the virtual environment, rather than to replicate it onto a physical network once it's debugged. Students will be assigned to make things work, and once they do (or don't), the whole thing will be torn down and replaced with the next assignment.
The educational uses of UML are legion, including courses that involve any sort of system administration and many that involve programming. System administration requires the students to have root privileges on the machines they are learning on. Doing this with physical machines on a physical network is problematic, to say the least.
As root, a student can completely destroy the system software (and possibly damage the hardware). With the system on a physical network, a student with privileges can make the network unusable by, wittingly or unwittingly, spoofing IP addresses, setting up rogue DNS or DHCP servers, or poisoning ARP (Address Resolution Protocol) caches on other machines on the network.
These problems all have solutions in a physical environment. Machines can be completely reimaged between boots to undo whatever damage was done to the system software. The physical network can be isolated from any other networks on which people are trying to do real work. However, all this takes planning, setup, time, and resources that just aren't needed when using a UML environment.
The boot disk of a UML instance is simply a file in the host's filesystem. Instead of reimaging the disk of a physical machine between boots, the old UML root filesystem file can be deleted and replaced with a copy of the original. As will be described in later chapters, UML has a technology called COW (Copy-On-Write) files, which allow changes to a filesystem to be stored in a host file separate from the filesystem itself. Using this, undoing changes to a filesystem is simply a matter of deleting the file that contains the changes. Thus, reimaging a UML system takes a fraction of a second, rather than the minutes that reimaging a disk can take.
Looking at the network, a virtual network of UMLs is by default isolated from everything else. It takes effort, and privileges on the host, to allow a virtual network to communicate with a physical one. In addition, an isolated physical network is likely to have a group of students on it, so that one sufficiently malign or incompetent student could prevent any of the others from getting anything done. With a UML instance, it is feasible (and the simplest option) to give each student a private network. Then, an incompetent student can't mess up anyone else's network.
UML is also commonly used for learning kernel-level programming. For novice to intermediate kernel programming students, UML is a perfect environment in which to learn. It provides an authentic kernel to modify, with the development and debugging tools that should already be familiar. In addition, the hardware underneath this kernel is virtualized and thus better behaved than physical hardware. Failures will be caused by buggy software, not by misbehaving devices. So, students can concentrate on debugging the code rather than diagnosing broken or flaky hardware.
Obviously, dealing with broken, flaky, slightly out-of-spec, not-quite-standards-compliant devices are an essential part of an expert kernel developer's repertoire. To reach that exalted status, it is necessary to do development on physical machines. But learning within a UML environment can take you most of the way there.
Over the years, I have heard of education institutions teaching many sort of Linux administration courses using UML. Some commercial companies even offer system administration courses over the Internet using UML. Each student is assigned a personal UML, which is accessible over the Internet, and uses it to complete the coursework.
Development
Moving from system administration to development, I've seen a number of programming courses that use UML instances. Kernel-level programming is the most obvious place for UMLs. A system-level programming course is similar to a system administration course in that each student should have a dedicated machine. Anyone learning kernel programming is probably going to crash the machine, so you can't really teach such a course on a shared machine.
UML instances have all the advantages already described, plus a couple of bonuses. The biggest extra is that, as a normal process running on the host, a UML instance can be debugged with all the tools that someone learning system development is presumably already familiar with. It can be run under the control of gdb, where the student can set breakpoints, step through code, examine data, and do everything else you can do with gdb. The rest of the Linux development environment works as well with UML as with anything else. This includes gprof and gcov for profiling and test coverage and strace and ltrace for system call and library tracing.
Another bonus is that, for tracking down tricky timing bugs, the debugging tool of last resort, the print statement, can be used to dump data out to the host without affecting the timing of events within the UML kernel. With a physical machine, this ranges from extremely hard to impossible. Anything you do to store information for later retrieval can, and probably will, change the timing enough to obscure the bug you are chasing. With a UML instance, time is virtual, and it stops whenever the virtual machine isn't in the host's userspace, as it is when it enters the host kernel to log data to a file.
A popular use for UML is development for hardware that does not yet exist. Usually, this is for a piece of embedded hardwarean appliance of some sort that runs Linux but doesn't expose it. Developing the software inside UML allows the software and hardware development to run in parallel. Until the actual devices are available, the software can be developed in a UML instance that is emulating the hardware.
Examples of this are hard to come by because embedded developers are notoriously close-lipped, but I know of a major networking equipment manufacturer that is doing development with UML. The device will consist of several systems hooked together with an internal network. This is being simulated by a script that runs a set of UML instances (one per system in the device) with a virtual network running between them and a virtual network to the outside. The software is controlling the instances in exactly the same that it will control the systems within the final device.
Going outside the embedded device market, UML is used to simulate large systems. A UML instance can have a very large amount of memory, lots of processors, and lots of devices. It can have more of all these things than the host can, making it an ideal way to simulate a larger system than you can buy. In addition to simulating large systems, UML can also simulate clusters. A couple of open source clustering systems and a larger number of cluster components, such as filesystems and heartbeats, have been developed using UML and are distributed in a form that will run within a set of UMLs.
Disaster Recovery Practice
A fourth area of UML use, which is sort of a combination of the previous two, is disaster recovery practice. It's a combination in the sense that this would normally be done in a corporate environment, but the UML virtual machines are used for training.
The idea is that you make a virtual copy of a service or set of services, mess it up somehow, and figure out how to fix it. There will likely be requirements beyond simply fixing what is broken. You may require that the still-working parts of the service not be shut down or that the recovery be done in the least amount of time or with the smallest number of operations.
The benefits of this are similar to those mentioned earlier. Virtual environments are far more convenient to set up, so these sorts of exercises become far easier when virtual machines are available. In many cases, they simply become possible since hardware can't be dedicated to disaster recovery practice. The system administration staff can practice separately at their desks, and, given a well-chosen set of exercises, they can be well prepared when disaster strikes.
The Future
This chapter provided a summary of the present state of UML and its user community. This book will also describe what I have planned for the future of UML and what those plans mean for its users.
Among the plans is a project to port UML into the host kernel so that it runs inside the kernel rather than in a process. With some restructuring of UML, breaking it up into independent subsystems that directly use the resources provided by the host kernel, this in-kernel UML can be used for a variety of resource limitation applications such as resource control and jailing.
This will provide highly customizable jailing, where a jail is constructed by combining the appropriate subsystems into a single package. Processes in such a jail will be confined with respect to the resources controlled by the jail, and otherwise unconfined. This structure of layering subsystems on top of each other has some other advantages as well. It allows them to be nested, so that a user confined within a jail could construct a subjail and put processes inside it. It also allows the nested subsystems to use different algorithms than the host subsystems. So, a workload with unusual scheduling or memory needs could be run inside a jail with algorithms suitable for it.
However, the project I'm most excited about is using UML as a library, allowing other applications to link against it and thereby gain a captive virtual machine. This would have a great number of uses:
Managing an application or service from the inside, by logging in to the embedded UML Running scripts inside the embedded UML to control, monitor, and extend the application Using clustering technology to link multiple embedded UMLs into a cluster and use scripts running on this cluster to integrate the applications in ways that are currently not possible
Chapter 2. Краткий обзор UML
Основное внимание будет уделено взаимодействию UML и хоста.
Для начинающих всегда загадка , где кончается хост и начинается виртуальная машина.
Обычно виртуальная машина - это часть хоста , поскольку она не может существовать без него.
Вы можете быть рутом в UML и не иметь привилегий на хосте.
Когда UML запущена, она использует хостовые ресурсы как свои собственные.
Рутовый пользователь внутри UML имеет абсолютные права, но только внутри.
UML - это одновременно и ядро , и процесс.
Ядро и процесс - это 2 разныз вещи. Мы будем рассматривать UML как снаружи , так и изнутри.
Figure 2.1
показывает связь между UML и хостом.
Для хоста UML - это обычный процесс.
Для UML-процессов, сам UML - это ядро.
Процессы взаимодействуют с ядром через системные вызовы.
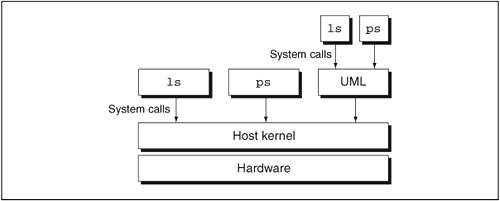
Как любой другой процесс на хосте, UML делает системные вызовы .
В отличие от других процессов, UML имеет свой собственный system call interface .
Давайте посмотрим на бинарник UML , который обычно называется linux:
host% ls -l linux
 -rwxrw-rw-  2 jdike jdike 23346513 Jan 27 12:16 linux
Он имеет стандарный формат Linux ELF :
host% file linux
 linux: ELF 32-bit LSB executable, Intel 80386, version 1 (SYSV), \
 for GNU/Linux 2.2.5, statically linked, not stripped
Текущая версия ядра :
host% ls -l /boot/vmlinuz-2.4.26
 -rw-r--r--  1 root root 945800 Sep 18 17:12 /boot/vmlinuz-2.4.26
UML binary - это не совсем хостовое ядро, у него стандартная внутрення символьная таблица.
А теперь давайте посмотрим на него :
 host% ls -l linux
 -rwxrw-rw-  2 jdike jdike 2236936 Jan 27 15:01 linux
Оно больше по размеру , чем хостовое ядро.
Настроечные опции встроены внутри UML.
Проверим модули загруженные на хосте :
host% lsmod
 Module                  Size  Used by
 usblp                  17473  0
 parport_pc             31749  1
 lp                     16713  0
 parport                39561  2 parport_pc,lp
 autofs4                23493  2
 sunrpc                145541  1
 ...
 host% lsmod | awk '{n += $2} END {print n}'
 1147092
Увеличенный вес UML обьясняется тем , что модули встроены в него.
Т.о. UML может быть запущен как обычный процесс , такой как bash или ls.
Первая загрузка UML
Запустим UML :
Результат показан ниже Figure 2.2.
Figure 2.2. Output from the first boot of UML
Checking for /proc/mm...not found
 Checking for the skas3 patch in the host...not found
 Checking PROT_EXEC mmap in /tmp...OK
 Linux version 2.6.11-rc1-mm1 (jdike@tp.user-mode-linux.org) (gcc version 3.3.2
      20031022 (Red Hat Linux 3.3.2-1)) #83 Thu Jan 27 12:16:00 EST 2005
 Built 1 zonelists
 Kernel command line: root=98:0
 PID hash table entries: 256 (order: 8, 4096 bytes)
 Dentry cache hash table entries: 8192 (order: 3, 32768 bytes)
 Inode-cache hash table entries: 4096 (order: 2, 16384 bytes)
 Memory: 29368k available
 Mount-cache hash table entries: 512 (order: 0, 4096 bytes)
 Checking for host processor cmov support...Yes
 Checking for host processor xmm support...No
 Checking that ptrace can change system call numbers...OK
 Checking syscall emulation patch for ptrace...missing
 Checking that host ptys support output SIGIO...Yes
 Checking that host ptys support SIGIO on close...No, enabling workaround
 Checking for /dev/anon on the host...Not available (open failed with errno 2)
 NET: Registered protocol family 16
 mconsole (version 2) initialized on /home/jdike/.uml/3m3vDd/mconsole
 VFS: Disk quotas dquot_6.5.1
 Dquot-cache hash table entries: 1024 (order 0, 4096 bytes)
 io scheduler noop registered
 io scheduler anticipatory registered
 io scheduler deadline registered
 io scheduler cfq registered
 NET: Registered protocol family 2
 IP: routing cache hash table of 512 buckets, 4Kbytes
 TCP established hash table entries: 2048 (order: 2, 16384 bytes)
 TCP bind hash table entries: 2048 (order: 1, 8192 bytes)
 TCP: Hash tables configured (established 2048 bind 2048)
 NET: Registered protocol family 1
 NET: Registered protocol family 17
 Initialized stdio console driver
 Console initialized on /dev/tty0
 Initializing software serial port version 1
 VFS: Waiting 19sec for root device...
 VFS: Waiting 18sec for root device...
 VFS: Waiting 17sec for root device...
 VFS: Waiting 16sec for root device...
 VFS: Waiting 15sec for root device...
 VFS: Waiting 14sec for root device...
 VFS: Waiting 13sec for root device...
 VFS: Waiting 12sec for root device...
 VFS: Waiting 11sec for root device...
 VFS: Waiting 10sec for root device...
 VFS: Waiting 9sec for root device...
 VFS: Waiting 8sec for root device...
 VFS: Waiting 7sec for root device...
 VFS: Waiting 6sec for root device...
 VFS: Waiting 5sec for root device...
 VFS: Waiting 4sec for root device...
 VFS: Waiting 3sec for root device...
 VFS: Waiting 2sec for root device...
 VFS: Waiting 1sec for root device...
 VFS: Cannot open root device "98:0" or unknown-block(98,0)
 Please append a correct "root=" boot option
 Kernel panic - not syncing: VFS: Unable to mount root fs on unknown-block(98,0)

 EIP: 0023:[<a015a751>] CPU: 0 Not tainted ESP: 002b:40001fa0 EFLAGS: 00000206
     Not tainted
 EAX: 00000000 EBX: 00002146 ECX: 00000013 EDX: 00002146
 ESI: 00002145 EDI: 00000000 EBP: 40001fbc DS: 002b ES: 002b
 Call Trace:
 a0863af0: [<a0030446>] printk+0x12/0x14
 a0863b00: [<a003ff32>] notifier_call_chain+0x22/0x40
 a0863b30: [<a002f9f2>] panic+0x56/0x108
 a0863b40: [<a003c0f6>] msleep+0x42/0x4c
 a0863b50: [<a0002d96>] mount_block_root+0xd6/0x188
 a0863bb0: [<a0002e9c>] mount_root+0x54/0x5c
 a0863bc0: [<a0002f07>] prepare_namespace+0x63/0xa8
 a0863bd0: [<a0002ebb>] prepare_namespace+0x17/0xa8
 a0863bd4: [<a000e190>] init+0x0/0x108
 a0863be4: [<a000e190>] init+0x0/0x108
 a0863bf0: [<a000e291>] init+0x101/0x108
 a0863c00: [<a0027131>] run_kernel_thread+0x39/0x40
 a0863c18: [<a000e190>] init+0x0/0x108
 a0863c28: [<a0027117>] run_kernel_thread+0x1f/0x40
 a0863c50: [<a0013211>] unblock_signals+0xd/0x10
 a0863c70: [<a002c51c>] finish_task_switch+0x24/0xa4
 a0863c84: [<a000e190>] init+0x0/0x108
 a0863c90: [<a002c5ad>] schedule_tail+0x11/0x124
 a0863cc4: [<a000e190>] init+0x0/0x108
 a0863cd0: [<a001ad58>] new_thread_handler+0xb0/0x104
 a0863cd4: [<a000e190>] init+0x0/0x108
 a0863d20: [<a015a508>] __restore+0x0/0x8
 a0863d60: [<a015a751>] kill+0x11/0x20
|
Вывод похож на вывод при загрузке линукса.
В данном случае загрузка не была завершена успешно.
Вывод похож на то , что обычно выдает dmesg.
UML не нуждается в полном наборе драйверов , что и хост,
поэтому вывод будет отличаться.
UML имеет архитектуру , отличную от архитектуры ядра , запускаемого на хосте.
Давайте посмотрим повнимательнее.
Checking for /proc/mm...not found
 Checking for the skas3 patch in the host...not found
 Checking PROT_EXEC mmap in /tmp...OK
Идет проверка оборудования хоста .
Checking for host processor cmov support...Yes
 Checking for host processor xmm support...No
 Checking that ptrace can change system call numbers...OK
Сначала проверяется процессор , затем проверяется , можно ли вообще запустить UML на хосте.
mconsole (version 2) initialized on /home/jdike/.uml/3m3vDd/mconsole
 ...
 Initialized stdio console driver
 ...
 Initializing software serial port version 1
UML инициализирует свои драйвера.
UML использует ресурсы хоста , и представлены несколько типов таких ресурсов.
Например block device внутри UML могут иметь доступ как host file,
поэтому для block devices требуется один UML driver.
Хотя на хосте имеется несколько block drivers, для IDE disks, SCSI disks, SATA disks, и т.д..
Драйвер под названием mconsole
позволяет осуществлять контроль над ним со стороны хоста.
Также имеются console и serial line драйверы, которые будут использовать т.н. pseudo-terminals.
VFS: Waiting 1sec for root device...
 VFS: Cannot open root device "98:0" or unknown-block(98,0)
 Please append a correct "root=" boot option
 Kernel panic - not syncing: VFS: Unable to mount root fs on \
       unknown-block(98,0)
Тут возникает паника , и UML убивается.
Проблема в том , что нужен т.н. рутовый девайс , поскольку UML не может быть замонтирован на рутовый каталог.
Для UML не требуется загрузчик-bootloader типа LILO или GRUB.
Он запускается из командной строки, и хост фактически является загрузчиком.
В результате мы вернемся в промпт , и ничего страшного не произойдет.
Повторная загрузка UML
Нужно указать UML на рутовый девайс.
В качестве примера файловой системы рассмотрим :
host% ls -l ~/roots/debian_22
 -rw-rw-r--  1 jdike jdike 1074790400 Jan 27 18:31 \
       /home/jdike/roots/debian_22
Запустим команду file
host% file ~/roots/debian_22
 /home/jdike/roots/debian_22: Linux rev 1.0 ext2 filesystem data
Теперь выполним loopback-mount для нее :
host# mount ~/roots/debian_22 ~/mnt -o loop
 host% ls ~/mnt
 bfs boot    dev floppy initrd lib        mnt  root tmp var
 bin cdrom   etc home   kernel lost+found proc sbin usr
При запуске UML теперь нужно будет указать опцию :
Тем самым мы говорим , что первым блочным устройством для UML будет ~/roots/debian_22.
Добавим еще один параметр командной строки :
Будет создан файл размером 128MB , который будет использоваться вместо виртуальной памяти
и записан в собственной файловой системе.
Реально память , выделяемая хостом для нужд UML , будет меньше 128 м.
Память , необходимая для нужд UML , будет свопиться хостом.
Кроме этого , у UML будет свой собственный своп.
Итак , запускаем повторно UML:
~/linux mem=128M ubda=/home/jdike/roots/debian_22
Figure 2.3 shows the results.
Figure 2.3. Output from the first successful boot of UML
~/linux/2.6/2.6.10 22849: ./linux mem=128M ubda=/home/jdike/roots/debian_22
 Checking for /proc/mm...not found
 Checking for the skas3 patch in the host...not found
 Checking PROT_EXEC mmap in /tmp...OK
 Linux version 2.6.11-rc1-mm1 (jdike@tp.user-mode-linux.org) (gcc version 3.3.2
      20031022 (Red Hat Linux 3.3.2-1)) #83 Thu Jan 27 12:16:00 EST 2005
 Built 1 zonelists
 Kernel command line: mem=128M ubda=/home/jdike/roots/debian_22 root=98:0
 PID hash table entries: 1024 (order: 10, 16384 bytes)
 Dentry cache hash table entries: 32768 (order: 5, 131072 bytes)
 Inode-cache hash table entries: 16384 (order: 4, 65536 bytes)
 Memory: 126720k available
 Mount-cache hash table entries: 512 (order: 0, 4096 bytes)
 Checking for host processor cmov support...Yes
 Checking for host processor xmm support...No
 Checking that ptrace can change system call numbers...OK
 Checking syscall emulation patch for ptrace...missing
 Checking that host ptys support output SIGIO...Yes
 Checking that host ptys support SIGIO on close...No, enabling workaround
 Checking for /dev/anon on the host...Not available (open failed with errno 2)
 NET: Registered protocol family 16
 mconsole (version 2) initialized on /home/jdike/.uml/igpn9r/mconsole
 VFS: Disk quotas dquot_6.5.1
 Dquot-cache hash table entries: 1024 (order 0, 4096 bytes)
 io scheduler noop registered
 io scheduler anticipatory registered
 io scheduler deadline registered
 io scheduler cfq registered
 NET: Registered protocol family 2
 IP: routing cache hash table of 512 buckets, 4Kbytes
 TCP established hash table entries: 8192 (order: 4, 65536 bytes)
 TCP bind hash table entries: 8192 (order: 3, 32768 bytes)
 TCP: Hash tables configured (established 8192 bind 8192)
 NET: Registered protocol family 1
 NET: Registered protocol family 17
 Initialized stdio console driver
 Console initialized on /dev/tty0
 Initializing software serial port version 1
  ubda: unknown partition table
 VFS: Mounted root (ext2 filesystem) readonly.
 line_ioctl: tty0: ioctl KDSIGACCEPT called
 INIT: version 2.78 booting
 Activating swap...
 Checking root file system...
 Parallelizing fsck version 1.18 (11-Nov-1999)
 /dev/ubd0: clean, 9591/131328 files, 64611/262144 blocks
 Calculating module dependencies... depmod: get_kernel_syms: Function not
      implemented
 done.
 Loading modules: cat: /etc/modules: No such file or directory
 modprobe: Can't open dependencies file /lib/modules/2.6.11-rc1-mm1/modules.dep
      (No such file or directory)
 Checking all file systems...
 Parallelizing fsck version 1.18 (11-Nov-1999)
 Setting kernel variables.
 Mounting local filesystems...
 mount: devpts already mounted on /dev/pts
 none on /tmp type tmpfs (rw)
 Setting up IP spoofing protection: rp_filter.
 Configuring network interfaces: done.

 Setting the System Clock using the Hardware Clock as reference...
 line_ioctl: tty1: unknown ioctl: 0x4b50
 hwclock is unable to get I/O port access: the iopl(3) call failed.
 System Clock set. Local time: Thu Jan 27 18:51:28 EST 2005

 Cleaning: /tmp /var/lock /var/run.
 Initializing random number generator... done.
 Recovering nvi editor sessions... done.
 INIT: Entering runlevel: 2
 Starting system log daemon: syslogd syslogd: /dev/xconsole: No such file or
      directory
  klogd.
 Starting portmap daemon: portmap.
 Starting NFS common utilities: statd lockdlockdsvc: Function not implemented
 .
 Starting internet superserver: inetd.
 Starting MySQL database server: mysqld.
 Not starting NFS kernel daemon: No exports.
 Starting OpenBSD Secure Shell server: sshd.
 Starting web server: apache.
 /usr/sbin/apachectl start: httpd started

 Debian GNU/Linux 2.2 usermode tty0

 usermode login:
|
Тут мы уже наблюдаем загрузку файловой системы .
Синхронизация internal kernel clock с системным hardware clock:
Setting the System Clock using the Hardware Clock as reference...
 line_ioctl: tty1: unknown ioctl: 0x4b50
 hwclock is unable to get I/O port access: the iopl(3) call \
       failed.
Для доступа к таймеру будет использован системный вызов gettimeofday.
Далее идет подключение таких сервисов как NFS, MySQL, Apache.
Каждый из них запускается так , как будто он находится на физической машине.
У автора все про все заняло 5 секунд, показывая способность UML к быстрой загрузке.

Looking at a UML from the Inside and Outside
Finally, we'll see a login prompt. Actually, I see three on my screen. One is in the xterm window in which I ran UML. The other two are in xterm windows run by UML in order to hold the second console and the first serial line, which are configured to have gettys running on them. We'll log in as root (using the highly secure default root password of root that most of my UML filesystems have) and get a shell:
usermode login: root
 Password:
 Last login: Thu Jan 27 18:51:35 2005 on tty0
 Linux usermode 2.6.11-rc1-mm1 #83 Thu Jan 27 12:16:00 EST 2005 \
       i686 unknown
 usermode:~#
Again, this is identical to what you'd see if you logged in to a physical machine booted on this filesystem.
Now it's time to start poking around inside this UML and see what it looks like. First, we'll look at what processes are running, as shown in Figure 2.4.
Figure 2.4. Output from ps uax inside UML
 usermode:~# ps uax
 USER       PID %CPU %MEM   VSZ  RSS TTY   STAT  START  TIME COMMAND
 root         1  0.0  0.3  1100  464 ?     S     19:17  0:00 init [2]
 root         2  0.0  0.0     0    0 ?     RWN   19:17  0:00 [ksoftirqd/0]
 root         3  0.0  0.0     0    0 ?     SW<   19:17  0:00 [events/0]
 root         4  0.0  0.0     0    0 ?     SW<   19:17  0:00 [khelper]
 root         5  0.0  0.0     0    0 ?     SW<   19:17  0:00 [kthread]
 root         6  0.0  0.0     0    0 ?     SW<   19:17  0:00 [kblockd/0]
 root         7  0.0  0.0     0    0 ?     SW    19:17  0:00 [pdflush]
 root         8  0.0  0.0     0    0 ?     SW    19:17  0:00 [pdflush]
 root        10  0.0  0.0     0    0 ?     SW<   19:17  0:00 [aio/0]
 root         9  0.0  0.0     0    0 ?     SW    19:17  0:00 [kswapd0]
 root        96  0.0  0.4  1420  624 ?     S     19:17  0:00 /sbin/syslogd
 root        98  0.0  0.3  1084  408 ?     S     19:17  0:00 /sbin/klogd
 daemon     102  0.0  0.3  1200  420 ?     S     19:17  0:00 /sbin/portmap
 root       105  0.0  0.4  1128  548 ?     S     19:17  0:00 /sbin/rpc.statd
 root       111  0.0  0.4  1376  540 ?     S     19:17  0:00 /usr/sbin/inetd
 root       120  0.0  0.6  1820  828 ?     S     19:17  0:00 /bin/sh /usr/bin/
 mysql      133  0.1  1.2 19244 1540 ?     S     19:17  0:00 /usr/sbin/mysqld
 mysql      135  0.0  1.2 19244 1540 ?     S     19:17  0:00 /usr/sbin/mysqld
 mysql      136  0.0  1.2 19244 1540 ?     S     19:17  0:00 /usr/sbin/mysqld
 root       144  0.9  0.9  2616 1224 ?     S     19:17  0:00 /usr/sbin/sshd
 root       149  0.0  1.0  2588 1288 ?     S     19:17  0:00 /usr/sbin/apache
 root       152  0.0  0.9  2084 1220 tty0  S     19:17  0:00 -bash
 root       153  0.0  0.3  1084  444 tty1  S     19:17  0:00 /sbin/getty 38400
 root       154  0.0  0.3  1084  444 tty2  S     19:17  0:00 /sbin/getty 38400
 root       155  0.0  0.3  1084  444 ttyS0 S     19:17  0:00 /sbin/getty 38400
 www-data   156  0.0  1.0  2600 1284 ?     S     19:17  0:00 /usr/sbin/apache
 www-data   157  0.0  1.0  2600 1284 ?     S     19:17  0:00 /usr/sbin/apache
 www-data   158  0.0  1.0  2600 1284 ?     S     19:17  0:00 /usr/sbin/apache
 www-data   159  0.0  1.0  2600 1284 ?     S     19:17  0:00 /usr/sbin/apache
 www-data   160  0.0  1.0  2600 1284 ?     S     19:17  0:00 /usr/sbin/apache
 root       162  2.0  0.5  2384  736 tty0  R     19:17  0:00 ps uax
 usermode:~#
|
There's not much to comment on except the total normality of this output. What's interesting here is to look at the host. Figure 2.5 shows the corresponding processes on the host.
Figure 2.5. Partial output from ps uax on the host
 USER     PID %CPU %MEM   VSZ  RSS TTY     STAT START TIME  COMMAND
 jdike   9938  0.1  3.1 131112 16264 pts/3 R    19:17 0:03 ./linux [ps]
 jdike   9942  0.0  3.1 131112 16264 pts/3 S    19:17 0:00 ./linux [ps]
 jdike   9943  0.0  3.1 131112 16264 pts/3 S    19:17 0:00 ./linux [ps]
 jdike   9944  0.0  0.0   472  132 pts/3   T    19:17 0:00
 jdike  10036  0.0  0.5  8640 2960 pts/3   S    19:17 0:00 xterm -T Virtual
 jdike  10038  0.0  0.0  1368  232 ?       S    19:17 0:00 /usr/lib/uml/port
 jdike  10039  0.0  1.5 131092 8076 pts/6  S    19:17 0:00 ./linux [hwclock]
 jdike  10095  0.0  0.1   632  604 pts/3   T    19:17 0:00
 jdike  10099  0.0  0.0   416  352 pts/3   T    19:17 0:00
 jdike  10107  0.0  0.0   428  332 pts/3   T    19:17 0:00
 jdike  10113  0.0  0.1   556  516 pts/3   T    19:17 0:00
 jdike  10126  0.0  0.0   548  508 pts/3   T    19:17 0:00
 jdike  10143  0.0  0.0   840  160 pts/3   T    19:17 0:00
 jdike  10173  0.0  0.2  1548 1140 pts/3   T    19:17 0:00
 jdike  10188  0.0  0.1  1232  780 pts/3   T    19:17 0:00
 jdike  10197  0.0  0.1  1296  712 pts/3   T    19:17 0:00
 jdike  10205  0.0  0.0   452  452 pts/3   T    19:17 0:00
 jdike  10207  0.0  0.0   452  452 pts/3   T    19:17 0:00
 jdike  10209  0.0  0.0   452  452 pts/3   T    19:17 0:00
 jdike  10210  0.0  0.5  8640 2960 pts/3   S    19:17 0:00 xterm -T Virtual
 jdike  10212  0.0  0.0  1368  232 ?       S    19:17 0:00 /usr/lib/uml/port
 jdike  10213  0.0  2.9 131092 15092 pts/7 S    19:17 0:00 ./linux [/sbin/ge
 jdike  10214  0.0  0.1  1292  688 pts/3   T    19:17 0:00
 jdike  10215  0.0  0.1  1292  676 pts/3   T    19:17 0:00
 jdike  10216  0.0  0.1  1292  676 pts/3   T    19:17 0:00
 jdike  10217  0.0  0.1  1292  676 pts/3   T    19:17 0:00
 jdike  10218  0.0  0.1  1292  676 pts/3   T    19:17 0:00
 jdike  10220  0.0  0.1  1228  552 pts/3   T    19:17 0:00
|
Each of the nameless host processes corresponds to an address space inside this UML instance. Except for application and kernel threads, there's a one-to-one correspondence between UML processes and these host processes.
Notice that the properties of the UML processes and the corresponding host processes don't have much in common. All of the host processes are owned by me, whereas the UML processes have various owners, including root. The process IDs are totally different, as are the virtual and resident memory sizes.
This is because the host processes are simply containers for UML address spaces. All of the properties visible inside UML are maintained by UML totally separate from the host. For example, the owner of the host processes will be whoever ran UML. However, many UML processes will be owned by root. These processes have root privileges inside UML, but they have no special privileges on the host. This important fact means that root can do anything inside UML without being able to do anything on the host. A user logged in to a UML as root has no special abilities on the host and, in fact, may not have any abilities at all on the host.
Now, let's look at the memory usage information in /proc/meminfo, shown in Figure 2.6.
Figure 2.6. The UML /proc/meminfo
 usermode:~# cat /proc/meminfo
 MemTotal:       126796 kB
 MemFree:        112952 kB
 Buffers:           512 kB
 Cached:           7388 kB
 SwapCached:          0 kB
 Active:           6596 kB
 Inactive:         3844 kB
 HighTotal:           0 kB
 HighFree:            0 kB
 LowTotal:       126796 kB
 LowFree:        112952 kB
 SwapTotal:           0 kB
 SwapFree:            0 kB
 Dirty:               0 kB
 Writeback:           0 kB
 Mapped:           5424 kB
 Slab:             2660 kB
 CommitLimit:     63396 kB
 Committed_AS:    23100 kB
 PageTables:        248 kB
 VmallocTotal:   383984 kB
 VmallocUsed:        24 kB
 VmallocChunk:   383960 kB
|
The total amount of memory shown, 126796K, is close to the 128MB we specified on the command line. It's not exactly 128MB because some memory allocated during early boot isn't counted in the total. Going back to the host ps output in Figure 2.5, notice that the linux processes have a virtual size (the VSZ column) of almost exactly 128MB. The difference of 50K is due to a small amount of memory in the UML binary, which isn't counted as part of its physical memory.
Now, let's go back to the host ps output and pick one of the UML processes:
jdike    9938  0.1  3.1 131112 16264 pts/3  R    19:17   0:03 \
      ./linux [ps]
We can look at its open files by looking at the /proc/9938/fd directory, which shows an entry like this:
lrwx------ 1 jdike jdike 64 Jan 28 12:48 3 -> \
      /tmp/vm_file-AwBs1z (deleted)
This is the host file that holds, and is the same size (128MB in our case) as, the UML "physical" memory. It is created in /tmp and then deleted. The deletion prevents something else on the host from opening it and corrupting it. However, this has the somewhat undesirable side effect that /tmp can become filled with invisible files, which can confuse people who don't know about this aspect of UML's behavior.
To make matters worse, it is recommended for performance reasons to use tmpfs on /tmp. UML performs noticeably better when its memory file is on tmpfs rather than on a disk-based filesystem such as ext3. However, a tmpfs mount is smaller than the disk-based filesystem /tmp would normally be on and thus more likely to run out of space when running multiple UML instances. This can be handled by making the tmpfs mount large enough to hold the maximum physical memories of all the UML instances on the host or by creating a tmpfs mount for each UML instance that is large enough to hold its physical memory.
Take a look at the root directory:
UML# ls /
 bfs  boot  dev floppy initrd lib        mnt  root tmp var
 bin  cdrom etc home   kernel lost+found proc sbin usr
This looks strikingly similar to the listing of the loopback mount earlier and somewhat different from the host. Here UML has done the equivalent of a loopback mount of the ~/roots/debian_22 file on the host.
Note that making the loopback mount on the host required root privileges, while I ran UML as my normal, nonroot self and accomplished the same thing. You might think this demonstrates that either the requirement of root privileges on the host is unnecessary or that UML is some sort of security hole for not requiring root privileges to do the same thing. Actually, neither is true because the two operations, the loopback mount on the host and UML mounting its root filesystem, aren't quite the same thing. The loopback mount added a mount point to the host's filesystem, while the mount of / within UML doesn't. The UML mount is completely separate from the host's filesystem, so the ability to do this has no security implications.
However, from a different point of view, some security implications do arise. There is no access from the UML filesystem to the host filesystem. The root user inside the UML can do anything on the UML filesystem, and thus, to the host file that contains it, but can't do anything outside it. So, inside UML, even root is jailed and can't break out.
This is a general property of UMLa UML is a full-blown Linux machine with its own resources. With respect to those resources, the root user within UML can do anything. But it can do nothing at all to anything on the host that's not explicitly provided to the UML. We've just seen this with disk space and files, and it's also true for networking, memory, and every other type of host resource that can be made accessible within UML.
Next, we can see some of UML's hardware support by looking at the mount table:
UML# mount
 /dev/ubd0 on / type ext2 (rw)
 proc on /proc type proc (rw)
 devpts on /dev/pts type devpts (rw,gid=5,mode=620)
 none on /tmp type tmpfs (rw)
Here we see the ubd device we configured on the command line now mounted as the root filesystem. The other mounts are normal virtual filesystems, procfs and devpts, and a tmpfs mount on /tmp. df will show us how much space is available on the virtual disk:
UML# df
 Filesystem         1k-blocks     Used Available Use% Mounted on
 /dev/ubd0            1032056   242108    737468  25% /
 none                   63396        0     63396   0% /tmp
Compare the total size of /dev/ubd0 (1032056K) to that of the host file:
-rw-rw-r--  1 jdike jdike 1074790400 Jan 27 18:31 \
       /home/jdike/roots/debian_22
They are nearly the same, with the difference probably being the ext2 filesystem overhead. The entire UML filesystem exists in and is confined to that host file. This is another way in which users inside the UML are confined or jailed. A UML user has no way to consume more disk space than is in that host file.
However, on the host, it is possible to extend the filesystem file, and the extra space becomes available to UML. In Chapter 6 we will see exactly how this is done, but for now, it's just important to note that this is a good example of how much more flexible virtual hardware is in comparison to physical hardware. Try adding extra space to a physical disk or a physical disk partition. You can repartition the disk in order to extend a partition, but that's a nontrivial, angst-ridden operation that potentially puts all of the data on the disk at risk if you make a mistake. You can also add a new volume to the volume group you wish to increase, but this requires that the volume group be set up beforehand and that you have a spare partition to add to it. In comparison, extending a file using dd is a trivial operation that can be done as a normal user, doesn't put any data at risk except that in the file, and doesn't require any prior setup.
We can poke around /proc some more to compare and contrast this virtual machine with the physical host it's running on. For some similarities, let's look at /proc/filesystems:
 UML# more /proc/filesystems
 nodev   sysfs
 nodev   rootfs
 nodev   bdev
 nodev   proc
 nodev   sockfs
 nodev   pipefs
 nodev   futexfs
 nodev   tmpfs
 nodev   eventpollfs
 nodev   devpts
         reiserfs
         ext3
         ext2
 nodev   ramfs
 nodev   mqueue
There's no sign of any UML oddities here at all. The reason is that the filesystems are not hardware dependent. Anything that doesn't depend on hardware will be exactly the same in UML as on the host. This includes things such as virtual devices (e.g., pseudo-terminals, loop devices, and TUN/TAP network interfaces) and network protocols, as well as the filesystems.
So, in order to see something different from the host, we have to look at hardware-specific stuff. For example, /proc/interrupts contains information about all interrupt sources on the system. On the host, it contains information about devices such as the timer, keyboard, and disks. In UML, it looks like this:
 UML# more /proc/interrupts
             CPU0
   0:      211586      SIGVTALRM timer
   2:          87          SIGIO console, console, console
   3:           0          SIGIO console-write, console-write, \
                           console-write
   4:        2061          SIGIO ubd
   6:           0          SIGIO ssl
   7:           0          SIGIO ssl-write
   9:           0          SIGIO mconsole
  10:           0          SIGIO winch, winch, winch
  11:          56          SIGIO write sigio
The timer, keyboard, and disks are here (entries 0, 2 and 6, and 4, respectively), as are a bunch of mysterious-looking entries. The -write entries stem from a weakness in the host Linux SIGIO support. SIGIO is a signal generated when input is available, or output is possible, on a file descriptor. A process wishing to do interrupt-driven I/O would set up SIGIO support on the file descriptors it's using. An interrupt when input is available on a file descriptor is obviously useful. However, an interrupt when output is possible is also sometimes needed.
If a process is writing to a descriptor, such as one belonging to a pipe or a network socket, faster than the process on the other side is reading it, then the kernel will buffer the extra data. However, only a limited amount of buffering is available. When that limit is reached, further writes will fail, returning EAGAIN. It is necessary to know when some of the data has been read by the other side and writes may be attempted again. Here, a SIGIO signal would be very handy. The trouble is that support of SIGIO when output is possible is not universal. Some IPC mechanisms support SIGIO when input is available, but not when output is possible.
In these cases, UML emulates this support with a separate thread that calls poll to wait for output to become possible on these descriptors, interrupting the UML kernel when this happens. The interrupt this generates is represented by one of the -write interrupts.
The other mysterious entry is the winch interrupt. This appears because UML wants to detect when one of its consoles changes size, as when you resize the xterm in which you ran UML. Obviously this is not a concern for the host, but it is for a virtual machine. Because of the interface for registering for SIGWINCH on a host device, a separate thread is created to receive SIGWINCH, and it interrupts UML itself whenever one comes in. Thus, SIGWINCH looks like a separate device from the point of view of /proc/interrupts.
/proc/cpuinfo is interesting:
 UML# more /proc/cpuinfo
 processor       : 0
 vendor_id       : User Mode Linux
 model name      : UML
 mode            : skas
 host            : Linux tp.user-mode-linux.org 2.4.27 #6 \
       Thu Jan 13 17:06:15 EST 2005 i686
 bogomips        : 1592.52
Much of the information in the host's /proc/cpuinfo makes no sense in UML. It contains information about the physical CPU, which UML doesn't have. So, I just put in some information about the host, plus some about the UML itself.
Conclusion
At this point, we've seen a UML from both the inside and the outside. We've seen how a UML can use host resources for its hardware and how it's confined to whatever has been provided to it.
A UML is both very similar to and very different from a physical machine. It is similar as long as you don't look at its hardware. When you do, it becomes clear that you are looking at a virtual machine with virtual hardware. However, as long as you stay away from the hardware, it is very hard to tell that you are inside a virtual machine.
Both the similarities and the differences have advantages. Obviously, having a UML run applications in exactly the same way as on the host is critical for it to be useful. In this chapter we glimpsed some of the advantages of virtual hardware. Soon we will see that virtualized hardware can be plugged, unplugged, extended, and managed in ways that physical hardware can't. The next chapter begins to show you what this means.
Logging In as a Normal User
In this chapter we will explore a UML instance in more detail, looking at how it is similar to and how it differs from a physical Linux machine. While doing a set of fairly simple, standard system administration chores in the instance, we will see some UML twists to them. For example, we will add swap space and mount filesystems. The twist is that we will do these things by plugging the required devices into the UML at runtime, from the host, without rebooting the UML.
First, let's log in to the UML instance, as we did in the previous chapter. When the UML boots, we see a login prompt in the window in which we started it. Some xterm windows pop up on the screen, which we ignore. They also contain login prompts. We could log in as root, but let's log in as a normal user, username user, with the very secure password user:
Debian GNU/Linux 2.2 usermode tty1
 usermode login: user
 Password:
 Last login: Sun Dec 22 21:50:44 2002 from uml on pts/0
 Linux usermode 2.6.11-rc3-mm1 #2 Tue Feb 8 15:41:40 EST 2005 \
 i686 unknown
 UML%  pwd
 /home/user
This is basically the same as a physical system. In this window, we are a normal, unprivileged user, in a normal home directory. We can test our lack of privileges by trying to do something nasty:
UML% rm -f /bin/ls
 rm: cannot unlink `/bin/ls': Permission denied
Consoles and Serial Lines
In addition to the xterm consoles that made themselves visible, some others have attached themselves less visibly to other host resources. You can attach UML consoles to almost any host device that can be used for that purpose. For example, they can be (and some, by default, are) attached to host pseudo-terminals. They announce themselves in the kernel log, which we can see by running dmesg:
UML% dmesg | grep "Serial line"
 Serial line 0 assigned device '/dev/pts/13'
This tells us that one UML serial line has been configured in /etc/inittab to have a login prompt on it. The serial line has been configured at the "hardware" level to be attached to a host pseudo-terminal, and it has allocated the host's /dev/pts/13.
Now we can run a terminal program, such as screen or minicom, on the host, attach it to /dev/pts/13, and log in to UML on its one serial line. After running
we see a blank screen session. Hitting return gives us another UML login prompt, as advertised:
Debian GNU/Linux 2.2 usermode ttyS0
 usermode login:
Notice the ttyS0 in the banner, in comparison to the tty0 we saw while logging in as root in the previous chapter and the tty1 we just saw while logging in as user. The tty0 and tty1 devices are UML consoles, while ttyS0 is the first serial line. On a physical machine, the consoles are devices that are displayed on the screen, and the serial lines are ports coming out of the back of the box. There's a clear difference between them.
In contrast, there is almost no difference between the consoles and serial lines in UML. They plug themselves into the console and serial line infrastructures, respectively, in the UML kernel. This is the cause of the different device names. However, in all other ways, they are identical in UML. They share essentially all their code, they can be configured to attach to exactly the same host devices, and they behave in the same ways.
In fact, the serial line driver in UML owes its existence to a historical quirk. Because of a limitation in the first implementation of UML, it was impossible to log in on a console in the window in which you ran it. To allow logging in to UML at all, I implemented the serial line driver to connect itself to a host device, and you would attach to this using something like screen.
As time went on and limitations disappeared, I implemented a real console driver. After a while, it dawned on me that there was no real difference between it and the serial line driver, so I started merging the two drivers, making them share more and more code. Now almost the only differences between them are that they plug themselves into different parts of the kernel.
UML consoles and serial lines can be attached to the same devices on the host, and we've seen a console attached to stdin and stdout of the linux process, consoles appearing in xterms, and a serial line attached to a host pseudo-terminal. They can also be attached to host ports, allowing you to telnet to the specified port on the host and log in to the UML from there. This is a convenient way to make a UML accessible from the network without enabling the network within UML.
Finally, UML consoles and serial lines can be attached to host terminals, which can be host consoles, such as /dev/tty*, or the slave side of pseudo-terminals. Attaching a UML console to a host virtual console has the interesting effect of putting the UML login prompt on the host console, making it appear (to someone not paying sufficient attention) to be the host login.
Let's look at some examples. First, let's attach a console to a host port. We need to find an unused console to work with, so let's use the UML management console tool to query the UML configuration:
host% uml_mconsole debian config con0
 OK fd:0,fd:1
 host% uml_mconsole debian config con1
 OK none
 host% uml_mconsole debian config con2
 OK pts:/dev/pts/10
 host% uml_mconsole debian config con3
 OK pts
We will cover the full capabilities of uml_mconsole in Chapter 8, but this gives us an initial look at it. The first argument, debian, specifies which UML we wish to talk to. A UML can be named and given a unique machine ID, or umid. When I ran this UML, I added umid=debian to the command line, giving this instance the name debian. uml_mconsole knows how to use this name to communicate with the debian UML.
If you didn't specify the umid on the command line, UML gives itself a random umid. There are a couple of ways to tell what it chose. First, look through the boot output or output from dmesg for a line that looks like this:
mconsole (version 2) initialized on /home/jdike/.uml/3m3vDd/mconsole
In this case, the umid is 3m3vDd. You can communicate with this instance by using that umid on the uml_mconsole command line.
Second, UML puts a directory with the same name as the umid in a special parent directory, by default, ~/.uml. So, you could also look at the subdirectory of your ~/.uml directory for the umid to use.
The rest of the uml_mconsole command line is the command to send to the specified UML. In this case, we are asking for the configurations of the first few consoles. Console names start with con; serial line names begin with ssl.
I will describe as much of the output format as needed here; Figure 3.1 contains a more complete and careful description.
Figure 3.1. Detailed description of UML console and serial line configurationA UML console or serial line configuration can consist of separate input and output configurations, or a single configuration for both. If both are present, they are separated by a colon. For example, fd:0,fd:1 specifies that console input comes from UML's file descriptor 0 and that output goes to file descriptor 1. In contrast, fd:3 specifies that both input and output are attached to file descriptor 3, which should have been set up on the UML command line with something like 3<>filename.
A single device configuration consists of a device type (fd in the examples above) and device-specific information separated by a colon. The possible device types and additional information are as follows.
fdA host file descriptor belonging to the UML process; specify the file descriptor number after the colon. ptyA BSD pseudo-terminal; specify the /dev/ptyxx name of the pseudo-terminal you wish to attach the console to. To access it, you will attach a terminal program, such as screen or minicom, to the corresponding /dev/ttyxx file. ptsA devpts pseudo-terminal; there is no pts-specific data you need to add. In order to connect to it, you will need to find which pts device it allocated by reading the UML kernel log through dmesg or by using uml_mconsole to query the configuration. portA host port; specify the port number. You access the port by telnetting to it. If you're on the host, you will telnet to localhost: host% telnet localhost port-number You can also telnet to that port from another machine on the network: host% telnet uml-host port-number xtermNo extra information needed. This will display an xterm on your screen with the console in it. UML needs a valid DISPLAY environment variable and xterm installed on the host, so this won't work on headless servers. This is the default for consoles other than console 0, so for headless servers, you will need to change this. nullNo extra information needed. This makes the console available inside UML, but output is ignored and there is never any input. This would be very similar to attaching the console to the host's /dev/null. noneNo extra information needed. This removes the device from UML, so that attempts to access it will fail with "No such device."
When requesting configuration information through uml_mconsole for pts consoles, it will report the actual device that it allocated after the colon, as follows:
host% uml_mconsole debian config con2
 OK pts:/dev/pts/10
The syntax for specifying console and serial line configurations is the same on the UML and uml_mconsole command lines, except that the UML command line allows giving all devices the same configuration. A specific console or serial line is specified as either con n or ssl n.
On the UML command line, all consoles or serial lines may be given the same configuration with just con= configuration or ssl= configuration.
Any specific device configurations that overlap this will override it. So
attaches all consoles to pts devices, except for the first one, which is attached to stdin and stdout.
Console input and output can be specified separately. They are completely independentthe host device types don't even need to match. For example,
will attach the second serial line's input to a host pts device and the output to an xterm. The effect of this is that when you attach screen or another terminal program to the host pts device, that's the input to the serial line. No output will appear in screenthat will all be directed to the xterm. Most input will also appear in the xterm because that is echoed in the shell.
This can have unexpected effects. Repeating a configuration for both the input and output will, in some cases, attach them to distinct host devices of the same type. For example,
will create two xtermsone will accept console input, and the other will display the console's output. The same is true for pts. |
Looking at the output about the UML configuration, we see an OK on each response, which means that the command succeeded in communicating with the UML and getting a response. The con0 response says that console 0 is attached to stdin and stdout. This bears some explaining, so let's pull apart that response. There are two pieces to it, fd:0 and fd:1, separated by a comma. In a comma-separated configuration like this, the first part refers to input to the console (or serial line), and the second part refers to output from it.
The fd:0 part also has two pieces, fd and 0, separated by a colon. fd says that the console input is to be attached to a file descriptor of the linux process, and 0 says that file descriptor will be stdin, file descriptor zero. Similarly, the output is specified to be file descriptor one, stdout.
When the console input and output go to the same device, as we can see with con2 being attached to pts:/dev/pts/10, input and output are not specified separately. There is only a single colon-separated device description. As you might have guessed, pts refers to a devpts pseudo-terminal, and /dev/pts/10 tells you specifically which pseudo-terminal the console is attached to.
The con1 configuration is one we haven't seen before. It simply says that the console doesn't existthere is no such device.
The configuration for con3 is the one we are looking for. pts says that this is a pts console, and there's no specific pts device listed, so it has not yet been activated by having a UML getty running on it. We will reconfigure this one to be attached to a host port:
host% uml_mconsole debian config con3=port:9000
 OK
port:9000 says that the console should be attached to the host's port 9000, which we will access by telnetting to that port.
We can double-check that the change actually happened:
host% uml_mconsole debian config con3
 OK port:9000
So far, so good. Let's try telnetting there now:
host% telnet localhost 9000
 Trying 127.0.0.1...
 telnet: connect to address 127.0.0.1: Connection refused
This failed because UML hasn't run a getty on its console 3. We can fix this by editing its /etc/inittab. Looking there on my machine, I see:
#3:2345:respawn:/sbin/getty 38400 tty3
I had enabled this one in the past but since disabled it. You may not have a tty3 entry at all. You want to end up with a line that looks like this:
3:2345:respawn:/sbin/getty 38400 tty3
I'll just uncomment mine; you may have to add the line in its entirety, so fire up your favorite editor on /etc/inittab and fix it. Now, tell init it needs to reread the inittab file:
Let's go back to the host and try the telnet again:
host% telnet localhost 9000
 Trying 127.0.0.1...
 Connected to localhost.
 Escape character is '^]'.
 Fedora Core release 1 (Yarrow)
 Kernel 2.4.27 on an i686
 Debian GNU/Linux 2.2 usermode tty3
 usermode login:
Here we have the UML's console, as advertised. Notice the discrepancy between the telnet banner and the login banner. Telnet is telling us that we are attaching to a Fedora Core 1 (FC1) system running a 2.4.27 kernel, while login is saying that we are attaching to a Debian system. This is because the host is the FC1 system, and telnetd running on the host and attaching us to the host's port 9000 is telling us about the host. There is some abuse of telnetd's capabilities going on in order to allow the redirection of traffic between the host port and UML, and this is responsible for the confusion.
Now, let's stick a UML console on a host console. First, we need to make sure there's no host getty or login running on the chosen console. Looking at my host's /etc/inittab, I see:
6:2345:respawn:/sbin/mingetty tty6
for the last console, and hitting Ctrl-Alt-F6 to switch to that virtual console confirms that a getty is running on it. I'll comment it out, so it looks like this:
#6:2345:respawn:/sbin/mingetty tty6
I tell init to reread inittab:
and switch back to that console to make sure it is not being used by the host any more. I now need to make sure that UML can open it:
host% ls -l /dev/tty6
 crw------ 1 root root 4, 6 Feb 17 16:26 /dev/tty6
This not being the case, I'll change the permissions so that UML has both read and write access to it:
host# chmod 666 /dev/tty6
After you make any similar changes needed on your own machine, we can tell UML to take over the console. We used the UML tty3 for the host port console, so let's look at tty4:
host% uml_mconsole debian config con4
 OK pts
So, let's assign con4 to the host's /dev/tty6 in the usual way:
host% uml_mconsole debian config con4=tty:/dev/tty6
 OK
After enabling tty4 in the UML /etc/inittab and telling init to reread the file, we should be able to switch to the host's virtual console 6 and see the UML login prompt. Taken to extremes, this can be somewhat mind bending. Applying this technique to the other virtual con soles results in them all displaying UML, not host, login prompts.
For the security conscious, this sort of redirection and fakery can be valuable. It allows potential attacks on the host to be redirected to a jail, where they can be contained, logged, and analyzed. For the rest of us, it serves as an example of the flexibility of the UML consoles.
Now that we've seen all the ways to access our UML console, it's time to stay logged in on the console and see what we can do inside the UML.
Adding Swap Space
UML is currently running everything in the memory that it has been assigned since it has no swap space. Normal Linux machines have some swap, so let's fix that now.
We need some sort of disk to swap onto, and since UML disks are generally host files, we need to make a file on the host to be the swap device:
host% dd if=/dev/zero of=swap bs=1024 seek=$[ 1024 * 1024 ] count=1
 1+0 records in
 1+0 records out
 host% ls -l swap
 -rw-rw-rw-  1 jdike jdike 1073742848 Feb 18 12:31 swap
This technique uses dd to create a 1GB sparse file on the host by seeking 1 million 1K blocks and then writing a 1K block of zeros there. The use of sparse files is pretty standard with UML since it allows host disk space to be allocated only when it is needed. So, this swap device file consumes only 1K of disk space, even though it is technically 1GB in length.
We can see the true size, that is, the actual disk space consumption, of the file by adding -s to the ls command line:
host% ls -ls swap
 12 -rw-rw-r-   1 jdike jdike 1073742848 Oct 27 17:27 swap
The 12 in the first column is the number of disk blocks actually occupied by the file. A disk block is 512 bytes, so this file that looks like it's 1GB in length is taking only 6K of disk space.
Now, we need to plug this new file into the UML as an additional block device, which we will do with the management console:
host% uml_mconsole debian config ubdb=swap
 OK
We can check this by asking for the configuration of ubdb in the same way we asked about consoles earlier:
host% uml_mconsole debian config ubdb
 OK /home/jdike/swap
Now, back in the UML, we have a brand-new second block device, so let's set it up for swapping, then swap on it, and look at /proc/meminfo to check our work:
UML# mkswap /dev/ubdb
 Setting up swapspace version 1, size = 1073737728 bytes
 UML# swapon /dev/ubdb
 UML# grep Swap /proc/meminfo
 SwapCached:          0 kB
 SwapTotal:     1048568 kB
 SwapFree:      1048568 kB
Let's further check our work by forcing the new swap device to be used. The following command creates a large amount of data by repeatedly converting the contents of /dev/mem (the UML's memory) into readable hex and feeds that into a little perl script that turns it into a very large string. We will use this string to fill up the system's memory and force it into swap.
UML# while true; do od -x /dev/mem ; done | perl -e 'my $s ; \
 while(<STDIN>){ $s .= $_; } print length($s);'
At the same time, let's log in on a second console and watch the free memory disappear:
UML# while true; do free; sleep 10; done
You'll see the system start with almost all of its memory free:
             total     used       free   shared   buffers \
 cached
 Mem:        126696    21624     105072        0       536 \
 7808
 -/+ buffers/cache:    13280     113416
 Swap:      1048568        0    1048568
The free memory will start disappearing, until we see a nonzero entry under used for the Swap row:
             total     used      free   shared   buffers   cached
 Mem:         126696  124548      2148        0        76     7244
 -/+ buffers/cache:   121823      9468
 Swap:       1048568    6524    1042044
Here UML is behaving exactly as any physical system wouldit is swapping when it is out of memory. Note that the host may have plenty of free memory, but the UML instance is confined to the memory we gave it.
Partitioned Disks
You may have noticed another difference between the way we're using disks in UML and the way they are normally used on a physical machine. We haven't been partitioning them and putting filesystems and swap space on the partitions. This is a consequence of the ease of creating and adding new virtual disks to a virtual machine. With a physical disk, it's much less convenient, and sometimes impossible, to add more disks to a system. Therefore, you want to make the best of what you have, and that means being able to slice a physical disk into partitions that can be treated separately.
When UML was first released, there was no partition support for exactly this reason. I figured there was no need for partitions, given that if you want more disk space in your UML, you just create a new host file for it, and away you go.
This was a mistake. I underestimated the desire of my users to treat their UMLs exactly like their physical machines. In part, this meant they wanted to be able to partition their virtual disks. So, partition support for UML block devices ultimately appeared, and everyone was happy.
However, my original mistake resulted in some naming conventions that can be extremely confusing to a UML newcomer. Initially, UML block devices were referred to by number, for example, ubd0, ubd1, and so on. At first, these numbers corresponded to their minor device numbers, so when you made a device node for ubd1, the command was:
UML# mknod /dev/ubd1 b 98 1
When partition support appeared, this style of device naming was wrong in a couple of respects. First, you want to refer to the partition by number, as with /dev/hda1 or /dev/sdb2. But does ubd10 refer to block device 10 or partition 0 on device 1? Second, there is support for 16 partitions per device, so each block device gets a chunk of 16 device minor numbers to refer to them. For example, block device 0 has minor numbers 0 through 15, device 1 has minors 16 though 31, and so on. This breaks the previous convention that device numbers correspond to minor numbers, leading people to specify ubd1 on the UML command line and not realize that it has minor device number 16 inside UML.
These two problems led to a naming convention that should have been present from the start. We name ubd devices in the same way as hd or sd devicesthe disk number is specified with a letter (a, b, c, and so on), and the partition is a number. So, partition 1 on virtual disk 1 is ubdb1. When you add a second disk on the UML command line or via mconsole, it is ubdb, not ubd1. This eliminates the ambiguity of multidigit device numbers and the naming confusion. In this book, I will adhere to this convention, although my fingers still use ubd0, ubd1, and so on when I boot UML. In addition, the filesystems I'm using have references to ubd0, so commands such as mount and df will refer to names such as ubd0 rather than ubda.
So, let's partition a ubd device just to see that it's the same as on a physical machine. First, let's make another host file to hold the device and plug it into the UML:
host% dd if=/dev/zero of=partitioned bs=1024 \
 seek=$[ 1024 * 1024 ] count=1
 1+0 records in
 1+0 records out
 host% uml_mconsole debian config ubdc=partitioned
 OK
Now, inside the UML, let's use fdisk to chop this into partitions. Figure 3.2 shows my dialog with fdisk to create two equal-size partitions on this disk.
Figure 3.2. Using fdisk to create two partitions on a virtual disk
usermode:~# fdisk /dev/ubdc
 Device contains neither a valid DOS partition table, nor Sun, SGI, or OSF
      disklabel
 Building a new DOS disklabel. Changes will remain in memory only,
 until you decide to write them. After that, of course, the previous
 content won't be recoverable.

 Command (m for help): p

 Disk /dev/ubdc: 128 heads, 32 sectors, 512 cylinders
 Units = cylinders of 4096 * 512 bytes

     Device Boot   Start        End    Blocks   Id  System

 Command (m for help): n
 Command action
    e   extended
    p   primary partition (1-4)
 p
 Partition number (1-4): 1
 First cylinder (1-512, default 1):
 Using default value 1
 Last cylinder or +size or +sizeM or +sizeK (1-512, default 512): 256

 Command (m for help): n
 Command action
    e   extended
    p   primary partition (1-4)
 p
 Partition number (1-4): 2
 First cylinder (257-512, default 257):
 Using default value 257
 Last cylinder or +size or +sizeM or +sizeK (257-512, default 512): 256
 Using default value 512

 Command (m for help): w
 The partition table has been altered!

 Calling ioctl() to re-read partition table.

 WARNING: If you have created or modified any DOS 6.x
 partitions, please see the fdisk manual page for additional
 information.
 Syncing disks.
 usermode:~#
|
Now, I don't happen to have device nodes for these partitions, so I'll create them:
UML# mknod /dev/ubdc1 b 98 33
 UML# mknod /dev/ubdc2 b 98 34
For some variety, let's make one a swap partition and the other a filesystem:
UML# mkswap /dev/ubdc1
 Setting up swapspace version 1, size = 536850432 bytes
 UML# mke2fs /dev/ubdc2
 mke2fs 1.18, 11-Nov-1999 for EXT2 FS 0.5b, 95/08/09
 Filesystem label=
 OS type: Linux
 Block size=4096 (log=2)
 Fragment size=4096 (log=2)
 131072 inodes, 262144 blocks
 13107 blocks (5.00%) reserved for the super user
 First data block=0
 8 block groups
 32768 blocks per group, 32768 fragments per group
 16384 inodes per group
 Superblock backups stored on blocks:
         32768, 98304, 163840, 229376
 Writing inode tables: done
And let's put them into action to see that they work as advertised:
UML# swapon /dev/ubdc1
 UML# free
              total        used     free    shared        buffers \
     cached
 Mem:        125128       69344    55784         0            448 \
      49872
 -/+ buffers/cache:       19024   106104
 Swap:      1572832           0  1572832
 UML# mount /dev/ubdc2  /mnt
 UML# df
 Filesystem            1k-blocks    Used Available Use%  Mounted on
 /dev/ubd0               1032056  259444    720132  26%  /
 none                      62564       0     62564   0%  /tmp
 /dev/ubdc2               507748      13    481521   0%  /mnt
So, we do, in fact, have another 512MB of swap space and a brand-new empty 512MB filesystem.
Rather than calling swapon by hand whenever we want to add some swap space to our UML, we can also just add the device to the UML's /etc/fstab. In our case, the relevant lines would be:
/dev/ubdb      swap       swap    defaults     0 0
 /dev/ubdc1     swap       swap    defaults     0 0
However, if you do this, you must remember to configure the devices on the UML command line since they must be present early in boot when the filesystems are mounted.
UML Disks as Raw Data
Normally, when you add a new block device to a UML, it will be used as either a filesystem or a swap device. However, some other possibilities are also useful with a UML. These work equally well on a physical machine but aren't used because of the lower flexibility of physical disks.
For example, you can copy files into a UML by creating a tar file on the host that contains them, plug that tar file into the UML as a virtual disk, and, inside the UML, untar the files directly from that device. So, on the host, let's create a tar file with some useful files in it:
host% tar cf etc.tar /etc
 tar: Removing leading `/' from member names
When I did this on my machine, I got a bunch of errors about files that I, as a normal user, couldn't read. Since this is just a demo, that's OK, but if you were really trying to copy your host's /etc into a UML, you'd want to become root in order to get everything.
host% ls -l etc.tar
 -rw-rw-rw-  1 jdike jdike 24535040 Feb 19 13:54 etc.tar
I did get about 25MB worth of files, so let's plug this tar file into the UML as device number 4, or ubdd:
host% uml_mconsole debian config ubdd=etc.tar
Now we can untar directly from the device:
This technique can also be used to copy a single file into a UML. Simply configure that file as a UML block device and use dd to copy it from the device to a normal file inside the UML filesystem. The draw-back of this approach is that the block device will be an even multiple of the device block size, which is 512 bytes. So, a file whose size is not an even multiple of 512 bytes will have some padding added to it. If this matters, that excess will have to be trimmed in order to make the UML file the same size as the host file.
UML block devices can be attached to anything on the host that can be accessed as a file. Formally, the underlying host file must be seekable. This rules out UNIX sockets, character devices, and named pipes but includes block devices. Devices such as physical disks, partitions, CD-ROMs, DVDs, and floppies can be passed to UML as block devices and accessed from inside as ubd devices. If there is a filesystem on the host block device, it can be mounted inside UML in exactly the same way as on the host, except for the different device name.
The UML must have the appropriate filesystem, either built-in or available as a module. For example, in order to mount a host CD-ROM inside a UML, it must have ISO-9660 filesystem support.
The properties of the host file show through to the UML device to a great extent. We have already seen that the host file's size determines the size of the UML block device. Permissions also control what can be done inside UML. If the UML user doesn't have write access to the host file, the resulting device will be only mounted read-only.
Networking
Let's take a quick look at networking with UML. This large subject gets much more coverage in Chapter 7, but here, we will put our UML instance on the network and demonstrate its basic capabilities.
As with all other UML devices, network interfaces are virtual. They are formed from some host network interface that allows processes to send packets either to the host network stack or to another UML instance without involving the host network. Here, we will do the former and communicate with the host.
Processes can send and receive frames from the host in a variety of ways, including TUN/TAP, Ethertap, SLIP, and PPP. All of these, except for PPP, are supported by UML. We will use TUN/TAP since it is intended for this purpose and doesn't have the limitations of the others. TUN/TAP is a driver on the host that creates a pipe, which is essentially a strand of Ethernet, between a process and the host networking system. The host end of this pipe is a network interface, typically named tap<n>, which can be seen using ifconfig just like the system's normal Ethernet device:
host% ifconfig tap0
 tap0      Link encap:Ethernet  HWaddr 00:FF:9F:DF:40:D3
           inet addr:192.168.0.254  Bcast:192.168.0.255  \
Mask:255.255.255.255
           UP BROADCAST RUNNING MULTICAST  MTU:1500  Metric:1
           RX packets:61 errors:0 dropped:0 overruns:0 frame:0
           TX packets:75 errors:0 dropped:0 overruns:0 carrier:0
           collisions:0 txqueuelen:1000
           RX bytes:10931 (10.6 Kb)  TX bytes:8198 (8.0 Kb)
           RX bytes:15771 (15.4 Kb)  TX bytes:13466 (13.1 Kb)
This output resulted from a short UML session in which I logged in to the UML from the host, ran a few commands, and logged back out. Thus, the packet counters reflect some network activity.
It looks just like a normal network interface, and, in most respects, it is. It is just not attached to a physical network card. Instead, it is attached to a device file, /dev/net/tun:
host% ls -l /dev/net/tun
 crw-rw-rw-   1 root root 10, 200 Sep 15 2003 /dev/net/tun
This file and the tap0 interface are connected such that any packets routed to tap0 emerge from the /dev/net/tun file and can be read by whatever process has opened it. Conversely, any packets written to this file by a process will emerge from the tap0 interface and be routed to their destination by the host network system. Within UML, there is a similar pipe between this file and the UML Ethernet device. Here is the ifconfig output for the UML eth0 device corresponding to the same short network session as above:
UML# ifconfig eth0
 eth0      Link encap:Ethernet  HWaddr FE:FD:C0:A8:00:FD
           inet addr:192.168.0.253  Bcast:192.168.0.255 \
 Mask:255.255.255.0
           UP BROADCAST RUNNING MULTICAST  MTU:1500  Metric:1
           RX packets:75 errors:0 dropped:0 overruns:0 frame:0
           TX packets:61 errors:0 dropped:0 overruns:0 carrier:0
           collisions:0 txqueuelen:1000
           Interrupt:5
Notice that the received and transmitted packet counts are mirror images of each otherthe number of packets received by the host tap0 interface is the same as the number of packets transmitted by the UML eth0 device. This is because these two interfaces are hooked up to each other back to back, with the connection being made through the host's /dev/net/tun file.
With this bit of theory out of the way, let's put our UML instance on the network. If we look at the interfaces present in our UML, we see only a loopback device, which isn't going to be too useful for us:
UML# ifconfig -a
 lo        Link encap:Local Loopback
           inet addr:127.0.0.1  Mask:255.0.0.0
           UP LOOPBACK RUNNING  MTU:16436   Metric:1
           RX packets:6 errors:0 dropped:0 overruns:0 frame:0
           TX packets:6 errors:0 dropped:0 overruns:0 carrier:0
           collisions:0 txqueuelen:0
Clearly, this needs to be fixed before we can do any sort of real networking. As you might guess from our previous work, we can simply plug a network device into our UML from the host:
host% uml_mconsole debian config eth0=tuntap,,,192.168.0.254
 OK
This uml_mconsole command is telling the UML to create a new eth0 device that will communicate with the host using its TUN/TAP interface, and that the IP address of the host side, the tap0 interface, will be 192.168.0.254. The repeated commas are for parameters we aren't supplying; they will be provided default values by the UML network driver.
My local network uses the 192.168.0.0 network, on which only about the first dozen IP addresses are in regular use. That leaves the upper addresses free for my UML instances. I usually use 192.168.0.254 for the host side of my TUN/TAP interface and 192.168.0.253 for the UML side. When I have multiple instances running, I use 192.168.0.252 and 192.168.0.251, respectively, and so on.
Here, and everywhere else that you put UML instances on the network, you will need to choose IP addresses that work on your local network. They can't already be in use, of course. If suitable IP addresses are in short supply, you may be looking askance at my use of two addresses per UML instance. You can cut this down to onethe UML IP addressby reusing an IP address for the host side of the TUN/TAP interface. You can reuse the IP address already assigned to your host's eth0 for this and everything will be fine.
Now we can look at the UML network interfaces and see that we have an Ethernet device as well as the previous loopback interface:
UML# ifconfig -a
 eth0      Link encap:Ethernet  HWaddr 00:00:00:00:00:00
           BROADCAST MULTICAST  MTU:1500  Metric:1
           RX packets:0 errors:0 dropped:0 overruns:0 frame:0
           TX packets:0 errors:0 dropped:0 overruns:0 carrier:0
           collisions:0 txqueuelen:1000
           Interrupt:5

 lo        Link encap:Local Loopback
           inet addr:127.0.0.1  Mask:255.0.0.0
           UP LOOPBACK RUNNING  MTU:16436  Metric:1
           RX packets:6 errors:0 dropped:0 overruns:0 frame:0
           TX packets:6 errors:0 dropped:0 overruns:0 carrier:0
           collisions:0 txqueuelen:0
The eth0 interface isn't running, nor is it configured with an IP address, so we need to fix that:
UML# ifconfig eth0 192.168.0.253 up
 * modprobe tun
 * ifconfig tap0 192.168.0.254 netmask 255.255.255.255 up
 * bash -c echo 1 > /proc/sys/net/ipv4/ip_forward
 * route add -host 192.168.0.253 dev tap0
 * bash -c echo 1 > /proc/sys/net/ipv4/conf/tap0/proxy_arp
 * arp -Ds 192.168.0.253 eth1 pub
This is more output than you normally expect to see from ifconfig, and in fact, it came from the kernel rather than ifconfig. This tells us exactly how the host side of the interface was set up and what commands were used to do it. If there had been any problems, the error output would have shown up here, and this would be the starting point for debugging the problem.
This setup enables the UML to communicate with the world outside the host and configures the host to route packets to and from the UML. In order to get UML on the network with the host, only the first two commands, modprobe and ifconfig, are needed. The modprobe command is precautionary since the host kernel may have TUN/TAP compiled or the tun module already loaded. Once TUN/TAP is available, the tap0 interface is brought up and given an IP address, and it is ready to go.
The bash command tells the host to route packets rather than just dropping packets it receives that aren't intended for it. The route command adds a route to the UML through the tap0 interface. This tells the host that any packet whose destination IP address is 192.168.0.253 (the address we gave to the UML eth0 interface) should be sent to the tap0 interface. Once there, it pops out of the /dev/net/tun file, which the UML network driver is reading, and from there to the UML eth0 interface.
The final two lines set up proxy arp on the host for the UML instance. This causes the instance to be visible, from an Ethernet protocol point of view, on the local LAN. Whenever one Ethernet host wants to send a packet to another, it starts by knowing only the destination IP address. If that address is on the local network, then the host needs to find out what Ethernet address corresponds to that IP address. This is done using Address Resolution Protocol (ARP). The host broadcasts a request on the Ethernet for any host that owns that IP address. The host in question will answer with its hardware Ethernet address, which is all the source host needs in order to build Ethernet frames to hold the IP packet it's trying to send.
Proxy arp tells the host to answer arp requests for the UML IP address just as though it were its own. Thus, any other machine on the network wanting to send a packet to the UML instance will receive an arp response from the UML host. The remote host will send the packet to the UML host, which will forward it through the tap0 interface to the UML instance.
So, the host routing and the proxy arp work together to provide a network path from anywhere on the network to the UML, allowing it to participate on the network just like any other machine.
We can start to see this by using the simplest network tool, ping. First, let's make sure we can communicate with the host by pinging the tap0 interface IP, 192.168.0.254 :
UML# ping 192.168.0.254
 PING 192.168.0.254 (192.168.0.254): 56 data bytes
 64 bytes from 192.168.0.254: icmp_seq=0 ttl=64 time=2.7 ms
 64 bytes from 192.168.0.254: icmp_seq=1 ttl=64 time=0.2 ms
This works fine. For completeness, let's go the other way and ping from the host to the UML:
host% ping 192.168.0.253
 PING 192.168.0.253 (192.168.0.253) 56(84) bytes of data.
 64 bytes from 192.168.0.253: icmp_seq=0 ttl=64 time=0.130 ms
 64 bytes from 192.168.0.253: icmp_seq=1 ttl=64 time=0.069 ms
Now, let's try a different host on the same network:
UML# ping 192.168.0.10
 PING 192.168.0.10 (192.168.0.10): 56 data bytes
 64 bytes from 192.168.0.10: icmp_seq=0 ttl=63 time=753.2 ms
 64 bytes from 192.168.0.10: icmp_seq=1 ttl=63 time=6.3 ms
Here the routing and arping that I described above is coming into play. The other system, 192.168.0.10, believes that the UML host owns the 192.168.0.253 address along with its regular IP and sends packets intended for the UML to it.
Now, let's try something real. Let's log in to the UML from that outside system:
host% ssh user@192.168.0.253
 user@192.168.0.253's password:
 Linux usermode 2.4.27-1um #6 Sun Jan 23 16:00:39 EST 2005 i686 unknown
 Last login: Tue Feb 22 23:05:13 2005 from uml
 UML%
Now, except for things like the fact we logged in as user, and the kernel version string and node name, we can't really tell that this isn't a physical machine. This UML is on the network in exactly the same way that all of the physical systems are, and it can participate on the network in all the same ways.
Shutting Down
The initial exploration of our UML is finished. We will cover everything in much more detail later, but this chapter has provided a taste of how UML works and how to use it. There is one final task: to shut down the UML. Figure 3.3 shows the output of the halt command run on the UML.
Figure 3.3. Output from halting a UML
usermode:~ halt

 Broadcast message from root (tty0) Wed Feb 23 00:00:32 2005...

 The system is going down for system halt NOW !!
 INIT: Switching to runlevel: 0
 INIT: Sending processes the TERM signal
 INIT: Sending processes the KILL signal
 Stopping web server: apache.
 /usr/sbin/apachectl stop: httpd (no pid file) not running
 Stopping internet superserver: inetd.
 Stopping MySQL database server: mysqld.
 Stopping OpenBSD Secure Shell server: sshd.
 Saving the System Clock time to the Hardware Clock...
 hwclock: Can't open /dev/tty1, errno=19: No such device.
 hwclock is unable to get I/O port access:  the iopl(3) call failed.
 Hardware Clock updated to Wed Feb 23 00:00:38 EST 2005.
 Stopping portmap daemon: portmap.
 Stopping NFS kernel daemon: mountd nfsd.
 Unexporting directories for NFS kernel daemon...done.

 Stopping NFS common utilities: lockd statd.
 Stopping system log daemon: klogd syslogd.
 Sending all processes the TERM signal... done.
 Sending all processes the KILL signal... done.
 Saving random seed... done.
 Unmounting remote filesystems... done.
 Deconfiguring network interfaces: done.
 Deactivating swap... done.
 Unmounting local filesystems... done.
 * route del -host 192.168.0.253 dev tap0
 * bash -c echo 0 > /proc/sys/net/ipv4/conf/tap0/proxy_arp
 * arp -i eth1 -d 192.168.0.253 pub
 Power down.
 * route del -host 192.168.0.253 dev tap0
 * bash -c echo 0 > /proc/sys/net/ipv4/conf/tap0/proxy_arp
 * arp -i eth1 -d 192.168.0.253 pub

 ~ 27056:
|
Just as with a physical system, this is a mirror image of the boot. All the services that were running are shut down, followed by the kernel shutting itself down. The only things you don't see on a physical system are the networking messages, which are the mirror images of the ones we saw when bringing up the network. These are cleaning up the routing and the proxy arp that were set up when we configured UML networking.
Once all this has happened, the UML exits, and we are back to the shell prompt from which we started. The UML has simply vanished, just like any other process that has finished its work.
Chapter 4. A Second UML Instance
Now that we've seen a single UML instance in action, we will run two of them and see how they can interact with each other. First, we'll boot the two instances from a single filesystem, which should cause them to interact with each other by corrupting it, but we'll use a method that avoids that problem. Then, we'll continue the networking we started in the previous chapter by having the two instances communicate with each other in a couple of different ways. Finally, we'll look at some more unusual ways for UMLs to communicate that take advantage of the fact that, as virtual machines, they can do things that physical machines can't.
COW Files
First, let's fire up our UML instances with basically the same command line as before, with a couple of changes:
linux mem=128M ubda=cow1,/home/jdike/roots/debian_22 \
 umid=debian1
and, in another window:
linux mem=128M ubda=cow2,/home/jdike/roots/debian_22 \
 umid=debian2
The main difference is that we included the ubda switch on both command lines to add what is called a COW file to the UML block device. COW stands for Copy-On-Write, a mechanism that allows multiple UML instances to share a host file as a filesystem, mounting it read-write without seeing each others' changes or otherwise interfering with each other.
This has a number of benefits, including saving disk space and memory and simplifying the management of multiple instances.
COW works by attaching a second file to the UML block device that captures all of the changes made to the filesystem. A good analogy for this is a sheet of clear plastic placed over a painting. You can "change" the artwork by painting on the plastic without changing the underlying painting. When you look at it, you see your changes in the places where you painted on the plastic sheet, and you see the underlying work of art in the places you haven't touched. This is shown in Figure 4.1, where we give Mona Lisa a moustache. We paint the mustache on a plastic sheet and place it over the Mona Lisa. We have committed artistic blasphemy without breaking any actual laws.

The COW file is the analog of the clear plastic sheet, and the original file that contains the UML filesystem is the analog of the painting.
The COW is placed "over" the filesystem in the same way that the clear sheet is placed over the painting. When you modify a file on a COWed block device, the changed blocks are written to the COW file, not the underlying, "backing" file. This is the equivalent of painting on the sheet rather than on the painting. When you read a modified file, this is like looking at a spot on the painting that you've painted over on the plastic, and the driver reads the data from the COW file rather than the backing file.
Figure 4.2 shows how this works. We start with a COW file with no valid blocks and a fully populated backing file. If a process reads a block from this device, it will get the data that's in the backing file. If it then writes that block back, the new data will be written to the corresponding block in the COW file. At this point, the original block in the backing file is covered and will never be read again. All subsequent reads of that block will get the data from the COW file.

Thus, the backing file is never modified since all changes are stored in the COW file. The backing file can be treated as read-only, but the device as a whole is still read-write.
On a host with multiple UML instances, this has a number of advantages. First, all the instances can boot from the same backing file, as long as they have private COW files. This saves disk space. Since no instance is likely to change every file on its root filesystem, most of the data it uses will come from the shared backing file, and there will be only one copy of that on the host rather than one copy per instance. This may not seem like a big deal since disks are so big and so cheap these days, but system memory, as large as it is, is finite. Disk space savings will translate directly into host memory savings since, if there's only one block on disk that's shared by all the instances, it can be present in the host's page cache only once. Host memory is often the factor limiting the number of instances that a host can support, so this memory savings translates directly into greater hosting capacity.
Second, because the data that an instance has changed is in a separate file from the backing file, it is a lot easier to make backups. The only data that needs saving is in the COW file, which is generally much smaller than the backing file. In Chapter 6, we will see how to back up an instance's data in a few seconds for a reasonably-sized filesystem, without having to reboot it.
Third, using COW files for multiple instances on a host can improve the instances' performance. The reason is the elimination of data duplication described earlier. If an instance needs data that another instance has already used, such as the contents of bash or libc, it will likely already be in the host's memory, in its page cache. So, access to that data will be much faster than when it is still on disk. The first instance to access a certain block from the backing file will have to wait for it to be read from disk, but later instances won't since the host will likely still have it in memory.
Finally, there is a fairly compelling use for COW files even when you're just running a single UML instance. They make it possible to test changes to a filesystem and back them out if they don't work. For example, you can reconfigure a service, storing the changes in a COW file. If the changes were wrong, you can revert them simply by throwing out the COW file. If they are good, you can commit them by merging them into the backing file. We will look at how to do this later in the chapter.
Along with these advantages, there is one major disadvantage, which stems from the fact that the backing file is read-only. If the backing file is modified after it has COW files, those COW files will become invalid. The reason is that if one of the blocks on the backing file that changed was also changed in a COW file, reading that block would result in the COW data being read, rather than the new data in the backing file. This means that this ubd device would appear to be a combination of old data and new, resulting in data corruption for blocks that contain file data and filesystem corruption for blocks that contain filesystem metadata.
The most common reason for wanting to modify the backing file is to upgrade the filesystem on it. This is understandable, but for backing files that have COW files based on them, this can't work. The right way to do upgrades in this case is to upgrade the COW files individually.
Going back to our two UML instances, which we booted from the same backing file, we see that they have almost exactly the same boot sequence. One exception is this from the first instance:
Creating "cow1" as COW file for "/home/jdike/roots/debian_22"
and this from the second:
Creating "cow2" as COW file for "/home/jdike/roots/debian_22"
You can specify, as we just did, a nonexistent file for the COW file, and the ubd driver will create the file when it starts up. Now that we have two UMLs booted, on the host, we can look at them:
host% ls -l cow*
 -rw-r--r--  1 jdike jdike 1075064832 Apr 24 17:33 cow1
 -rw-r--r--  1 jdike jdike 1075064832 Apr 24 17:34 cow2
Looking at those sizes, you may think I was fibbing when I went on about saving disk space. These files seem about the same size as the backing file. In fact, they look a bit larger than the backing file:
host% ls -l /home/jdike/roots/debian_22
 -rw-rw-r--  1 jdike jdike 1074790400 Apr 23 21:40
     /home/jdike/roots/debian_22
I was not, in fact, fibbing, and therein lies an important fact about UML COW files. They are sparse, which means that even though their size implies that they occupy a certain number of blocks on disk (a disk block is 512 bytes, so the number of blocks occupied by a file is generally its size divided by 512, plus possibly another for the fragment at the end), many of those blocks are not occupied or allocated on disk.
There are two definitions for a file size here, and they conflict when it comes to sparse files. The first is how much data can be read from the file. The second is how much disk space the file occupies. Usually, these sizes are close. They won't be exactly the same because the fragment of the file at the end may occupy a full block. However, for a sparse file, many data blocks will not be allocated on disk. When they are read, the read operation will produce zeros, but those zeros are not stored on disk. Only when a hitherto untouched block is written is it allocated on disk.
So, for our purposes, the "true" file size is its disk allocation, which you can see by adding the s switch to ls:
host% ls -ls cow*
 540 -rw-r--r--  1 jdike jdike 1075064832 Apr 24 17:53 cow1
 540 -rw-r--r--  1 jdike jdike 1075064832 Apr 24 17:54 cow2
The number in the first column is the number of disk blocks actually allocated to the file. This implies that the two COW files are actually using 270K of disk space, rather than the 1GB implied by the ls -l output. This space is occupied by data that the instances modified as they booted, generally log files and the like, which are touched by daemons and other system utilities as they start up.
We will talk more fully about COW file management later in this chapter, but here I will point out that the sparseness of COW files requires us to take some care when dealing with them. Primarily, this means being careful when copying them. The most common methods of copying a sparse file result in it becoming nonsparseall the parts of the file that were previously unallocated on disk become allocated and that disk space filled with zeros. So, to avoid this, copying a COW file must be done in a sparseness-aware way. The main file copying utilities have switches for preserving sparseness when copying a file. For example, cp has --sparse=auto and --sparse=always, and tar has -S and --sparse.
Also, in order to detect that a backing file has been changed, thus invalidating any COW files based on it, the ubd driver compares the current modification time of the backing file to the modification time at the point that the COW file was created (which is stored in the COW file header). If they differ, the backing file has been modified, and a mount of the COW file may result in a corrupt filesystem.
Merely copying the backing file after restoring or moving it for some reason will change the modification time, even though the contents are unchanged. In this case, it is safe to mount a COW file that's based on it, but the ubd driver will refuse to do the mount. For this reason, it is important to also preserve the modification time of backing files, as well as sparseness, when copying them. However, everyone will forget once in a while, and later in this chapter, we will discuss some ways to recover from this.
Booting from COW Files
Now, we should look at what these COW files really mean from the perspective of the UML instances. First, we will make some changes in the two filesystems. In the first instance, let's copy /lib to /tmp :
In the second, let's copy /usr/bin to /tmp:
UML2 # cp -r /usr/bin /tmp
In each, let's look at /tmp to see that the changes in one instance are not reflected in the other. First, the one where we copied /lib:
UML1 # ls -l /tmp
 total 0
 drwxr-xr-x    4 root     root      1680 Apr 25 13:02 lib
And next, the one with the copy of /usr/bin:
UML2 # ls -l /tmp
 total 0
 drwxr-xr-x    3 root     root      7200 Apr 25 13:07 bin
Here we can see that, even though they are booted off the same root filesystem, any changes they make are private. They can't be seen by other instances that have been booted from the same backing filesystem.
We can check this in another way by seeing how the sizes of the COW files on the host have changed:
host% ls -ls cow*
 936 -rw-r--r--   1 jdike jdike 1075064832 Apr 25 13:22 cow0
 1060 -rw-r--r--   1 jdike jdike 1075064832 Apr 25 13:22 cow1
Recall that after they booted, they both had 540 blocks allocated on disk. Now, they both have more than that396 and 520 more, respectively. I chose to copy /lib and /usr/bin for this example because /usr/bin is noticeably larger than /lib, and making a copy of it should cause a significantly larger number of blocks to change in the COW file. This is exactly what happened.
So, at this point, we have two instances each booted on a 1GB filesystem, something that would normally take 2GB of disk space. With the use of COW files, this is taking 1GB plus 1MB, since together, the UMLs have made about 1MB worth of changes in this filesystem. There is a commensurate saving of memory on the host because the data that both instances read from the filesystem will be present only once in the host's page cache instead of twice, as would be the case if they were booted from separate filesystems. Each new UML instance booted from the same filesystem similarly requires only enough host disk space to store its modifications, so the more instances you have booted from the same COWed filesystem, the more host disk space and memory you save.
I have one final remark on the subject of sharing filesystem images. Doing it using COW files is the only safe mechanism for sharing. If you booted two instances on the same filesystem, you would end up with a hopelessly corrupted filesystem. This is basically the same thing as booting two physical machines from the same disk, when both have direct access to the disk, as when it is dual-ported to both machines. Each instance will flush out data from memory to the filesystem file in such a way as to keep its own data consistent, but without regard to anything else that might be doing the same thing.
The only way for two machines to access the same data directly is for them to coordinate with each other, as happens with a clustering filesystem. They have to cooperate to maintain the consistency of the data they are sharing. We will see an example of such a UML cluster in Chapter 12.
In fact, you can't boot two UML instances from the same filesystem because UML locks the files it uses according to the access it needs to those files. It gets exclusive locks on filesystems it is going to write and nonexclusive read-only locks on files it will access but not write. So, when using a COW file, the UML instance will get an exclusive, read-write lock on the COW file and a nonexclusive read-only lock on the backing file. If another instance tries to get any lock on that COW file or a read-write lock on the backing file, it will fail. If that's the UML's root filesystem, the result will be an error message followed by a panic:
F_SETLK failed, file already locked by pid 21238
 Failed to lock '/home/jdike/roots/debian_22', err = 11
 Failed to open '/home/jdike/roots/debian_22', errno = 11
 VFS: Cannot open root device "98:0" or unknown-block(98,0)
 Please append a correct "root=" boot option
 Kernel panic - not syncing: VFS: Unable to mount root fs on
       unknown-block(98,0)
This prevents people from accidentally booting two instances from the same filesystem and protects them from the filesystem corruption that would certainly follow.
Moving a Backing File
In order to avoid some basic mistakes, the UML block driver performs some sanity checks on the COW file and its backing file before mounting them. The COW file stores some information about the backing file:
Without these, the user would have to specify both the COW file and the backing file on the command line. If the backing file were wrong, without any checks, the result would be a hopelessly corrupted filesystem. The COW file is a block-level image of changes to the backing file. As such, it is tightly tied to a particular backing file and makes no sense with any other backing file.
If the backing file were modified, that would invalidate any already-existing COW files. This is the reason for the check of the modification time of the backing file.
However, this check gets in the way of moving the backing file since the file, in its new location, would normally have its modification time updated. So, it is important to preserve the timestamp on a backing file when moving it. A number of utilities have the ability to do this, including
After you have carefully moved the backing file, you still need to get the COW file header to contain the new location. You do this by booting an instance on the COW file, specifying both filenames in the device description:
ubda=cow-file,new-backing-file
The UML block driver will notice the mismatch between the command line and the COW file header, make sure the size and timestamp of the new location are what it expects, and update the backing file location. When this happens, you will see a message such as this:
Backing file mismatch - "debian30" requested,
 "/home/jdike/linux/debian30" specified in COW header of "cow2"
 Switching backing file to 'debian30'
However, at some point, you will forget to preserve the timestamp, and the COW file will appear to be useless. If it's a UML root device, the boot will fail like this:
mtime mismatch (1130814229 vs 1130970724) of COW header vs \
     backing file
 Failed to open 'cow2', errno = 22
 VFS: Cannot open root device "98:0" or unknown-block(98,0)
 Please append a correct "root=" boot option
All is not lost. You need to restore the timestamp on the new backing file by hand, taking the proper timestamp from the error message above:
host% date --date="1970-01-01 UTC 1130814229 seconds"
 Mon Oct 31 22:03:49 EST 2005
 host% touch --date="Mon Oct 31 22:03:49 EST 2005" debian30
The date command converts the timestamp, which is the number of seconds since January 1, 1970, into a form that touch will accept. In turn, the touch command applies that timestamp as the modification time of the backing file.
To minimize the amount of typing, you can abbreviate this operation as follows:
touch --date="`date --date='1970-01-01 UTC 1130814229 seconds'`" \
       debian30
You may wonder why this isn't automated like the filename operation. When both the backing filename and timestamp don't match the information in the COW header, the only thing left is the file size. And there aren't enough common file sizes to have any sort of reasonable guarantee that you're associating the COW file with the correct backing file. I require that you update the timestamp by hand so you look at the file in question and can catch a mistake before it happens.
Merging a COW File with Its Backing File
Sometimes you want to merge the modified data in a COW file back into the backing file. For example, you may have created a COW file in order to test a modification of the filesystem, such as the installation or modification of a service. If the results are bad, you can back out to the original filesystem merely by throwing out the COW file. If the results are good, you want to keep them by merging them back into the backing filein essence, committing them.
The tool used to do this is called uml_moo. Using it is simple. You just need to decide whether you want to do an in-place merge or create a new file, leaving the original COW and backing files unchanged. The second option is recommended if you're feeling paranoid, although making a copy of the backing file before doing an in-place merge is just as safe. Most often, people choose based on the amount of disk space available on the hostif it's low, they do an in-place merge.
Create a new file by doing this:
host% uml_moo COW-file new-backing-file
Do an in-place merge like this:
host% uml_moo -d COW-file
You can use the -b switch to specify the true location of the backing file in the event that the name stored in the COW file header is incorrect. This happens most often when the COW file was created inside a chroot jail. In this case, the backing file specified in the COW file will be relative to the jail and thus wrong outside the jail. For example, if you had a COW file created by a UML instance that was jailed to /jail and contains /rootfs as the backing file, you would do an in-place merge like this:
host% uml_moo -b /jail/rootfs -d /jail/cow-file
Networking the UML Instances
After seeing the example of two UML instances not interacting (i.e., not corrupting each other's filesystems) when you might expect them to, let's make them interact when we want them to. We will create a small private network with just these two instances on it and see that they can use it to communicate with each other in the same way that physical machines communicate on a physical network.
For a pair of virtual machines, the basic requirement for setting up a network between them is some method of exchanging packets. Since packets are just hunks of data, albeit specially formatted ones, in principle, any interprocess communication (IPC) mechanism will suffice. All that's needed in UML is a network driver that can send and receive packets over that IPC mechanism.
This is enough to set up a private network that the UML instances can use to talk to each other, but it will not let them communicate with anything else, such as the host or anything on the Internet. Communicating with the outside world, including the host, requires root privileges at some point. The instance needs to send packets to the host and have them be handled by its network subsystem. This ability requires root privileges because it implies that the instance is a networking peer of the host and could foul up the network through misconfiguration or malice.
Here, we will introduce UML networking by setting up a two-machine private network with no access to the outside world. We will cover networking fully in Chapter 7, including access to the host and the Internet.
As I said earlier, in principle, any IPC mechanism can be used to construct a virtual network. However, they differ in their convenience, which is strongly related to how well they map onto a network. Fundamentally, Ethernet is a broadcast medium in which a message sent by one host is seen by all the others on the same Ethernet, although, in practice, the broadcasting is often suppressed by intelligent hardware such as switches. Most IPC mechanisms, on the other hand, are point to point. They have two ends, with one process at each end, and a message sent by a process at one end is seen by the host at the other.
This mismatch makes most IPC mechanisms not well suited for setting up a network. Each host would need a connection to each other host, including itself, so the total number of connections in the network would grow quadratically with the number of hosts. Further, each packet would need to be sent individually to each host, rather than having it sent once and received by all the other hosts.
However, one broadcast IPC mechanism is available: multicasting. This little-used networking mechanism allows processes to join a group, called a multicast group. When a message is sent to this group, it is received by all the processes that have joined the group. This nicely matches the semantics needed by a broadcast medium, with one caveatit matches an Ethernet device that's connected by a hub, not a switch. A hub repeats every packet to every host connected to it, while a switch knows which Ethernet MAC addresses are associated with each of its ports and sends each packet only to the hosts it's intended for. With a multicast virtual network, as with a hub, each host will see all of the packets on the network and will have to discard the ones not addressed to it.
To start things off, we need Ethernet interfaces in our UML instances. To do this, we need to plug them in:
host% uml_mconsole debian1 config eth0=mcast
 OK
 host% uml_mconsole debian2 config eth0=mcast
 OK
This hot-plugs an Ethernet device into each instance. If you were starting them from the shell here, you would simply add eth0=mcast to their command lines.
Now, if you go back to one of the instances and run ifconfig, you will notice that it has an eth0 :
UML1# ifconfig -a
 eth0      Link encap:Ethernet  HWaddr 00:00:00:00:00:00
           BROADCAST MULTICAST  MTU:1500  Metric:1
           RX packets:0 errors:0 dropped:0 overruns:0 frame:0
           TX packets:0 errors:0 dropped:0 overruns:0 carrier:0
           collisions:0 txqueuelen:1000
           Interrupt:5

 lo        Link encap:Local Loopback
           inet addr:127.0.0.1  Mask:255.0.0.0
           UP LOOPBACK RUNNING  MTU:16436  Metric:1
           RX packets:6 errors:0 dropped:0 overruns:0 frame:0
           TX packets:6 errors:0 dropped:0 overruns:0 carrier:0
           collisions:0 txqueuelen:0
You'll see the same thing has happened in the other UML.
Now we need to bring them up, so we'll assign IP addresses to them. We'll use 192.168.0.1 for one instance:
UML1# ifconfig eth0 192.168.0.1 up
and similarly in the other instance, we'll assign 192.168.0.2:
UML2# ifconfig eth0 192.168.0.2 up
Don't worry if you are already using these addresses on your own networkwe have set up an isolated network, so there can't be any conflicts between IP addresses if they can't exchange packets with each other.
Running ifconfig again shows that both interfaces are now up and running:
UML1# ifconfig eth0
 eth0      Link encap:Ethernet HWaddr FE:FD:C0:A8:00:01
           inet addr:192.168.0.1 Bcast:192.168.0.255
     \Mask:255.255.255.0
           UP BROADCAST RUNNING MULTICAST MTU:1500 Metric:1
           RX packets:0 errors:0 dropped:0 overruns:0 frame:0
           TX packets:0 errors:0 dropped:0 overruns:0 carrier:0
           collisions:0 txqueuelen:1000
           Interrupt:5
No packets have been transmitted or received, so we need to fix that. Let's ping the second UML from the first:
UML1# ping 192.168.0.2
 PING 192.168.0.2 (192.168.0.2): 56 data bytes
 64 bytes from 192.168.0.2: icmp_seq=0 ttl=64 time=9.3 ms
 64 bytes from 192.168.0.2: icmp_seq=1 ttl=64 time=0.2 ms
 64 bytes from 192.168.0.2: icmp_seq=2 ttl=64 time=0.2 ms

 --- 192.168.0.2 ping statistics ---
 3 packets transmitted, 3 packets received, 0% packet loss
 round-trip min/avg/max = 0.2/3.2/9.3 ms
This establishes that we have basic network connectivity. To see some more interesting network action, let's request a Web page from the other UML. Since we don't have any ability to run a graphical Web browser inside the UML yet, we'll use the command-line tool wget:
UML1# wget -O - http://192.168.0.2
 --15:51:10--  http://192.168.0.2:80/
            => `-'
 Connecting to 192.168.0.2:80... connected!
 HTTP request sent, awaiting response... 200 OK
 Length: 4,094 [text/html]
     0K -><!DOCTYPE HTML PUBLIC "-//W3C//DTD HTML 3.2//EN">
 <HTML>
 <HEAD>
Following that snippet, you'll see the rest of the default Apache home page as shipped by Debian. If you want a more interactive Web experience at this point, you can just run lynx, the text-mode Web browser, with the same URL, and you'll see a pretty good text representation of that page. The external links (those that point to debian.org, apache.org, and the like) will not work because these instances don't have access to the outside network. However, any links internal to the other UML instance, such as the Apache documentation, should work fine.
Now that we have basic networking between the two instances, I am going to complicate the configuration as much as possible, given that we have only two hosts, and add them both to what amounts to a second Ethernet network. I'm going to keep this network separate from the current one, and to do so, I need to specify a different port from the default. We specified no multicast parameters when we set up the first network, so the UML network driver assigned default values. To keep this new network separate from the old one, we will provide a full specification of the multicast group:
host% uml_mconsole debian1 config eth0=mcast,,239.192.168.1,1103,1
 OK
 host% uml_mconsole debian2 config eth0=mcast,,239.192.168.1,1103,1
 OK
We are separating this network from the previous one by using the next port. You can see how things are set up by looking at the kernel message log:
UML# dmesg | grep mcast
 Configured mcast device: 239.192.168.1:1102-1
 Netdevice 0 : mcast backend multicast address: \
     239.192.168.1:1102, TTL:1
 Configured mcast device: 239.192.168.1:1103-1
 Netdevice 1 : mcast backend multicast address: \
     239.192.168.1:1103, TTL:1
We used the same default IP address, but used port 1103 instead of the default 1102. We are still defaulting the second parameter, which is the hardware MAC address that will be assigned to the adapters. Since we're not providing one, it will be derived from the first IP assigned to the interface.
Again, if you run ifconfig, you will see that another interface has materialized on the system:
UML1# ifconfig -a
 eth0      Link encap:Ethernet HWaddr FE:FD:C0:A8:00:01
           inet addr:192.168.0.1 Bcast:192.168.0.255
      \Mask:255.255.255.0
           UP BROADCAST RUNNING MULTICAST MTU:1500 Metric:1
           RX packets:1363 errors:0 dropped:0 overruns:0 frame:0
           TX packets:1117 errors:0 dropped:0 overruns:0 carrier:0
           collisions:0 txqueuelen:1000
           Interrupt:5
 eth1      Link encap:Ethernet  HWaddr 00:00:00:00:00:00
           BROADCAST MULTICAST  MTU:1500  Metric:1
           RX packets:0 errors:0 dropped:0 overruns:0 frame:0
           TX packets:0 errors:0 dropped:0 overruns:0 carrier:0
           collisions:0 txqueuelen:1000
           Interrupt:5

 lo        Link encap:Local Loopback
           inet addr:127.0.0.1 Mask:255.0.0.0
           UP LOOPBACK RUNNING MTU:16436 Metric:1
           RX packets:546 errors:0 dropped:0 overruns:0 frame:0
           TX packets:546 errors:0 dropped:0 overruns:0 carrier:0
           collisions:0 txqueuelen:0
We'll bring these up with IP addresses on a different subnet:
UML1# ifconfig eth0 192.168.1.1 up
and:
UML2# ifconfig eth0 192.168.1.2 up
As before, we can verify that we have connectivity by pinging one from the other:
UML# ping 192.168.1.1
 PING 192.168.1.1 (192.168.1.1): 56 data bytes
 64 bytes from 192.168.1.1: icmp_seq=0 ttl=64 time=18.6 ms
 64 bytes from 192.168.1.1: icmp_seq=1 ttl=64 time=0.4 ms

 --- 192.168.1.1 ping statistics ---
 2 packets transmitted, 2 packets received, 0% packet loss
 round-trip min/avg/max = 0.4/9.5/18.6 ms
Now that we have two networks, we can do some routing experiments. We have two interfaces on each UML instance, on two different networks, with correspondingly different IP addresses. We can pretend that the 192.168.1.0/24 network is the only one working and set up one instance to reach the 192.168.0.0/24 interface on the other. So, let's first look at the routing table on one of the instances:
UML# route -n
 Kernel IP routing table
 Destination     Gateway                 Genmask          Flags Metric Ref \
      Use Iface
 192.168.1.0     0.0.0.0                 255.255.255.0    U     0      0   \
      0 eth1
 192.168.0.0     0.0.0.0                 255.255.255.0    U     0      0   \
      0 eth0
We will delete the 192.168.0.0/24 route on both instances to pretend that network doesn't work any more:
UML1# route del -net 192.168.0.0 netmask 255.255.255.0 dev eth0
and identically on the other:
UML2# route del -net 192.168.0.0 netmask 255.255.255.0 dev eth0
Now, let's add the route back in, except we'll send those packets through eth1 :
UML1# route add -net 192.168.0.0 netmask 255.255.255.0 dev eth1
and on the other:
UML2# route add -net 192.168.0.0 netmask 255.255.255.0 dev eth1
Now, the routing table looks like this:
UML# route -n
 Kernel IP routing table
 Destination     Gateway     Genmask            Flags Metric Ref
      Use Iface
 192.168.1.0     0.0.0.0     255.255.255.0      U     0      0
      0 eth1
 192.168.0.0     0.0.0.0     255.255.255.0      U     0      0
      0 eth1
Before we ping the other side to make sure that the packets are traveling the desired path, let's look at the packet counts on eth0 and etH1 before and after the ping. Running ifconfig shows this output for eth0:
RX packets:3597 errors:0 dropped:0 overruns:0 frame:0
 TX packets:1117 errors:0 dropped:0 overruns:0 carrier:0
and this for eth1:
RX packets:8 errors:0 dropped:0 overruns:0 frame:0
 TX packets:4 errors:0 dropped:0 overruns:0 carrier:0
The rather large packet count for eth0 comes from my playing with the network without recording here everything I did. Also, notice that the receive count for etH1 is double the transmit count. This is because of the hublike nature of the multicast network that I mentioned earlier. Every packet is seen by every host, including the ones the host itself sent. The UML received its own transmitted packets and the replies. Since there was one reply for each packet sent out, the number of packets received will be exactly double the number transmitted.
Now, let's test our routing by pinging one instance from the other:
UML# ping 192.168.0.251
 PING 192.168.0.251 (192.168.0.251): 56 data bytes
 64 bytes from 192.168.0.251: icmp_seq=0 ttl=64 time=19.9 ms
 64 bytes from 192.168.0.251: icmp_seq=1 ttl=64 time=0.4 ms
 64 bytes from 192.168.0.251: icmp_seq=2 ttl=64 time=0.4 ms

 --- 192.168.0.251 ping statistics ---
 3 packets transmitted, 3 packets received, 0% packet loss
 round-trip min/avg/max = 0.4/6.9/19.9 ms
This worked, so we didn't break anything. Let's check the packet counters for eth0 again:
RX packets:3597 errors:0 dropped:0 overruns:0 frame:0
 TX packets:1117 errors:0 dropped:0 overruns:0 carrier:0
and for etH1:
RX packets:18 errors:0 dropped:0 overruns:0 frame:0
 TX packets:9 errors:0 dropped:0 overruns:0 carrier:0
Nothing went over eth0, as planned, and the pings went over eth1 for both UMLs. So, even though the 192.168.0.0/24 network is still up and running, we persuaded the UMLs to pretend it wasn't there and to use the 192.168.1.0/24 network instead.
Although this is a simple demonstration, we just simulated a scenario you could run into in real life, and dealing with it incorrectly in real life could seriously mess up a network.
For example, say you have two parallel networks, with one acting as a backup for the other. If one goes out of commission, you want to fail over to the other. Our scenario is similar to having the 192.168.0.0/24 network fail. Leaving the eth0 interfaces running is consistent with this because they would remain up on a physical machine on a physical Ethernetthey would just have 100% packet loss. Having somehow seen the network fail, we reset the routes so that all traffic would travel over the backup network, 192.168.1.0/24. And we did it with no extra hardware and no Ethernet cables, just a standard Linux box and some software.
Setting this up and doing the failover without having tested the procedure ahead of time would risk fouling up an entire network, with its many potentially unhappy users, some of whom may have influence over the size of your paycheck and the duration of your employment. Developing the procedure without the use of a virtual network would involve setting up two physical test networks, with physical machines and cables occupying space somewhere. Simply setting this up to the point where you can begin simulating failures would require a noticeable amount of time, effort, and equipment. In contrast, we just did it with no extra hardware, in less than 15 minutes, and with a handful of commands.
A Virtual Serial Line
We are going to round out this chapter with another example of the two UML instances communicating over simulated hardware. This time, we will use a virtual serial line running between them to log in from one to the other.
This serial line will be constructed from a host pseudo-terminal, namely, a UNIX 98 pts device. Pseudo-terminals on UNIX are pipes whatever goes in one end comes out the other, possibly with some processing in between, such as line editing. This processing distinguishes pseudo-terminals from normal UNIX pipes. The end that's opened first is the pty end, and it's the master sidethe device doesn't really exist until this side is opened. So, the instance to which we are going to log in will open the master side of the device, and later, the slave side will be opened by the other instance when we log in over it.
We are going to make both ends of the device appear inside the instances as normal, hardwired terminals. One instance is going to run a getty on it, and we will run a screen session inside the other instance attached to its terminal.
To get started, we need to identify an unused terminal in both instances. There are two ways to do thisread /etc/inittab to find the first terminal that has no getty running on it, or run ps to discover the same thing. The relevant section of inittab looks like this:
# /sbin/getty invocations for the runlevels.
 #
 # The "id" field MUST be the same as the last
 # characters of the device (after "tty").
 #
 # Format:
 #  <id>:<runlevels>:<action>:<process>
 0:2345:respawn:/sbin/getty 38400 tty0
 1:2345:respawn:/sbin/getty 38400 tty1
 2:2345:respawn:/sbin/getty 38400 tty2
 3:2345:respawn:/sbin/getty 38400 tty3
 4:2345:respawn:/sbin/getty 38400 tty4
 5:2345:respawn:/sbin/getty 38400 tty5
 6:2345:respawn:/sbin/getty 38400 tty6
 7:2345:respawn:/sbin/getty 38400 tty7
 c:2345:respawn:/sbin/getty 38400 ttyS0
It appears that tty8 is unused. ps confirms this:
UML1# ps uax | grep getty
 root       153  0.0  0.3  1084  444 tty1    S   14:07    0:00
      /sbin/getty 38400 tty1
 root       154  0.0  0.3  1088  448 tty2    S   14:07    0:00
      /sbin/getty 38400 tty2
 root       155  0.0  0.3  1084  444 tty3    S   14:07    0:00
      /sbin/getty 38400 tty3
 root       156  0.0  0.3  1088  448 tty4    S   14:07    0:00
      /sbin/getty 38400 tty4
 root       157  0.0  0.3  1088  452 tty5    S   14:07    0:00
      /sbin/getty 38400 tty5
 root       158  0.0  0.3  1088  452 tty6    S   14:07    0:00
      /sbin/getty 38400 tty6
 root       159  0.0  0.3  1088  452 tty7    S   14:07    0:00
      /sbin/getty 38400 tty7
 root       160  0.0  0.3  1084  444 ttyS0   S   14:07    0:00
      /sbin/getty 38400 ttyS0
This is the same on both instances, as you would expect, so we will use tty8 as the serial line on both.
First we need to plug in a properly configured tty8 to the master UML instance, the one to which we will be logging in. We do this with uml_mconsole on the host, configuring con8, which is the mconsole name for the device that is tty8 inside UML:
host% uml_mconsole debian2 config con8=pts
 OK
Now, the master UML instance has a tty8, and we need to know which pseudo-terminal on the host it allocated so that we can connect the other instance's tty8 to the other end of it. Right now, it's not connected to anything, as it waits until the device is opened before allocating a host terminal. So, to get something to open it, we'll run getty on it:
UML2# /sbin/getty 38400 tty8
Now we need to know what the other end of the pts device is, since that's determined dynamically for these devices:
host% uml_mconsole debian2 config con8
 OK pts:/dev/pts/28
This tells us how to configure con8 on the slave UML:
host% uml_mconsole debian1 config con8=tty:/dev/pts/28
 OK
Here we are using tty instead of pts as the device type because the processes of opening the two sides of the device are slightly different, and we are opening the slave side here.
This will just sit there, so we now go to the slave UML instance and attach screen to its tty8 :
Figure 4.3 shows what we have constructed. The two UML consoles are connected to opposite ends of the host's /dev/pts/28 and communicate through it. From inside the UML instances, it appears that the two UML /dev/tty8 devices are connected directly to each other.
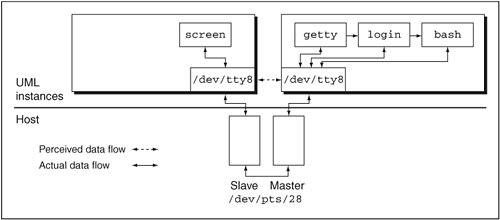
Now you should see a login prompt in the screen session. Log in and determine that it really is the other instance. During the examples in this chapter, we've copied different things into /tmp, assigned different IP addresses to their network interfaces, and played with their routing tables, so this should not be hard to verify.
Once you log out, you'll notice that the getty exits back to the shell, and you get no login prompt in the screen session. This is the purpose of the respawn on the getty lines in /etc/inittab. If you wrapped the getty command in an infinite loop, you would be doing a passable imitation of init. However, we will just exit the screen session (^A K ) to get back to the prompt in the other instance.
We are done with these UMLs, so you can just halt them and remove their COW files if you want to reclaim whatever disk space they consumed.
The point of this exercise was not to demonstrate that two UML instances can be used to simulate a serial linephysical serial lines are not hard to come by and not that hard to set up. Rather, it was to demonstrate how easily a virtual device on the host can be pressed into service as a physical device inside UML. A serial line is probably the simplest example of this, which is why I used it. Out of the box, UML can emulate many other sorts of hardware, and for other types, it is fairly simple to write a UML driver that emulates the device. Other examples include using shared memory on the host to emulate a device with memory-mapped I/O, which some embedded systems developers have done, and using shared memory to emulate a cluster interconnect, with multiple UML instances on the host being the emulated cluster.
More prosaic, and more common, is the need to emulate a network environment for purposes such as setting it up, reconfiguring it, and testing fault handling. We saw an example of testing failover from a failed network to a hot spare network. This only scratches the surface of what can be done with a virtual network. A network of UMLs can be configured in any way that a physical network can and a lot of ways that a physical network can't, making UML an ideal way to set up, develop, and test networks before physically building them.
Chapter 5. Playing with a UML Instance
By now, you have at least a basic idea of what UML is and how it can be used. In this chapter, we will see a wider variety of things we can do with UML. We will set up a basic network and use it to gain access to the host and to the outside network, and also access the UML instance from the outside. We will continue playing with virtual devices, seeing how they can be used like physical devices and what they can do that physical devices can't.
Use and Abuse of UML Block Devices
First, let's look at ways to copy data into a UML instance from the host without using the network. We will use UML block devices for this, tying them to files containing the data that we want to access inside the instance. Until now, we have used UML block devices only for filesystems. However, like physical disks, block devices can contain any data whatsoever, and that data can be accessed by anything that understands its format. Putting a filesystem on a disk formats the disk's data in a particular way that can be understood by the filesystem that will mount it. However, if you don't need to mount the disk as a filesystem, the data on it can be anything you want.
For example, let's say that we want to copy a directory from the host to the instance. In this example, we will create a tar file on the host containing the directory, attach a UML block device to the file, and untar the directory inside the instance. We saw this in Chapter 3, but I will go into more depth here.
To start, we need the tar file. I will use the host's /etc here:
host% tar cpf etc.tar /etc
 host% ls -l etc.tar
 -rw-rw-rw- 1  jdike jdike 25149440 May 13 22:28 etc.tar
I ran tar as a normal user and got a bunch of errors from files I didn't have permission to read. That's fine for an example, but if you really wanted all those files, you would run tar as root to ensure that they all end up in the tar file.
At the end of the previous chapter, we shut down our UML instances, so if you don't have one running now, start one up.
We now have a 25MB file that we will turn into a UML block device, using uml_mconsole:
host% uml_mconsole debian config ubdb=etc.tar
 OK
This causes a second block device, /dev/ubdb, to come into existence inside our instance. Rather than mounting it as a filesystem, as we have done before, we will treat it as a tape drive. These days, tar is often used to archive data in files and to retrieve files from those files. It used to be more common to use tar to write the data directly to a device, usually a tape drive. We are going to treat our new block device similarly and tar the directory off the device directly.
First, let's go to the UML, see if /dev/ubdb contains something that tar recognizes, and ask it to show us what's on the device:
UML# tar tf /dev/ubdb | head
 etc/
 etc/sysconfig/
 etc/sysconfig/network-scripts/
 etc/sysconfig/network-scripts/ifdown-aliases
 etc/sysconfig/network-scripts/ifcfg-lo
 etc/sysconfig/network-scripts/ifdown
 etc/sysconfig/network-scripts/ifdown-ipsec
 etc/sysconfig/network-scripts/ifdown-ippp
 etc/sysconfig/network-scripts/ifup-aliases
 etc/sysconfig/network-scripts/ifdown-ipv6
That looks a lot like a /etc, so let's pull it off for real:
Now you will see an /etc directory in your current directory. If you run ls on it, you will see that it is, in fact, the same as what you copied on the host.
This should make it clear that the data on a UML block device can be any format and that all you need to pull the data off the device inside the UML instance is a utility that understands the format.
Let's pull the data off in a way that assumes nothing about the format. We will just make a raw copy of the device in a file inside UML and see that it contains what we expect. To start, remove the /etc directory we just made:
Now, let's use dd to copy the device into a file:
UML# dd if=/dev/ubdb of=etc.tar
 49120+0 records in
 49120+0 records out
We can check whether tar still thinks it contains a copy of /etc:
That finishes successfully, and you can again check with ls that you extracted the same directory as before.
As a final example using this tar file, we will compress the file before attaching it to a block device, and then uncompress and untar it inside UML. Again, let's remove our copy of /etc :
Now, back on the host, we compress the tar file and attach it to UML block device 2:
host% gzip etc.tar
 host% uml_mconsole debian config ubdc=etc.tar.gz
 OK
Back inside the UML instance, we now uncompress the compressed tar file to stdout and pipe that into tar, hopefully extracting the same directory that we did before:
UML# gunzip -c < /dev/ubdc | tar xf -
Again, you can check that etc is the same as in the previous examples.
When copying files into UML using this method, you need to be careful about lengths. We are mapping a host file, which can be any length, onto a block device, which is expected to be a multiple of 512 bytes longthe size of a disk sector in Linux. Block devices are expected to contain sectors, with no bytes left over. To see how this affects files copied into UML, let's copy a single, odd-length file through a block device.
Locate a file on the host whose length is not an even multiple of 512 bytes.
On my system, /etc/passwd is suitable:
host% ls -l /etc/passwd
 -rw-r--r--  1 root root 1575 Dec 10 18:38 /etc/passwd
Let's attach this file to UML:
host% uml_mconsole debian config ubdd=/etc/passwd
 OK
Here's what we get when we copy it inside UML:
UML# dd if=/dev/ubdd of=passwd
 4+0 records in
 4+0 records out
 UML# ls -l passwd
 -rw-r--r--  1 root root 2048 May 13 23:48 passwd
Notice that the size changed. If you look at the file with a suitable utility, such as od, you will see that the extra bytes are all zeros.
There is a mismatch between a file with no size restrictions being mapped to a device that must be an even number of sectors. The UML block driver has to bridge this gap somehow. When it reaches the end of a host file and has read only a partial sector, it pads the sector with zeros and pretends that it read the entire thing. This is a necessary fiction in order to generally handle the end of a file, but it results in the block driver copying more data than it should.
To deal with this problem, we need to tell dd exactly how much data to copy. The UML block driver will still pad the last sector with zeros, but dd won't copy them.
My /etc/passwd is 1575 bytes long, so this is what we will tell dd to copy:
UML# dd if=/dev/ubdd of=passwd bs=1 count=1575
 1575+0 records in
 1575+0 records out
 UML# ls -l passwd
 -rw-r--r--  1 root root 1575 May 13 23:56 passwd
The bs=1 argument to dd tells it to copy data in units of a single byte, and the count argument tells it to copy 1575 of those units.
Now, the size is what we expect, and if you check the contents, you will see that they are, in fact, the same.
Some file formats are self-documenting in terms of their lengthit is possible to tell whether extra data has been added to the length of the file. tar and bzip files are two examplestar and bunzip2 can tell when they've reached the end of the data they are supposed to process, and bunzip2 will complain about the extra data. If you are copying data from a ubd device that is in one of these formats, you can use the device directly as the data source. You don't need to copy the correct number of bytes from the device into a file in order to recreate the original data.
Networking and the Host
Now, let's move to a more conventional method of transferring data between machines. Pluggable block devices are cute and sometimes invaluable, but a network is more conventional, more flexible, and usually easier to use. We saw a bit of UML networking in the previous chapter, which showed that UML instances can be used to construct an isolated network. But the value of networking lies in accessing the outside world. Let's do this now.
We will plug a network interface into the UML as we did before, but we are going to use a different host mechanism to transfer the packets:
host% uml_mconsole debian config eth0=tuntap,,,192.168.0.254
 OK
At this point, the IP addresses we use will be visible to the outside network, so choose ones that aren't used on your network. If you are using 192.168.0.254 already, change the uml_mconsole command to specify an unused IP address (or one that is already used by a different interface on the host, if IP addresses are scarce on your network). Inside the UML, you should see a message similar to this:
Netdevice 0 : TUN/TAP backend - IP = 192.168.0.254
If it doesn't appear on the main console, you will be able to see it by running dmesg. Some distributions don't have their logging configured so that kernel messages appear on the main console. In this case, running dmesg is the most convenient way to see the recent kernel log.
In this example, we are setting up a virtual network interface on the host that will be connected to the UML's eth0. There are a number of mechanisms for doing this, such as SLIP, PPP, Ethertap, and TUN/ TAP. TUN/TAP is the newest and most general-purpose one of the bunch. It provides a file that, when opened by a process, allows that process to receive and transmit Ethernet frames to the system's network stack.
Figure 5.1 shows an example of using TUN/TAP. Here we have a system with eth0, a wired Ethernet interface; eth1, a wireless interface; and tap0, a TUN/TAP interface. Frames that are routed to eth0 or eth1 are sent to a hub or switch, or to a wireless router, respectively, for delivery to their destination. In contrast, a frame that's routed to the tap0 device is sent to whatever process on the system opened the /dev/ net/tun file and associated that file descriptor with the tap0 interface.
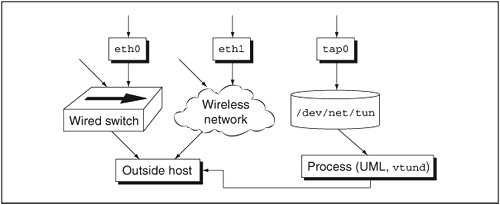
This process may do anything with the frames it receives. UML will send the frames through its own network stack, which could do almost anything with them, including delivering the data to a local process, forwarding them to another host that it's connected to, or just dropping them.
UML isn't the only process that can attach itself to a TUN/TAP interfacevtund is another example. vtund is used to construct a Virtual Private Network (VPN)it will read frames from a TUN/TAP interface, encrypt them, and forward them to another vtund instance on a remote host. The remote vtund will decrypt the frames and inject them into the network on its host by writing them to its TUN/TAP interface. So, the TUN/TAP interface provides a general-purpose mechanism for processes to receive and transmit network traffic and do any sort of processing on it.
This is unlike the mcast transport we saw in the previous chapter in that frames sent to a TUN/TAP device are interpreted and routed by the host's network stack. With mcast, the frames were simply hunks of data to be sent from one process to another. Since frames sent to a TUN/TAP device are seen as network frames by the host, they will be routed to whatever host owns the frame's destination IP address. That could be the host itself, another machine on the local network, or a host on the Internet.
Similarly, if the IP address given to the UML is visible to the outside world (the ones we're using will be visible on the local net, but not to the Internet as a whole), people in the outside world will be able to make network connections to it. It will appear to be a perfectly normal network host.
A TUN/TAP device is very similar to a strand of Ethernet connecting the host and the UML. Each end of the strand plugs into a network device on one of the systems. As such, the device at each end needs an IP address, and the two ends need different IP addresses. The address we specified on the uml_mconsole command line, 192.168.0.254, is the address of the host end of the TUN/TAP device.
The fact that a TUN/TAP interface is like a strand of Ethernet has an important implication: The TUN/TAP interface and the UML eth0 form their own separate Ethernet broadcast domain, as shown in Figure 5.2. This means that any Ethernet broadcast protocols, such as ARP and DHCP, will be restricted to those two interfaces and the hosts they belong to. In contrast, the local Ethernet on which the host resides is a broadcast domain with many hosts on it. Without some extra work, protocols like ARP and DHCP can't cross between these two domains. This means that a UML instance can't use the DHCP server on your local network to acquire an IP address and that it can't use ARP to figure out the MACs of other hosts in order to communicate with them. In Chapter 7, we will discuss this problem in detail and see several methods for fixing it.

Returning to our exercise, the next step is to bring up the UML eth0, which is the other end of the strand, and to assign an IP address to it. Since it's a different system, it will need a different unused IP address. Here, I will use 192.168.0.253 :
UML# ifconfig eth0 192.168.0.253 up
 * modprobe tun
 * ifconfig tap0 192.168.0.254 netmask 255.255.255.255 up
 * bash -c echo 1 > /proc/sys/net/ipv4/ip_forward
 * route add -host 192.168.0.253 dev tap0
 * bash -c echo 1 > /proc/sys/net/ipv4/conf/tap0/proxy_arp
 * arp -Ds 192.168.0.253 eth1 pub
Again, if the output above doesn't appear on your console, run dmesg to see it. The UML network driver is running a helper process on the host in order to set up the host side of the network, and this output shows what commands the helper is running. We will go into much more detail in Chapter 7, but, briefly, these are making sure that TUN/ TAP is available on the host, configuring the TUN/TAP interface, tap0, and setting up routing and proxy arp so that the instance will be visible on your local network.
At this point, we have the network running between the host and the UML instance, and you should be able to ping back and forth:
UML# ping 192.168.0.254
 PING 192.168.0.254 (192.168.0.254): 56 data bytes
 64 bytes from 192.168.0.254: icmp_seq=0 ttl=64 time=19.6 ms
 --- 192.168.0.254 ping statistics ---
 1 packets transmitted, 1 packets received, 0% packet loss
 round-trip min/avg/max = 19.6/19.6/19.6 ms

 host% ping 192.168.0.253
 PING 192.168.0.253 (192.168.0.253) 56(84) bytes of data.
 64 bytes from 192.168.0.253: icmp_seq=0 ttl=64 time=0.209 ms

 --- 192.168.0.253 ping statistics ---
 1 packets transmitted, 1 received, 0% packet loss, time 0ms
 rtt min/avg/max/mdev = 0.209/0.209/0.209/0.000 ms, pipe 2
This is the most basic level of networking. The next step is to access the outside world. We need to do two thingsgive our UML instance a route to the outside, and give it a name server. First, look at the UML routing table:
UML# route -n
 Kernel IP routing table
 Destination     Gateway         Genmask         Flags Metric Ref \
     Use Iface
 192.168.0.0     0.0.0.0         255.255.2550    U     0      0   \
     0 eth0
This tells us we have a route to the local network, but nothing else. So, we need a default route:
UML# route add default gw 192.168.0.254
 UML# route -n
 Kernel IP routing table
 Destination     Gateway         Genmask         Flags Metric Ref \
     Use Iface
 192.168.0.0    0.0.0.0          255.255.255.0   U     0      0   \
     0 eth0
 0.0.0.0        192.168.0.254    0.0.0.0         UG    0      0   \
     0 eth0
This new route just tells the UML network to send all packets it doesn't know what to do with (in this case, those not destined for the local network) to the host tap interface and let it deal with them. Presumably, the host has access to the Internet and knows how to route packets to it.
Second, we need to give the UML instance an /etc/ resolv.conf. This is normally set up by DHCP, but since we are setting up the network by hand, this must be done by hand, too. I normally just copy the host's /etc/resolv.conf:
UML# cat > /etc/resolv.conf
 ; generated by /sbin/dhclient-script
 search user-mode-linux.org
 nameserver 192.168.0.3
I just cut the host's resolv.conf from one xterm window and pasted it into another that has UML running in it. You should do something similar here. Definitely don't use my resolv.conf since that won't work on your network.
We need to set up one thing on the host. Since I am using the 192.168.x.x address block, the host will need to do masquerading for it. This address block and the 10.x.x.x one are nonroutable, so they can't be used by any machine that has direct access to the Internet. Masquerading, or Network Address Translation (NAT), on the host will solve this problem by having the host use its own address for outgoing UML network traffic.
If you are using normal, routable IP addresses, you don't need to worry about masquerading. But if you are using a nonroutable IP address for your instance, you need to NAT it. So, as root on the host, run:
host# iptables -t nat -A POSTROUTING -o eth0 -j MASQUERADE
If eth0 is not the device used to access the Internet, change that part of the code to the correct device. For example, if you're a dialup user with Internet access through the ppp0 device, you would use ppp0 instead of eth0.
It is common for the firewall on the host to interfere with UML's ability to communicate with any machines other than the host. To see if your host has a potentially interfering firewall, run iptables -L as root. If you have no firewall, you will see this:
Chain INPUT   (policy ACCEPT)
 target     prot  opt  source              destination
 Chain   FORWARD (policy ACCEPT)
 target     prot  opt  source              destination
 Chain OUTPUT    (policy ACCEPT)
 target     prot  opt  source              destination
 Chain   RH-Firewall-1-INPUT (0 references)
 target     prot  opt  source              destination
If you see anything else, it's a good idea to poke a hole in the firewall for the UML instance's traffic like this, again as root:
host# iptables -I FORWARD -d 192.168.0.253 -j ACCEPT
 host# iptables -I FORWARD -s 192.168.0.253 -j ACCEPT
This tells the host to allow all traffic being forwarded to and from 192.168.0.253, the IP address that we've assigned to the UML instance, through the firewall. You might imagine that there are security implications to this, since a firewall is an important part of any network's security infrastructure, and there are. This means that any attacks aimed at the UML IP address will reach it. Whether they succeed is a different question altogether. But this is simply making a new host accessible to the outside network, including anything malicious out there.
If the host is masquerading the UML IP, that provides a degree of protection because it is invisible to the outside network, except for connections that it initiates itself. For example, if you ran a Web browser in the UML instance and loaded a Web page from a malicious Web site, the instance could be attacked by that site, through the browser. However, the instance is invisible to everything else, including worms and other malicious software scanning the network for victims. The downside of this is that it would be unusable as a server, since that would require that it be visible enough for outside clients to make connections to it.
The situation is somewhat different if you are using a real, routable IP for your UML. In this case, it is visible on the outside network and to whatever nasty things are scanning it.
In either case, you want the UML to be a full-fledged member of the network, so you need to take the same care with its security as you do with any physical machine. Make sure that the distribution you are booting in it is reasonably up to date and that you take the same precautions here as you take elsewhere.
With masquerading set up, and a hole poked in the host firewall if necessary, the UML should now be a full member of your network. We can do another simple test to make sure the UML has name service:
UML# host www.user-mode-linux.org
 www.user-mode-linux.org A       66.59.111.166
Now that this works, we can check that we have full Internet access by pinging http://www.user-mode-linux.org:
UML# ping www.user-mode-linux.org
 PING www.user-mode-linux.org (66.59.111.166): 56 data bytes
 64 bytes from 66.59.111.166: icmp_seq=0 ttl=52 time=223.7 ms
 64 bytes from 66.59.111.166: icmp_seq=1 ttl=52 time=38.9 ms

 --- www.user-mode-linux.org ping statistics ---
 3 packets transmitted, 2 packets received, 33% packet loss
 round-trip min/avg/max = 38.9/131.3/223.7 ms
At this point, we can start playing with the UML from the outside. There should be an Apache running inside it, and you should now be able to access it at http://192.168.0.253 with your favorite browser. This is what wget shows from the host:
host% wget http://192.168.0.253
 --16:40:43--  http://192.168.0.253/
            => `index.html'
 Connecting to 192.168.0.253:80... connected.
 HTTP request sent, awaiting response... 200 OK
 Length: 4,110 [text/html]

 100%[====================================>] 4,110 3.92M//s \
     ETA 00:00

 16:40:43 (3.92 MB/s) - `index.html' saved [4110/4110]
This is the default Apache install page. You can now turn your UML instance into a Web server by installing some real content into Apache's html directory. You can figure out where this is by finding httpd.conf under either /etc/apache or /etc/httpd and looking at how it defines DocumentRoot:
UML# grep DocumentRoot /etc/apache/conf/httpd.conf
 # DocumentRoot: The directory out of which you will serve your
 DocumentRoot /var/www
 # This should be changed to whatever you set DocumentRoot to.
 #    DocumentRoot /www/docs/host.some_domain.com
In this case, Apache expects HTML content to be put in /var/www. If you put some Web pages there, they would be visible in your browser on the host.
The next thing many people like to do is remotely log in to their instance. ssh is the usual way to do this, and it works exactly as you'd expect:
host% ssh root@192.168.0.253
 Password:
 Last login: Mon May 23 19:56:28 2005
Here, I logged in as root since that's how I normally log in to a UML instances. If you create an account for yourself and put your ssh public key in it, you'll be able to log in to your instance as yourself, without needing a password, just as you do with any physical machine.
Obviously ssh in the other direction will work just as well. I continue this session by logging back in on the host as myself:
UML# ssh jdike@192.168.0.254
 jdike@192.168.0.254's password:
 host%
You'll want to substitute your own username for mine in the ssh command line.
With Web and ssh access working, it should be clear that the network is operating just as it does with any Linux machine. Now, let's look at another use of the network, X, and how it can be virtualized.
First, let's see that X clients running inside UML can be displayed on the host display. There are several authorization mechanisms in use by X and Xlib to ensure that X applications can connect only to displays they're allowed on. The two most common are xhost and Xauthority. Xauthority authorization relies on a secret (a magic cookie) stored in ~/.Xauthority by the session manager when you log in. A client is expected to read that file; if it can, that is considered evidence that it has sufficient permissions to connect to your display. It presents the contents of the file to the X server, which checks that it really is the contents of your. Xauthority file.
The other mechanism is xhost, which is a simple access control list (ACL) naming remote machines that are allowed to connect to your display. This is less fine-grained than Xauthority since it would allow someone else logged in to a remote machine in your xhost list to open windows on your display. Despite this disadvantage, I will use xhost authorization here.
First, on whatever machine you're sitting in front of (which may not be the UML host, as it is not for me), run xhost:
X-host% xhost
 access control enabled, only authorized clients can connect
This tells us that xhost access is enabled, which is good, and that no one has xhost access to this display. So, let's give access to the UML:
X-host% xhost 192.168.0.253
 192.168.0.253 being added to access control list
 X-host% xhost
 access control enabled, only authorized clients can connect
 INET:192.168.0.253
Your X server may be configured to not accept remote connections. You can check this by running ps to see the full X server command line:
X-host% ps uax | grep X
 root       4215 1.6  2.4  59556 12672 ?      S 10:29      7:44 \
     /usr/X11R6/bin/X :0  -audit 0 -auth /var/gdm/:0.Xauth \
     -nolisten tcp vt7
-nolisten tcp causes any attempts to make X client connections fail with "connection refused." This causes the X server to accept local connections only by accepting them through a UNIX-domain socket. It is not listening to a TCP socket, and it is inaccessible to the network.
To change this, I ran gdmsetup, selected the Security tab, and turned off the "Always disallow TCP connections to X server" option. Other display managers, such as xdm or the KDE display manager, probably have similar setup applications. Then, it's necessary to restart the X server. Logging out usually suffices. You should recheck the X command line after logging back in to see that -nolisten has disappeared. If it hasn't, it may be necessary to kill the display manager to force it to restart.
Now, we need to set our DISPLAY environment variable inside UML to point at our display:
UML# export DISPLAY=192.168.0.254:0
Here I'm assuming that the machine you're using is the UML host and that you chose the IP address we assigned to the host end of the tap device. Any IP address associated with that host, or its name, would work equally well.
Now you should be able to run any X client on the UML and see it display on your screen. Starting with xdpyinfo or xload to see that it basically works is a good idea. What's more fun is xterm. This gives you a terminal on the UML without needing to log into it anymore.
Now that we have X working between the UML and the rest of the world, let's introduce a new sort of virtualization, in keeping with the spirit of this book. It is possible to virtualize X by running a process that appears to be an X server to X clients, and a client to an X server. This application is called Xnest, and its name pretty well describes it. It creates a window on its own X server, which is its own root window, then accepts connections from other clients, displaying their windows on this root window.
This little root window is a totally different display from the main one. There can and generally will be separate session and window managers running on it. They will be completely confined to that window and will not be able to tell that there's anything outside it.
Xnest has nothing to do with UML, but it's easy to draw parallels between them. A good one is between this little root window inside the main one, on the one hand, and the UML filesystem in a host file on the host filesystem, on the other. In both cases, the host sees something, either a file or a window, that, unbeknownst to it, contains a full universe, either the filesystem run by UML or the X session run by Xnest.
Running Xnest is simple:
:0 tells Xnest to become display 0 on the UML instance. On a physical machine with a display already attached to it, you would normally use display 1 or greater. The instance has no incumbent displays, so Xnest can use display 0.
You should now see a largish blank window on your screen. This is the new virtual display. Next, set the DISPLAY environment variable inside UML to use the Xnest display:
At this point, you can run some X clients, and you will see their windows appear within this virtual X display. You will also notice that they have no borders and can't be moved, resized, or otherwise adjusted. The thing to do now is run a window manager so that these windows become controllable. Here, I'm using fvwm, a lightweight, minority window manager:
Now you should see borders around the windows within the Xnest display, and you should be able to move them around just as on your normal display.
To get a bit surreal, let's run an X client on the host, displaying over the network to the UML Xnest, which is displaying back over the network to the host. First, we need to do the same X security things inside the UML instance as we did on the host earlier. For this step, make sure there is some X client attached to the Xnest display through the entire process. The X server reinitializes itself whenever the last client disconnects, and this reinitialization includes resetting the xhost list. This is a problem because xhost itself is a client, and if it is the only one, when it disconnects, it triggers this reinitialization, which unfortunately throws out the permission changes it added.
Running xhost on the UML now shows:
UML# xhost
 access control enabled, only authorized clients can connect
 INET:192.168.0.253
 LOCAL:
So, right now, the UML allows connections from local clients, either connecting over a UNIX domain socket (LOCAL:) or over a local TCP connection. We need to add the host from which we will be running clients and to which we will be ultimately displaying them back:
UML# xhost 192.168.0.254
 192.168.0.254 being added to access control list
 UML# xhost
 access control enabled, only authorized clients can connect
 INET:192.168.0.254
 INET:192.168.0.253
 LOCAL:
Now, if we go back to the host and display to the UML display 0, we should see those clients within the virtual X display:
host% export DISPLAY=192.168.0.253:0
 host% xhost
 access control enabled, only authorized clients can connect
 INET:192.168.0.254
 INET:192.168.0.253
 LOCAL:
 host%  xterm &
 [1] 7535
 host% fvwm &
 [2] 7654
Now, as expected, we have a host window manager and xterm window displaying within the virtual X display running on the UML. Figure 5.3 shows a partial screenshot of a display with an Xnest running from a UML instance. I have xhost set up as described earlier, and the xterm window inside the Xnest is running over the network from a third host. There is also a local xload window and window manager running inside the Xnest.
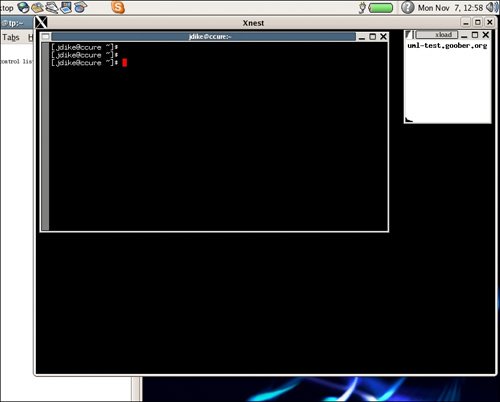
Now, strictly speaking, none of this Xnest stuff required UML. Everything we just did could have been done on the host, with Xnest providing a second display that happens to be shown on part of the first. However, it is a nice example of providing a virtual machine with a new piece of virtualized hardware that behaves just like the equivalent piece of physical hardware. It also shows another instance of constructing this virtual device with part of the equivalent physical hardware. As I pointed out earlier, the analogy of Xnest with other UML devices is more than skin deep. Xnest does have a role to play with UML, even if it was created independent of and earlier than UML, and even if it is rarely required for day-to-day work.
|
|
|
|
|
|
|
|
|
|
|
|
|
|
|
|
|
|
|

 LINUX
LINUX 
 Books
Books
