Инсталляция и загрузка
В предыдущих разделах было описано , как собрать ядро.
Настало время его установить и запустить.
Все команды выполняются из-под рута.
Использование дистрибутивного инсталяционного скрипта
Почти во всех дистрибутивах есть скрипт
installkernel ,
который может быть использован ядром в режиме автомата,
при этом модифицируется бут-лоадер.
Обычно этот скрипт лежит в пакете mkinitrd.
Попробуйте набрать :
make modules_install
Будут проинсталированы все необходимые модули.
Модули лежат в каталоге /lib/modules/
kernel_version
где
kernel_version - версия вашего нового ядра.
После инсталяции модулей можно инсталировать ядро :
# make install
При этом происходит следующее :
-
Проверяется корректность собранного ядра.
-
Ядро статически устанавливается в каталог /boot ,
в названии исполняемого файла ядра при этом присутствует номер версии.
-
Создается ramdisk-образ с использованием модулей и modules_install.
-
В скрипт загрузчика будет добавлена новая строка.
-
Теперь можно попробовать загрузиться.
Новая инсталляция никак не затронет уже существующие версии ядра,
поэтому всегда можно будет сделать откат в случае неудачи.
Инсталяция вручную
Если в вашем дистрибутиве нет installkernel ,
или если вы все хотите сделать вручную, тогда:
Вначале инсталируем модули :
# make modules_install
Далее :
# make kernelversion
2.6.17.11
Версия ядра может различаться.
Используя префикс KERNEL_VERSION , выполняем следующее :
# cp arch/i386/boot/bzImage /boot/bzImage-KERNEL_VERSION
# cp System.map /boot/System.map-KERNEL_VERSION
Вручную редактируем конфиг-файл загрузчика.
Если загрузка не проходит,это может быть из-за отсутствия
ramdisk image.
Для этого нужно выполнить команды , указанные выше.
Можно использовать следующий скрипт для инсталяции ядра :
#!/bin/sh
#
# installs a kernel
#
make modules_install
# find out what kernel version this is
for TAG in VERSION PATCHLEVEL SUBLEVEL EXTRAVERSION ; do
eval `sed -ne "/^$TAG/s/ //gp" Makefile`
done
SRC_RELEASE=$VERSION.$PATCHLEVEL.$SUBLEVEL$EXTRAVERSION
# figure out the architecture
ARCH=`grep "CONFIG_ARCH " include/linux/autoconf.h | cut -f 2 -d "\""`
# copy the kernel image
cp arch/$ARCH/boot/bzImage /boot/bzImage-"$SRC_RELEASE"
# copy the System.map file
cp System.map /boot/System.map-"$SRC_RELEASE"
echo "Installed $SRC_RELEASE for $ARCH"
Редактирование загрузчика
Для линукса есть 2 основных загрузчика- GRUB и LILO.
GRUB используется чаще ,
некоторые вещи в нем сделать легче , чем в LILO, но и LILO неплох.
Рассмотрим их оба.
Для определения типа загрузчика смотрим в каталог /boot.
Если есть grub , то :
$ ls -F /boot | grep grub
grub/
В противном случае смотрим файл /etc/lilo.conf :
$ ls /etc/lilo.conf
/etc/lilo.conf
Если он есть , значит у вас LILO .
Добавление нового ядра и там , и там различны.
GRUB
Нужно отредактировать конфиг /boot/grub/menu.lst.
:
$ info grub
Самый простой способ редактирования - скопировать уже существующий вариант загрузки.
Например , рассмотрим файл menu.lst для Gentoo :
timeout 300
default 0
splashimage=(hd0,0)/grub/splash.xpm.gz
title 2.6.16.11
root (hd0,0)
kernel /bzImage-2.6.16.11 root=/dev/sda2 vga=0x0305
title 2.6.16
root (hd0,0)
kernel /bzImage-2.6.16 root=/dev/sda2 vga=0x0305
Строка , которая начинается со слова title
, обьявляет новую версию ядра.
Нужно просто скопировать блок :
title 2.6.16.11
root (hd0,0)
kernel /bzImage-2.6.16.11 root=/dev/sda2 vga=0x0305
Добавляем этот блок в конец файла,подправляем номер версии,
заголовок особого значения не имеет,
получится что-то типа :
timeout 300
default 0
splashimage=(hd0,0)/grub/splash.xpm.gz
title 2.6.16.11
root (hd0,0)
kernel /bzImage-2.6.16.11 root=/dev/sda2 vga=0x0305
title 2.6.16
root (hd0,0)
kernel /bzImage-2.6.16 root=/dev/sda2 vga=0x0305
title 2.6.17.11
root (hd0,0)
kernel /bzImage-2.6.17.11 root=/dev/sda2 vga=0x0305
Сохраняем файл , перезагружаемся , в меню загрузчика появляется новая строка,
ее и выбираем.
LILO
В LILO нужно модифицировать файл /etc/lilo.conf ,
после чего выполнить команду lilo
:
$ man lilo
Тут все аналогично - копируем существующий раздел :
boot=/dev/hda
prompt
timeout=50
default=2.6.12
image=/boot/bzImage-2.6.15
label=2.6.15
read-only
root=/dev/hda2
image=/boot/bzImage-2.6.12
label=2.6.12
read-only
root=/dev/hda2
Корректируем его :
image=/boot/bzImage-2.6.15
label=2.6.15
read-only
root=/dev/hda2
Окончательно файл будет выглядеть так :
boot=/dev/hda
prompt
timeout=50
default=2.6.12
image=/boot/bzImage-2.6.15
label=2.6.15
read-only
root=/dev/hda2
image=/boot/bzImage-2.6.12
label=2.6.12
read-only
root=/dev/hda2
image=/boot/bzImage-2.6.17
label=2.6.17
read-only
root=/dev/hda2
Сохраним изменения :
# /sbin/lilo
При загрузке выбираем новую строку .
Апгрэйд ядра
Inevitably
it happens: you have a custom-built kernel, working just wonderfully
except for one little thing that you know is fixed in the latest
release from the kernel developers. Or a security problem is found, and
a new stable kernel release is made public. Either way, you are faced
with the issue of upgrading the kernel and you do not want to lose all
the time and effort that went into making that perfect kernel
configuration.
This
chapter is going to show how easy it is to update a kernel from an
older versions, while still retaining all of the configuration options
from the previous one.
First off, please back up the .config file in the kernel source directory. You have spent some time and effort into creating it, and it should be saved in case some - thing goes wrong when trying to upgrade.
$ cd ~/linux/linux-2.6.17.11$ cp .config ../good_config
Only five simple steps are needed to upgrade a kernel from a previously built one:
-
Get the new source code.
-
Apply the changes to the old source tree to bring it up to the newer level.
-
Reconfigure the kernel based on the previous kernel configuration.
-
Build the new kernel.
-
Install the new kernel.
The last two steps work the same as described before, so we will only discuss the first three steps in this chapter.
In
this chapter, we are going to assume that you have built a successful
2.6.17.9 kernel release, and want to upgrade to the 2.6.17.11 release.
Download the New Source
The
Linux kernel developers realize that users do not wish to download the
entire source code to the kernel for every update. That would be a
waste of bandwidth and time. Because of this, they offer a patch that
can upgrade an older kernel release to a newer one.*
On the main kernel.org web
site, you will remember that it contained a list ofthe current kernel
versions that are available for download, as shown in Figure 6-1.
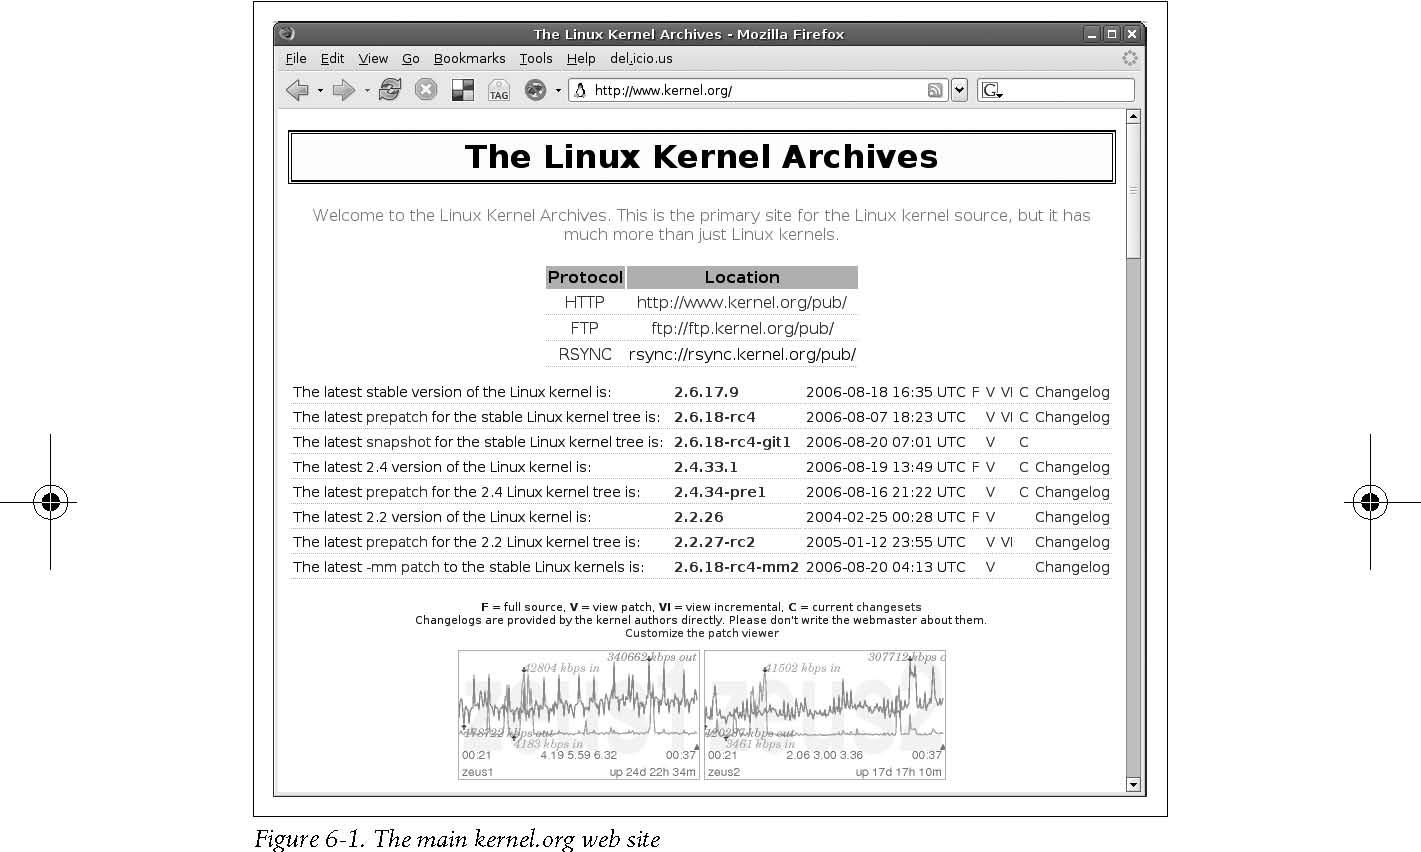
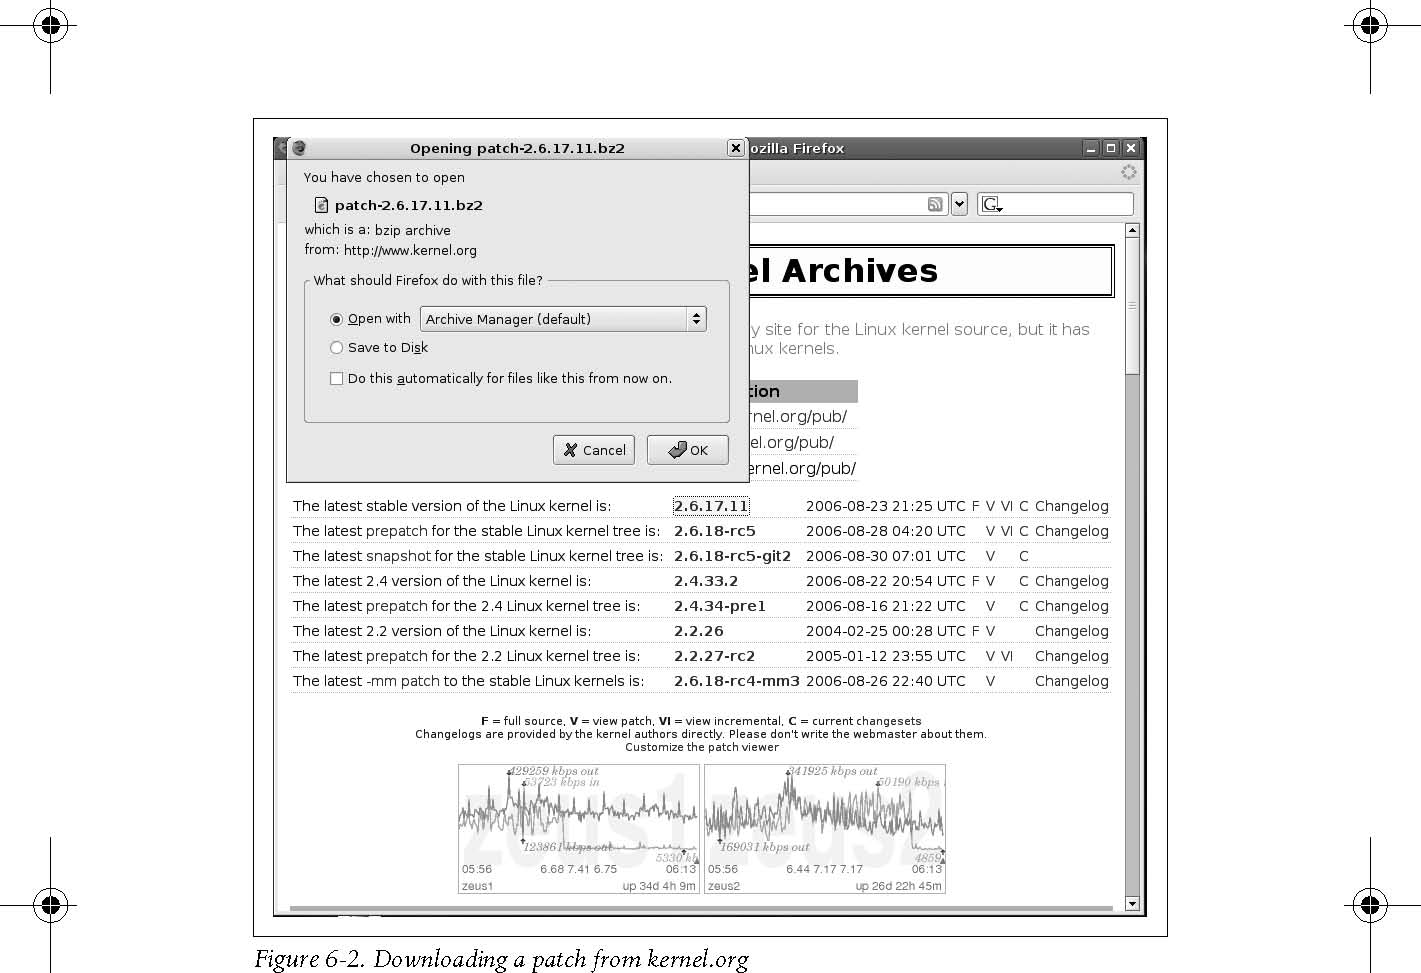
Previously, you used the link pointed to you by the F to
download the entire source code for the kernel. However, if you click
on the name of the kernel release, it will download a patch file
instead, as shown in Figure 6-2.
* It is called patch because the program patch takes the file and applies it to the original tree, creat-ing the new tree. The patch file contains a representation of the changes that are necessary to re-construct
the new files, based on the old ones. Patch files are readable, and
contain a list of the lines that are to be removed and the lines that
are to be added, with some context within the file showing where the
changes should be made.
This is what we want to do when upgrading. But we need to figure out what patch to download.
Which Patch Applies to Which Release?
A
kernel patch file will upgrade the source code from only one specific
release to another specific release. Here is how the different patch
files can be applied:
-
Stable kernel patches apply to the base kernel version. This means that the
-
2.6.17.10 patch
will only apply to the 2.6.17 kernel release. The 2.6.17.10 kernel
patch will not apply to the 2.6.17.9 kernel or any other release.
-
Base
kernel release patches only apply to the previous base kernel version.
This means that the 2.6.18 patch will only apply to the 2.6.17 kernel
release. It will not apply to the last 2.6.17.y kernel release, or any
other release.
-
Incremental
patches upgrade from a specific release to the next release. This
allows developers to not have to downgrade their kernel and then
upgrade it, just to switch from the latest stable release to the next
stable release (remem - ber
that the stable release patches are only against the base kernel, not
the previous stable release). Whenever possible, it is recommended that
you use the incremental patches to make your life easier.
Finding the Patch
As
we want to go from the 2.6.17.9 kernel release, to the 2.6.17.11
release, we will need to download two different patches. We will need a
patch from the 2.6.17.9 release to the 2.6.17.10 release, and then from
the 2.6.17.10 release to the 2.6.17.11 release.*
The
stable and base kernel patches are located in the same directory
structure as the main source trees. All incremental patches can be
found one level lower, in the incr subdirectory. So, to find the patch that goes from 2.6.17.9 to 2.6.17.10, we look in the /pub/linux/kernel/v2.6/incr directory to find the files we need:†
$ cd ~/linux
$ lftp ftp.kernel.org/pub/linux/kernel/v2.6/incr
cd ok, cwd=/pub/linux/kernel/v2.6/incr
lftp ftp.kernel.org:/pub/linux/kernel/v2.6/incr>
ls *2.6.17.9*.bz2
-rw-rw-r--1 536 536 2872 Aug 22 19:23 patch-2.6.17.9-10. bz2
lftp ftp.kernel.org:/pub/linux/kernel/v2.6/incr> get patch-2.6.17.9-10.bz2 2872 bytes transferred
lftp ftp.kernel.org:/pub/linux/kernel/v2.6/incr> get patch-2.6.17.10-11.bz2 7901 bytes transferred
lftp ftp.kernel.org:/pub/linux/kernel/v2.6/incr> exit $
ls -F
good_config linux-2.6.17.9/ patch-2.6.17.10-11.bz2 patch-2.6.17.9-10.bz2
Applying the Patch
As the patches we have downloaded are compressed, the first thing to do is uncompress them with the bzip2 command:
$ bzip2 -dv patch-2.6.17.9-10.bz2
patch-2.6.17.9-10.bz2: done
$ bzip2 -dv patch-2.6.17.10-11.bz2
patch-2.6.17.10-11.bz2: done
$ ls -F
good_config linux-2.6.17.9/ patch-2.6.17.10-11 patch-2.6.17.9-10
Now we need to apply the patch files to the kernel directory. Go into the directory:
$ cd linux-2.6.17.9
Now run the patch program to apply the first patch moving the source tree from the 2.6.17.9 to the 2.6.17.10 release:
$ patch -p1 < ../patch-2.6.17.9-10
* Ifyou
need to upgrade more than two versions, it is recommended as a way to
save steps, to go backward and then upgrade forward. In this case, we
could go backward from 2.6.17.9 to 2.6.17 and then forward from 2.6.17
to 2.6.17.11.
In this example, we use the very good lftp FTP program to download the patch files. Any FTP pro-gram or a web browser can be used to download the same files. The important thing here is to show where the files are located.
patching file Makefile
patching file block/elevator.c
patching file fs/udf/super.c
patching file fs/udf/truncate.c
patching file include/net/sctp/sctp.h
patching file include/net/sctp/sm.h
patching file net/sctp/sm_make_chunk.c
patching file net/sctp/sm_statefuns.c
patching file net/sctp/socket.c
Verify
that the patch really did work properly and that there are no errors or
warnings in the output ofthe patch program. It is also a good idea to
look at the Makefile of the kernel to see the kernel version:
$ head -n 5 Makefile
VERSION = 2
PATCHLEVEL = 6
SUBLEVEL = 17
EXTRAVERSION = .10
NAME=Crazed Snow-Weasel
Now
that the kernel is at the 2.6.17.10 release level, do the same thing as
before, and apply the patch to bring it up to the 2.6.17.11 level:
$ patch -p1 < ../patch-2.6.17.10-11
patching file Makefile
patching file arch/ia64/kernel/sys_ia64.c
patching file arch/sparc/kernel/sys_sparc.c
patching file arch/sparc64/kernel/sys_sparc.c
patching file drivers/char/tpm/tpm_tis.c
patching file drivers/ieee1394/ohci1394.c
patching file drivers/md/dm-mpath.c
patching file drivers/md/raid1.c
patching file drivers/net/sky2.c
patching file drivers/pci/quirks.c
patching file drivers/serial/Kconfig
patching file fs/befs/linuxvfs.c
patching file fs/ext3/super.c
patching file include/asm-generic/mman.h
patching file include/asm-ia64/mman.h
patching file include/asm-sparc/mman.h
patching file include/asm-sparc64/mman.h
patching file kernel/timer.c
patching file lib/spinlock_debug.c
patching file mm/mmap.c
patching file mm/swapfile.c
patching file net/bridge/netfilter/ebt_ulog.c
patching file net/core/dst.c
patching file net/core/rtnetlink.c
patching file net/ipv4/fib_semantics.c
patching file net/ipv4/netfilter/arp_tables.c
patching file net/ipv4/netfilter/ip_tables.c
patching file net/ipv4/netfilter/ipt_ULOG.c
patching file net/ipv4/route.c
patching file net/ipx/af_ipx.c
patching file net/netfilter/nfnetlink_log.c
Again verify that the output of the patch program did not show any errors and look at the Makefile :
$ head -n 5 Makefile
VERSION = 2
PATCHLEVEL = 6
SUBLEVEL = 17
EXTRAVERSION = .11
NAME=Crazed Snow-Weasel
Now
that the source code is successfully updated to the version you wish to
use, it is a good idea to go back and change the directory name to
refer to the kernel version number to avoid confusion at a later time:
$ cd ..$
mv linux-2.6.17.9 linux-2.6.17.11
$ ls -F
good_config linux-2.6.17.11/ patch-2.6.17.10-11 patch-2.6.17.9-10
Reconfigure the Kernel
Previously, we used the make menuconfig or gconfig or xconfig method
to change different configuration options. But once you have a working
configuration, the only thing that is necessary is to update it with
any new options that have been added to the kernel since the last
release. To do this, the make oldconfig and make silentoldconfig options should be used.
make oldconfig takes the current kernel configuration in the .config file, and updates it based on the new kernel release. To do this, it prints out all configura - tion
questions, and provides an answer for them if the option is already
handled in the configuration file. If there is a new option, the
program stops and asks the user what the new configuration value should
be set to. After answering the prompt, the program continues on until
the whole kernel configuration is finished.
make silentoldconfig works exactly the same way as oldconfig , but it does not print anything to the screen, unless it needs to ask a question about a new configura - tion option.
Usually,
when upgrading between different versions of the stable releases, no
new configuration options are added, as this is supposed to be a stable
kernel series. If this happens, there are no new questions that need to
be answered for the kernel configuration, so the program continues
successfully without any need for user intervention. An example of this
is moving from the 2.6.17.9 to 2.6.17.11 release:
$ cd linux-2.6.17.11
$ make silentoldconfig
scripts/kconfig/conf -s arch/i386/Kconfig
#
# using defaults found in .config
#
The following example shows what happens when a new kernel option shows up in a new release. The kernel option to enable Mutex debugging is a new one for certain kernel releases. Here is the output when this happened:
$ make silentoldconfig
scripts/kconfig/conf -s arch/i386/Kconfig
#
# using defaults found in .config
#
*
-
*
-
Restart config...
*
*
-
*
-
Kernel hacking
*
Show timing information on printks (PRINTK_TIME) [Y/n/?] y
Magic SysRq key (MAGIC_SYSRQ) [Y/n/?] y
Kernel debugging (DEBUG_KERNEL) [Y/n/?] y
Kernel log buffer size (16 => 64KB, 17 => 128KB) (LOG_BUF_SHIFT) [16] 16
Detect Soft Lockups (DETECT_SOFTLOCKUP) [Y/n/?] y
Collect scheduler statistics (SCHEDSTATS) [N/y/?] n
Debug slab memory allocations (DEBUG_SLAB) [Y/n/?] y
Memory leak debugging (DEBUG_SLAB_LEAK) [Y/n] y
Mutex debugging, deadlock detection (DEBUG_MUTEXES) [N/y/?] (NEW) y
The configuration program stops at this option and asks for the user to choose an option. Press y , and the program continues on:
Spinlock debugging (DEBUG_SPINLOCK) [Y/n/?] y
Sleep-inside-spinlock checking (DEBUG_SPINLOCK_SLEEP) [Y/n/?] y
kobject debugging (DEBUG_KOBJECT) [N/y/?] n
Highmem debugging (DEBUG_HIGHMEM) [N/y/?] n
Compile the kernel with debug info (DEBUG_INFO) [N/y/?] n
Debug Filesystem (DEBUG_FS) [Y/?] y
Debug VM (DEBUG_VM) [N/y/?] n
Compile the kernel with frame pointers (FRAME_POINTER) [N/y/?] n
Compile the kernel with frame unwind information (UNWIND_INFO) [N/y/?] n
Force gcc to inline functions marked 'inline' (FORCED_INLINING) [N/y/?] n
torture tests for RCU (RCU_TORTURE_TEST) [N/m/y/?] n
Check for stack overflows (DEBUG_STACKOVERFLOW) [N/y/?] n
Stack utilization instrumentation (DEBUG_STACK_USAGE) [N/y/?] n
Stack backtraces per line (STACK_BACKTRACE_COLS) [2] 2 *
* Page alloc debug is incompatible with Software Suspend on i386
*
Write protect kernel read-only data structures (DEBUG_RODATA) [N/y/?] n
Use 4Kb for kernel stacks instead of 8Kb (4KSTACKS) [N/y/?] n
So upgrading the kernel configuration for a new release is as simple as using a different configuration option to make . With this method, you do not need to use the graphical or text-oriented configuration programs for any new kernel update.
Can't This Be Automated?
The
whole process ofdownloading the proper patch file, uncompressing it,
and then applying it seems to be ripe for automating. Kernel developers
being the type that like to automate repetitive tasks, the program ketchup has
been created to handle all ofthis automatically. See Appendix A for
more details on how this program works and how to use it.
Customizing a Kernel
One of the hardest parts of building your own version of the Linux kernel is deter - mining
exactly which drivers and configuration options are needed for your
machine to work properly.This chapter will walk you through this
process of finding and selecting the correct drivers.
Using a Distribution Kernel
One
of the easiest ways to determine which modules are necessary is to
start with the kernel configuration that comes with your distribution’s
kernel package.It is also much easier to determine which drivers are
needed on a running system, where the proper drivers are already bound
to the hardware.
If
you do not already have a Linux distribution installed on the machine
that you are building the kernel for, use a LiveCD version of a
distribution.This allows you to boot Linux on the machine and determine
what kernel configuration options are needed in order to get the
hardware working properly.
Where Is the Kernel Configuration?
Almost all distributions provide the kernel configuration files as part of the distri - bution
kernel package.Read the distribution-specific documentation for how to
find these configurations.It is usually somewhere below the /usr/src/linux/ direc - tory tree.
If the kernel configuration is hard to find, look in the kernel itself.Most distribu - tion kernels are built to include the configuration within the /proc filesystem.To determine if this is true for your running kernel, enter:
$ ls /proc/config.gz
/proc/config.gz
If the /proc/config.gz filename is present, copy this file to your kernel source direc - tory and uncompress it:
$ cp /proc/config.gz ~/linux/
$ cd ~/linux
$ gzip -dv config.gz
config.gz: 74.9% -- replaced with config
Copy this configuration file into your kernel directory and rename it to .config . Then use it as the basis of the kernel configuration to build the kernel as described in Chapter 4.
Using
this configuration file should always generate a working kernel image
for your machine.The disadvantage of this kernel image is that you will
have built almost every kernel module and driver that is present in the
kernel source tree. This is almost never needed for a single machine,
so you can start to turn off different drivers and options that are not
needed.It is recommended that you disable only those options that you
are sure you do not need, as there might be parts of the system that
rely on specific options being enabled.
Finding Which Module Is Needed
A
configuration file that comes from a distribution takes a very long
time to build, because of all of the different drivers being built.You
want to build only the drivers for the hardware that you have, which
will save time on building the kernel, and allows you to build some or
all of the drivers into the kernel itself, possibly saving a bit of
memory, and on some architectures, making for a faster running
system.To cut your drivers down, you need to determine which modules
are needed to drive your hardware.We will walk though two examples of
how to find out what driver is needed to control what piece of
hardware.
Several
locations on your system store useful information for determining which
devices are bound to which drivers in a running kernel.The most
important loca - tion is a virtual filesystem called sysfs. sysfs should always be mounted at the /sys location in your filesystem by the initialization scripts of your Linux distribution. sysfs provides
a glimpse into how the different portions of the kernel are hooked
together, with many different symlinks pointing all around the
filesystem.
In all of the following examples, real sysfs paths
and hardware types are shown. Your machine will be different, but the
relative locations of information will be the same.Do not be alarmed if
the filenames in sysfs are different from your machine; it is to be expected.
Additionally, the internal structure of the sysfs filesystem constantly changes around, due to the reorganization of devices and rethinking by the kernel devel - opers
about how to best display internal kernel structures to
userspace.Because of this, over time, some of the symlinks previously
mentioned in this chapter might not be present.However, the information
is all still there, just moved around a little bit.
Example: Determining the network driver
One
of the most common and important devices in the system is the network
interface card.It is imperative to figure out which driver is
controlling this device and enable it in your kernel configuration so
that networking works properly.
First,
work backward from the network connection name to find out which PCI
device is controlling it. To do this, look at the different network
names:
$ ls /sys/class/net/
eth0 eth1 eth2 lo
The lo directory represents the network loopback device, and is not attached to any real network device.The eth0 , eth1 , and eth2 directories are what you should pay attention to, as they represent real network devices.
To look further at these network devices in order to figure out which you care about, use the ifconfig utility:
|
eth0 |
Link encap:Ethernet HWaddr 00:12:3F:65:7D:C2 |
|
|
inet addr:192.168.0.13 Bcast:192.168.0.255 Mask:255.255.255.0 |
|
|
UP BROADCAST NOTRAILERS RUNNING MULTICAST MTU:1500 Metric:1 |
|
|
RX packets:2720792 errors:0 dropped:0 overruns:0 frame:0 |
|
|
TX packets:1815488 errors:0 dropped:0 overruns:0 carrier:0 |
|
|
collisions:0 txqueuelen:100 |
|
|
RX bytes:3103826486 (2960.0 Mb) TX bytes:371424066 (354.2 Mb) |
|
|
Base address:0xdcc0 Memory:dfee0000-dff00000 |
|
eth1 |
Link encap:UNSPEC HWaddr 80-65-00-12-7D-C2-3F-00-00-00-00-00-00 |
|
|
00-00-00 |
|
|
BROADCAST MULTICAST MTU:1500 Metric:1 |
|
|
RX packets:0 errors:0 dropped:0 overruns:0 frame:0 |
|
|
TX packets:0 errors:0 dropped:0 overruns:0 carrier:0 |
|
|
collisions:0 txqueuelen:1000 |
|
|
RX bytes:0 (0.0 b) TX bytes:0 (0.0 b) |
|
eth2 |
Link encap:UNSPEC HWaddr 00-02-3C-04-11-09-D2-BA-00-00-00-00-00 |
|
|
00-00-00 |
|
|
BROADCAST MULTICAST MTU:1500 Metric:1 |
|
|
RX packets:0 errors:0 dropped:0 overruns:0 frame:0 |
|
|
TX packets:0 errors:0 dropped:0 overruns:0 carrier:0 |
|
|
collisions:0 txqueuelen:1000 |
|
|
RX bytes:0 (0.0 b) TX bytes:0 (0.0 b) |
|
lo |
Link encap:Local Loopback |
|
|
inet addr:127.0.0.1 Mask:255.0.0.0 |
|
|
UP LOOPBACK RUNNING MTU:16436 Metric:1 |
|
|
RX packets:60 errors:0 dropped:0 overruns:0 frame:0 |
|
|
TX packets:60 errors:0 dropped:0 overruns:0 carrier:0 |
|
|
collisions:0 txqueuelen:0 |
|
|
RX bytes:13409 (13.0 Kb) TX bytes:13409 (13.0 Kb) |
From this list, you can tell that the eth0 device is the network device that is active and working, as can be seen by the lines:
eth0 Link encap:Ethernet HWaddr 00:12:3F:65:7D:C2 inet addr:192.168.0.13 Bcast:192.168.0.255 Mask:255.255.255.0
The ouput shows this is an Ethernet device with valid IP (inet ) address assigned to it.
Now that we have determined that we want to make sure the eth0 device
will be working in our new kernel, we need to find which driver is
controlling it.This is simply a matter of walking the different links
in the sysfs filesystem, which can be done in a one-line command:
$ basename `readlink /sys/class/net/eth0/device/driver/module`e1000
The output shows that the module named e1000 is controlling the eth0 network device.The basename command shown compresses the following steps into a single command line:
-
Follow the /sys/class/net/eth0/device symlink into the directory within the /sys/ device/ tree that contains the information for the device that controls eth0 . Note that the /sys/class/net/eth0 directory might also be a symlink on the newer versions of the kernel.
-
Within the directory that describes the device in sysfs , there is a symlink to the driver bound to this device.That symlink is called driver , so we follow that link.
-
Within the directory that describes the driver in sysfs , there is a symlink to the module that this driver is contained within.That symlink is called module . We want the target of that symlink.To get the target, we use the readlink command, which produces output such as:
$ readlink /sys/class/net/eth0/device/driver/module
../../../../module/e1000
4. Because we care only about the name of the module, we want to strip the rest of the path off the output of the readlink command, and only save the right-most portion.That is what the basename command does.Executed directly on a pathname, it would produce:
$ basename ../../../../module/e1000
e1000
So we put the output of the long symlink traversal to the readlink location into the basename program, enabling the whole process to be done in one line.
Now
that we have the module name, we need to find the kernel configuration
option that controls it.You can look through the different network
device config - uration menus or search the kernel source code itself to make sure you have the right option:
$ cd ~/linux/linux-2.6.17.8
$ find -type f -name Makefile | xargs grep e1000 ./drivers/net/Makefile:obj-$(CONFIG_E1000)
+= e1000/ ./drivers/net/e1000/Makefile:obj-$(CONFIG_E1000) += e1000.o
./drivers/net/e1000/Makefile:e1000-objs := e1000_main.o e1000_hw.o
e1000_ ethtool.o e1000_param.o
Remember to replace the e1000 used for this example with the name of the module that you are looking to find.
The important thing to look for in the output of the previous find command is any line that has the term CONFIG_ in
it.That is the configuration option that the kernel needs to have
enabled in order to build the module.In the above example, the option CONFIG_E1000 is the configuration option that you are looking for.
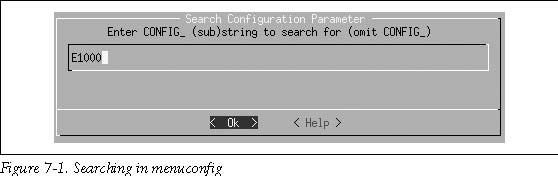
Now you have the information you need to configure the kernel.Run the menu configuration tool:
$ make menuconfig
Then press the / key (which initiates a search) and type in the configuration option, minus the CONFIG_ portion of the string.This process is shown in Figure 7-1.
The kernel configuration system will then tell you exactly where to select the option to enable this module. See Figure 7-2.
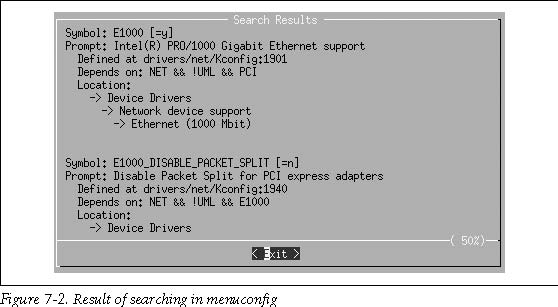
The
first item in the display exactly matches what you searched for.The
location information in the display tells you that to build the module E1000 into the kernel, and the following configuration option must be enabled:
Device Drivers
Network device support
[*] Network device support
Ethernet (1000 Mbit)
[*] Intel(R) PRO/1000 Gigabit Ethernet support
These steps will work for any type of device active in the kernel.
Example: A USB device
As
another example, let’s look at a USB-to-serial converter that is
present in our example system.It is currently connected to the /dev/ttyUSB0 port, so you need to look in the sysfs tty section:
$ ls /sys/class/tty/ | grep USB
ttyUSB0
You can trace through sysfs for this device to find the controlling module, as shown in the previous section:
$ basename `readlink /sys/class/tty/ttyUSB0/device/driver/module`
pl2303
Then search the kernel source tree to find the configuration option that you need to enable:
$ cd ~/linux/linux-2.6.17.8
$ find -type f -name Makefile | xargs grep pl2303
./drivers/usb/serial/Makefile:obj-$(CONFIG_USB_SERIAL_PL2303) += pl2303.o
Use the kernel configuration tool, as shown in Figure 7-3, to find the proper
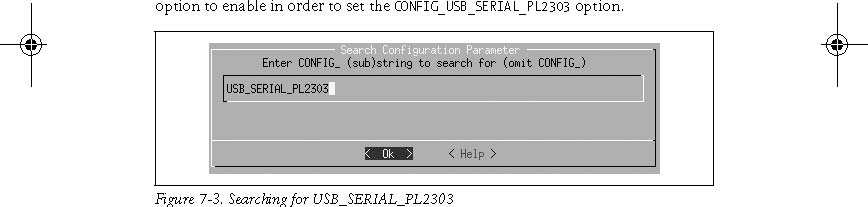
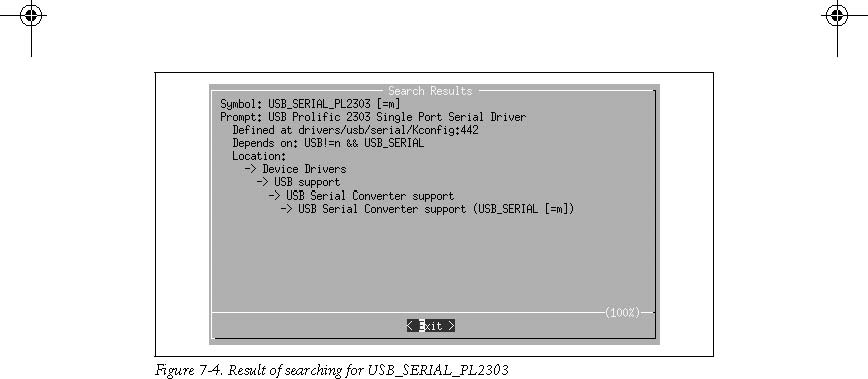
In our case, this displays the screen shown in Figure 7-4.
This shows exactly where to find the USBProlific2303SinglePortSerialDriver option that is needed to control this device properly.
Summary of device discovery
In summary, here are the steps needed to find the driver for a device that has a working driver already bound to it:
-
Find the proper sysfs class device that the device is bound to.Network devices are listed in /sys/class/net and tty devices in /sys/class/tty .Other types of devices are listed in other directories in /sys/class , depending on the type of device.
-
Trace through the sysfs tree to find the module name that controls this device.It will be found in the /sys/class/class_name/device_name/device/driver/ module , and can be displayed using the readlink and basename applications:
$ basename `readlink /sys/class/class_name/device_name/device/driver/ module`
3. Search the kernel Makefiles for the CONFIG_ rule that builds this module name by using find and grep :
$ find -type f -name Makefile | xargs grep module_name
4. Search
in the kernel configuration system for that configuration value and go
to the location in the menu that it specifies to enable that driver to
be built.
Let the kernel tell us what we need
Now that we have gone through all of the steps of poking around in sysfs and following symlinks to module names, here is a very simple script that will do all of that work, in a different way:
#!/bin/bash
#
# find_all_modules.sh
#
for i in `find /sys/ -name modalias -exec cat {} \;`; do
/sbin/modprobe --config /dev/null --show-depends $i ;
done | rev | cut -f 1 -d '/' | rev | sort -u
You
can download an example file containing this script from the book’s web
site, provided in the “How to Contact Us” section of the Preface.
This script goes through sysfs and finds all files called modalias .The modalias file contains the module alias that tells the modprobe command
which module should be loaded to control this device.The module alias
is made up of a combination of device manufacturer, ID, class type, and
other unique identifiers for that specific type of device.All kernel
driver modules have an internal list of devices that they support that is generated automatically by the list of devices the driver tells the kernel it supports.The modprobe looks
through this list of devices by all drivers and tries to match it up
with the alias it has.If it finds a match, it will then load the module
(this procedure is how the automatic driver loading functionality in
Linux works).
The script has the modprobe program
stop before actually loading the module, and just print out what
actions it would take.This gives us a list of all of the modules that
are needed to control all devices in the system.A little cleaning up of
the list, by sorting it and finding the proper field to display,
results in this output:
$ find_all_modules.sh
8139cp.ko
8139too.ko
ehci-hcd.ko
firmware_class.ko
i2c-i801.ko
ieee80211.ko
ieee80211_crypt.ko
ipw2200.ko
mii.ko
mmc_core.ko
pcmcia_core.ko
rsrc_nonstatic.ko
sdhci.ko
snd-hda-codec.ko
snd-hda-intel.ko
snd-page-alloc.ko
snd-pcm.ko
snd-timer.ko
snd.ko
soundcore.ko
uhci-hcd.ko
usbcore.ko
yenta_socket.ko
This is a list of all of the modules that are needed to control the hardware in the machine.
The script will also probably print out some error messages that look like:
FATAL: Module pci:v00008086d00002592sv000010CFsd000012E2bc03sc00i00 not
found.
FATAL: Module serio:ty01pr00id00ex00 not found.
Which
means that it could not find a module that can control that device.Do
not be concerned about this, as some devices do not have kernel drivers
that will work for them.
Determining the Correct Module from Scratch
Sometimes
you do not have the option of getting a distribution kernel working on
a machine in order to determine what kernel modules are needed to drive
the hardware.Or you have added new hardware to your system, and you
need to figure
out what kernel configuration option needs to be enabled to get it to
work properly.This section will help you determine how to find that
configuration option to get the hardware up and running.
The
easiest way to figure out which driver controls a new device is to
build all of the different drivers of that type in the kernel source
tree as modules, and let the udev startup
process match the driver to the device.Once this happens, you should be
able to work backwards using the steps just discussed to determine the
proper driver needed, and then go back and enable just that driver in
the kernel configuration.
But
if you do not want to build all drivers, or this does not work for some
reason, it will require a bit more work to determine the proper driver
that is needed.The following steps are complex and require digging in
the kernel source code at times.Do not be afraid of this; it will only
help you understand your hardware and the kernel source better.
The
steps involved in matching the driver to the device differ depending on
the type of device that you are working with.We will discuss the two
most common forms of devices in this chapter: PCI and USB devices.The
methods described here will also work with other types of devices.
Also,
it is very important for the kernel to be able to find all of the
filesystems in the system, the most important one being the root
filesystem.We will go into how to do this later in “Root Filesystem.”
PCI Devices
PCI
devices are distinguished by vendor ID and device ID; each combination
of vendor and device ID could require a unique driver.This is the basis
for the research this section shows you.
For
this example, let’s use a PCI network card that is not working with the
currently running kernel version.This example will be different from
your situa - tion,
with different PCI device and bus ID values, but the steps involved
should be relevant to any type of PCI device you wish to find a working
driver for.
First, find the PCI device in the system that is not working.To get a list of all PCI devices, use the lspci program.Because
we care only about Ethernet PCI devices, we will narrow our search of
the PCI devices by searching only for strings containing the term Ethernet (case-insensitive):
$ /usr/sbin/lspci | grep -i ethernet
06:04.0 Ethernet controller: Realtek Semiconductor Co., Ltd. RTL-8139/ 8139C/8139C+ (rev 10)
This is the device we wish to get working.*
* Note
that you can just try searching through the kernel configuration for a
device that matches the string described here, a device from Realtek
Semiconductor with a product name of RTL-8139/8139C/8139C+, but this does not always work.That is why we are taking the long way around in this chapter.
Almost all distributions place the lspci program in the /usr/sbin/ directory, but some place it in other locations.To find out where it is located, enter:
$ which lspci
/usr/sbin/lspci
If you are using a distribution that puts it somewhere else, please use that path whenever we discuss using lspci .
The first few bits of the lspci output show the PCI bus ID for this device, 06:04.0 . That is the value we will use when looking through sysfs in order to find out more information about this device.
Go into sysfs where all of the different PCI devices are listed, and look at their names:
$ cd /sys/bus/pci/devices/
$ ls
0000:00:00.0 0000:00:1d.0 0000:00:1e.0 0000:00:1f.3 0000:06:03.3
0000:00:02.0 0000:00:1d.1 0000:00:1f.0 0000:06:03.0 0000:06:03.4
0000:00:02.1 0000:00:1d.2 0000:00:1f.1 0000:06:03.1 0000:06:04.0
0000:00:1b.0 0000:00:1d.7 0000:00:1f.2 0000:06:03.2 0000:06:05.0
The kernel numbers PCI devices with a leading 0000: that do not show up in the output of the lspci program.* So add the leading 0000: onto the number that you found using lspci and go into that directory:
$ cd 0000:06:04.0
In this directory, you want to know the values of the vendor and device filenames:
$ cat vendor
0x10ec
$ cat device
0x8139
These
are the vendor and device IDs for this PCI device.The kernel uses these
values to match a driver to a device properly.PCI drivers tell the
kernel which vendor and device IDs they will support so that the kernel
knows how to bind the driver to the proper device.Write them down
somewhere, as we will refer to them later.
Now
that we know the vendor and product ID for this PCI device, we need to
find the proper kernel driver that advertises that it supports this
device.Go back to the kernel source directory:
$ cd ~/linux/linux-2.6.17.8/
The most common location for PCI IDs in the kernel source tree is include/linux/ pci_ids.h . Search that file for our vendor product number:
$ grep -i 0x10ec include/linux/pci_ids.h
#define PCI_VENDOR_ID_REALTEK 0x10ec
* Some 64-bit processors will show the leading bus number for PCI devices in the output of lspci, but for the majority of the common Linux machines, it will not show up by default.
The defined value here, PCI_VENDOR_ID_REALTEK is what will probably be used in any kernel driver that purports to support devices from this manufacturer.
To be safe, also look in this file for our device ID, as it is also sometimes described there:
$ grep -i 0x8139 include/linux/pci_ids.h
#define PCI_DEVICE_ID_REALTEK_8139 0x8139
That definition will be useful later.
Now look for driver source files referring to this vendor definition:
$ grep -Rl PCI_VENDOR_ID_REALTEK *
include/linux/pci_ids.h
drivers/net/r8169.c
drivers/net/8139too.c
drivers/net/8139cp.c
We don’t need to look at the first file listed here, pci_ids.h , because that is where we found the original definition.But the files r8139.c , 8139too.c , and 8169cp.c in the drivers/net/ subdirectory should be examined more closely.
Open one of these files in an editor and search for PCI_VENDOR_ID_REALTEK .In the file drivers/net/r8169.c , it shows up in this section of code:
static struct pci_device_id rtl8169_pci_tbl[] = {
{ PCI_DEVICE(PCI_VENDOR_ID_REALTEK, 0x8169), },
{ PCI_DEVICE(PCI_VENDOR_ID_REALTEK, 0x8129), },
|
|
{ PCI_DEVICE(PCI_VENDOR_ID_DLINK, |
0x4300), }, |
|
|
{ PCI_DEVICE(0x16ec, |
0x0116), }, |
|
|
{ PCI_VENDOR_ID_LINKSYS, |
0x1032, PCI_ANY_ID, 0x0024, }, |
|
|
{0,}, |
|
|
}; |
|
|
All PCI drivers contain a list of the different devices that they support.That list is contained in a structure of struct pci_device_id values,
just like this one.That is what we need to look at in order to
determine whether our device is supported by this driver.The vendor
value matches here, but the second value after the vendor is the device
value.Our device has the value 0x8139 , while this driver supports the device values of 0x8169 and 0x8129 for devices with the vendor ID of PCI_VENDOR_ ID_REALTEK . So this driver will not support our device.
Moving on to the next file, drivers/net/8139too.c , we find the string PCI_VENDOR_ ID_REALTEK in the following bit of code:
if
(pdev->vendor == PCI_VENDOR_ID_REALTEK && pdev->device ==
PCI_DEVICE_ID_REALTEK_8139 && pci_rev >= 0x20) {
dev_info(&pdev->dev,
"This (id %04x:%04x rev %02x) is an enhanced 8139C+ chip\n",
pdev->vendor, pdev->device, pci_rev); dev_info(&pdev->dev,
"Use the \"8139cp\" driver for improved performance and stability.\n"); }
The use of the PCI_VENDOR_ID_REALTEK value here also corresponds with the code that checks whether the PCI device ID matches the PCI_DEVICE_ID_REALTEK_8139 value.If
it does, the driver is to print out a message that says: “Use the
8139cp driver for improved performance and stability.” Perhaps we
should look at that driver next.Even if we did not have such a visible
clue, the 8139too.c driver does not have the vendor and device ID pair that we are looking for in a struct pci_ device_id variable, so that gives us the clue that it will not support our device.
Finally, look at the drivers/net/8139cp.c file.It uses the PCI_VENDOR_ID_REALTEK definition in the following code segment:
static struct pci_device_id cp_pci_tbl[] = {
{ PCI_VENDOR_ID_REALTEK, PCI_DEVICE_ID_REALTEK_8139,
PCI_ANY_ID, PCI_ANY_ID, 0, 0, },
{ PCI_VENDOR_ID_TTTECH, PCI_DEVICE_ID_TTTECH_MC322,
PCI_ANY_ID, PCI_ANY_ID, 0, 0, },
{ },
};
MODULE_DEVICE_TABLE(pci, cp_pci_tbl);
Here is a use of both our vendor and device ID values in a structpci_device_id variable. This driver should support our device.
Now
that we have the driver name, we can work backward, as shown in the
first section in this chapter, to find the proper kernel configuration
value that should be enabled to build this driver.
In summary, here are the steps needed in order to find which PCI driver can control a specific PCI device:
-
Find the PCI bus ID of the device for which you want to find the driver, using lspci .
-
Go into the /sys/bus/pci/devices/0000:bus_id directory, where bus_id is the PCI bus ID found in the previous step.
-
Read the values of the vendor and device files in the PCI device directory.
-
Move back to the kernel source tree and look in include/linux/pci_ids.h for the PCI vendor and device IDs found in the previous step.
-
Search the kernel source tree for references to those values in drivers.Both the vendor and device ID should be in a struct pci_device_id definition.
-
Search the kernel Makefiles for the CONFIG_ rule that builds this driver by using find and grep :
$ find -type f -name Makefile | xargs grep DRIVER_NAME
7. Search
in the kernel configuration system for that configuration value and go
to the location in the menu that it specifies to enable that driver to
be built.
USB Devices
Finding
the specific driver for a USB device is much like finding the driver
for a PCI device as described in the previous section, with only minor
differences in finding the bus ID values.
In
this example, let’s find the driver that is needed for a USB wireless
device.As with the PCI device example, the details in this example will
be different from your situation, but the steps involved should be
relevant to any type of USB device for which you wish to find a working
driver.
As with the PCI device, the bus ID must be found for the USB device you wish to find the driver for.To do this, you can use the lsusb program that comes in the usbutils package.
The lsusb program
shows all USB devices attached to the system.As you do not know what
the specific device you’re looking for is called, start by looking at
all devices:
$ /usr/sbin/lsusb
Bus 002 Device 003: ID 045e:0023 Microsoft Corp. Trackball Optical
Bus 002 Device 001: ID 0000:0000
Bus 005 Device 003: ID 0409:0058 NEC Corp. HighSpeed Hub
Bus 005 Device 001: ID 0000:0000
Bus 004 Device 003: ID 157e:300d
Bus 004 Device 002: ID 045e:001c Microsoft Corp.
Bus 004 Device 001: ID 0000:0000
Bus 003 Device 001: ID 0000:0000
Bus 001 Device 001: ID 0000:0000
The devices with an ID of 0000:0000 can be ignored, as they are USB host control - lers that drive the bus itself. Filtering them away leaves us with four devices:
$ /usr/sbin/lsusb | grep -v 0000:0000
Bus 002 Device 003: ID 045e:0023 Microsoft Corp. Trackball Optical
Bus 005 Device 003: ID 0409:0058 NEC Corp. HighSpeed Hub
Bus 004 Device 003: ID 157e:300d
Bus 004 Device 002: ID 045e:001c Microsoft Corp.
Because USB devices are easy to remove, unplug the device you want to find the driver for and run lsusb again:
$ /usr/sbin/lsusb | grep -v 0000:0000
Bus 002 Device 003: ID 045e:0023 Microsoft Corp. Trackball Optical
Bus 005 Device 003: ID 0409:0058 NEC Corp. HighSpeed Hub
Bus 004 Device 002: ID 045e:001c Microsoft Corp.
The third device is now missing, which means the device shown as:
Bus 004 Device 003: ID 157e:300d
is the device you want to find the driver for.
If you replace the device and look at the output of lsusb again, the device number will have changed:
$ /usr/sbin/lsusb | grep 157e
Bus 004 Device 004: ID 157e:300d
This
is because the USB device numbers are not unique, but change every time
a device is plugged in.What is stable is the vendor and product ID,
shown here by lsusb as two four-digit values with a : between them.For this device, the vendor ID is 157e and the product ID is 300d .Write down the values you find, as you will use them in future steps.
As
with the PCI device, we will search the kernel source code for the USB
vendor and product IDs in order to find the proper driver to control
this device.Unfortu - nately, no single file contains all of the USB vendor IDs, as PCI has.So a search of the whole kernel source tree is necessary:
$ grep -i -R -l 157e drivers/*
drivers/atm/pca200e.data
drivers/atm/pca200e_ecd.data
drivers/atm/sba200e_ecd.data
drivers/net/wireless/zd1211rw/zd_usb.c
drivers/scsi/ql1040_fw.h
drivers/scsi/ql1280_fw.h
drivers/scsi/qlogicpti_asm.c
We know this is a USB wireless device, and not an ATM or SCSI device, so we can safely ignore the files found in the atm and scsi directories.That leaves the drivers/ net/wireless/zd1211rw/zd_usb.c filename to investigate.
zd_usb.c shows the string 157e in the following chunk of code:
static
struct usb_device_id usb_ids[] = { /* ZD1211 */ { USB_DEVICE(0x0ace,
0x1211), .driver_info = DEVICE_ZD1211 }, { USB_DEVICE(0x07b8, 0x6001),
.driver_info = DEVICE_ZD1211 }, { USB_DEVICE(0x126f, 0xa006),
.driver_info = DEVICE_ZD1211 }, { USB_DEVICE(0x6891, 0xa727),
.driver_info = DEVICE_ZD1211 }, { USB_DEVICE(0x0df6, 0x9071),
.driver_info = DEVICE_ZD1211 }, { USB_DEVICE(0x157e, 0x300b),
.driver_info = DEVICE_ZD1211 }, /* ZD1211B */ { USB_DEVICE(0x0ace,
0x1215), .driver_info = DEVICE_ZD1211B }, { USB_DEVICE(0x157e, 0x300d),
.driver_info = DEVICE_ZD1211B }, {}
};
Like
PCI drivers, USB drivers tell the kernel what devices they support in
order for the kernel to bind the driver to the device.This is done by
using a struct usb_ device_id variable, as shown here.This is a list of the different vendor and product IDs that are supported by this driver. The line:
{ USB_DEVICE(0x157e, 0x300b), .driver_info = DEVICE_ZD1211 },
shows that our vendor and product IDs are supported by this driver.
Once you have the driver name that is necessary to control this device, work back - ward through the kernel Makefiles , as described earlier in the chapter, to determine how to enable this driver to be built properly.
In summary, the steps needed in order to find which USB driver will control a specific USB device are:
-
Find the USB vendor and product ID of device for which you want to find the driver, using lsusb after adding and then removing the device to see what changes in the list.
-
Search the kernel source tree for the vendor and product ID of the USB device.Both the vendor and product ID should be in a structusb_device_id definition.
-
Search the kernel Makefiles for the CONFIG_ rule that builds this driver by using find and grep :
$ find -type f -name Makefile | xargs grep DRIVER_NAME
4. Search
in the kernel configuration system for that configuration value and go
to the location in the menu that it specifies to enable that driver to
be built.
Root Filesystem
The
root filesystem is the filesystem from which the main portion of the
running system boots.It contains all of the initial programs that start
up the distro, and also usually contains the entire system
configuration for the machine.In short, it is very important, and must
be able to be found by the kernel at boot time in order for things to
work properly.
If your newly configured kernel dies at boot time with an error such as:
VFS: Cannot open root device hda2 (03:02)
Please append a correct "root=" boot option
Kernal panic: VFS: Unable to mount root fs on 03:02
then
the root filesystem wasn’t found.If you are not using a ramdisk image
at boot time, it is usually recommended that you build both the
filesystem that you use for your root partition, and the disk
controller for that disk, into the kernel, instead of having it as a
module.If you use a ramdisk at boot time, you should be safe building
these portions as modules.
How
can you determine whether you are using a ramdisk at boot time? In
Chapter 5 we mention using the distribution installation script to
install the kernel versus doing the installation on your own.If you are
using the distribution installation script, you are probably using a
ramdisk.If you are installing it on your own, you are probably not.
The following subsections show how to let the kernel find the root filesystem during boot.
Filesystem type
First, the type of filesystem that the root partition is using needs to be deter - mined. To do that, look in the output of the mount command:
$ mount | grep " / "
/dev/sda2 on / type ext3 (rw,noatime)
We are interested in the type of the filesystem, which is shown after the word type .In this example, it is ext3 .This is the type of filesystem that the root parti - tion
is using.Go into the kernel configuration system and make sure that
this filesystem type is enabled, as described in Chapter 8.
Disk controller
In the output of the mount command
shown earlier, the first portion of the line shows which block device
the root filesystem is mounted on.In this example, it’s /dev/sda2 .Now
that the filesystem is configured properly in your kernel, you must
also make sure that this block device will also work correctly.To find
out which drivers are needed for this, you need to look at sysfs again.
All block devices show up in sysfs in either /sys/block or in /sys/class/block ,
depending on the version of the kernel you are using.In either
location, the block devices are a tree, with the different partitions
being children of the main device:
$ tree -d /sys/block/ | egrep "hd|sd"
|-- hdc
|-- hdd
`-- sda
|-- sda1
|-- sda2
|-- sda3
Given the information in the mount command, you need to ensure that the sda2 device
is configured properly.Because this is a partition (disk partitions are
numbered, while main block devices are not), the whole sda device must be configured.(Without the main block device, there is no way to access the indi - vidual partitions on that device.)
The sda block
device is represented just like the network device we looked at earlier
in this chapter.There is a symlink in the device’s directory called device that points to the logical device that controls this block device:
$ ls -l /sys/block/sda
...
device -> ../../devices/pci0000:00/0000:00:1f.2/host0/target0:0:0/0:0:0:0
...
Now you need to start walking up the chain of devices in sysfs to find out which driver is controlling this device:
$ ls -l /sys/devices/pci0000:00/0000:00:1f.2/host0/target0:0:0/0:0:0:0
...
driver -> ../../../../../../bus/scsi/drivers/sd
...
Here
we see that the SCSI disk controller driver is responsible for making
this device work.So we know we need to configure SCSI disk support into
our kernel configuration.
Continuing up the directory chain in sysfs , try to find where the driver is that controls the hardware:
$ ls -l /sys/devices/pci0000:00/0000:00:1f.2/host0/target0:0:0
...
There is no link called driver in this directory, so go back up one more level:
$ ls -l /sys/devices/pci0000:00/0000:00:1f.2/host0
...
Again, no driver here. Continuing on up one more level:
$ ls -l /sys/devices/pci0000:00/0000:00:1f.2
...
driver -> ../../../bus/pci/drivers/ata_piix ...
There! This is the disk controller we need to ensure is in our kernel configuration.
So for this root filesystem, we need to enable the ext3 , sd , and ata_piix drivers in our kernel configuration so that we will be able to successfully boot our kernel on this hardware.
Helper Script
As mentioned near the beginning of this chapter, files and directories within sysfs change
from one release of the kernel to another.Here is a script that is
handy in determining the needed kernel driver and module module name
for any device node in the system.It has been developed with the kernel
developers responsible for sysfs and should successfully work on all future versions of the 2.6 kernel.
For instance, it makes short work of the previous example, when you had to get all of the proper drivers for the sda block device:
$ get-driver.sh sda
looking at sysfs device: /sys/devices/pci0000:00/0000:00:1f.2/host0/
target0:0:0/0:0:0:0
found driver: sd
found driver: ata_piix
I can also find all of the proper drivers needed for complex things such as USB-toserial devices:
$ get-driver.sh ttyUSB0
looking at sysfs device: /sys/devices/pci0000:00/0000:00:1d.3/usb4/4-2/4-2. 3/4-2.3:1.0/ttyUSB0
found driver: pl2303 from module: pl2303
found driver: pl2303 from module: pl2303
found driver: usb from module: usbcore
found driver: usb from module: usbcore
found driver: usb from module: usbcore
found driver: uhci_hcd from module: uhci_hcd
You
can download an example file containing this script from the book’s web
site, provided in the “How to Contact Us” section of the Preface.
The script follows:
#!/bin/sh
#
# Find all modules and drivers for a given class device.
#
if [ $# != "1" ] ; then
echo echo "Script to display the drivers and modules for a specified sysfs
class device"
echo "usage: $0 <CLASS_NAME>"
echo
echo "example usage:"
echo " $0 sda"
echo "Will show all drivers and modules for the sda block device."
echo
exit 1
fi
DEV=$1
if test -e "$1"; then
DEVPATH=$1
else
# find sysfs device directory for device
DEVPATH=$(find /sys/class -name "$1" | head -1)
test -z "$DEVPATH" && DEVPATH=$(find /sys/block -name "$1" | head -1)
test -z "$DEVPATH" && DEVPATH=$(find /sys/bus -name "$1" | head -1)
if ! test -e "$DEVPATH"; then
echo "no device found"
exit 1
fi
fi
echo "looking at sysfs device: $DEVPATH"
if test -L "$DEVPATH"; then
# resolve class device link to device directory
DEVPATH=$(readlink -f $DEVPATH)
echo "resolve link to: $DEVPATH"
fi
if test -d "$DEVPATH"; then # resolve old-style "device" link to the parent device
PARENT="$DEVPATH";
while test "$PARENT" != "/"; do
if test -L "$PARENT/device"; then
DEVPATH=$(readlink -f $PARENT/device)
echo "follow 'device' link to parent: $DEVPATH"
break
fi
PARENT=$(dirname $PARENT)
done
fi
while test "$DEVPATH" != "/"; do
DRIVERPATH=
DRIVER=
MODULEPATH=
MODULE=
if test -e $DEVPATH/driver; then
DRIVERPATH=$(readlink -f $DEVPATH/driver)
DRIVER=$(basename $DRIVERPATH)
echo -n "found driver: $DRIVER"
if test -e $DRIVERPATH/module; then
MODULEPATH=$(readlink -f $DRIVERPATH/module)
MODULE=$(basename $MODULEPATH)
echo -n " from module: $MODULE"
fi
echo
fi
DEVPATH=$(dirname $DEVPATH)
done
|
|

 LINUX
LINUX 
 Books
Books
