Что такое связаный список?
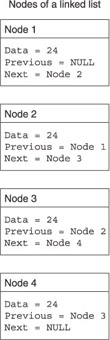
Связаный список состоит из элементов,каждый из которых имеет указатель на предыдущий и следующий элементы.
В этом разделе мы рассмотрим одинарные и двойные связаные списки.
Связанный список
Связанный список-структура данных,которая позволяет менять порядок элементов в нем
без дополнительного выделения памяти.
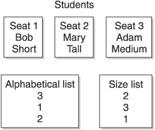
Рассмотрим класс, в котором сидят студенты в произвольном порядке.
У каждого места есть свой уникальный номер.
Учителю нужно рассадить их в алфавитном порядке.
Адам должен сесть на место с номером 1,Боб-на место с номером,Мария-на место с номером 3.
Можно оставить в покое студентов,а взять и составить список,
в котором студенты будут в алфавитном порядке.
Порядок в таком списке будет таков: 3, 1, 2, как на
Figure 6-1.
Можно перевернуть этот список,и порядок в нем будет таков:1, 3, 2, справа на
Figure 6-1.
Перемещаясь по этому списку вниз,учитель видит,какой студент сидит на следующем месте.
То же самое в обратном порядке.
Такой список называется связанным списком,поскольку каждый элемент
связан с предыдущим и со следующим элементом.
Реальный мир и связаные списки
It is very important to keep the real world in mind as you learn how to use a linked list; otherwise, you’ll fall into the trap of thinking that a linked list is an abstract concept that has little use in the real world. Actually, linked lists play a critical role in applications that help companies and governments manage data dynamically.
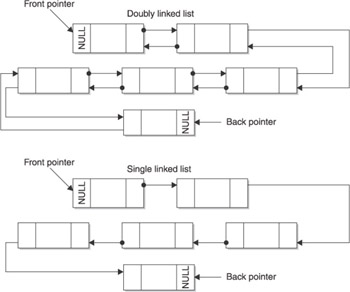
There are two versions of a linked list, a single link and a double link. A single link list enables a program to move through the list in one direction, which is usually from the front of the list moving to the end of the list. A doubly linked list enables the program to move through the list in both directions. We’ll focus on the doubly linked list for most of the examples in this chapter and then discuss the single link list toward the end of the chapter.
Although we’ve mentioned that an entry in a linked list contains data and pointers to the previous and next entries in the list, this is an oversimplification. The data we’re talking about is typically a set of data such as customer information. Customer information could be a customer ID, customer first name, customer last name, customer street address, customer city, customer state, customer ZIP, and so on. Programmers call this a record. This means that an entry in a linked list may contain several data elements. In our example, however, we’ll store only a single value of an integer so that we can focus on the principle of how a linked list works. In reality, you can add as many additional attributes to each node as you need.
Programmers choose linked lists over an array because linked lists can grow or shrink in size during runtime. Another entry can be placed at the end of the last entry on the linked list simply by assigning reference to the new entry in the last entry on the linked list.
Likewise, the last entry can be removed from the linked list by simply removing reference to it in the next element of the second-to-last entry on the linked list. This is more efficient than using an array and resizing at runtime.
If you change the size of the array, the operating system tries to increase the array by using memory alongside the array. If this location is unavailable, then the operating system finds another location large enough to hold elements of the array and new array elements. Elements of the array are then copied to the new location.
If you change the size of a linked list, the operating system changes references to the previous item and the next item on the list, which is fewer steps than changing the size of an array.
The Structure of a Linked List
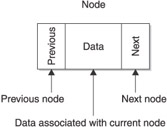
Each entry in a linked list is called a node. Think of a node as an entry that has three subentries. One subentry contains the data, which may be one attribute or many attributes. Another points to the previous node, and the last points to the next node. When you enter a new item on a linked list, you allocate the new node and then set the pointers to previous and next nodes.
Programmers create a node in C++ by using either a structure or a class object; our example uses a structure. As you’ll recall from your C++ programming course, a structure is a user-defined data type. The following example is a structure used to define a node. Figure 6-2 shows a node.
 typedef struct Node
 {
  struct Node(int data)
  {
  this->data = data;
  previous = NULL;
  next = NULL;
  }
  int data;
  struct Node* previous;
  struct Node* next;
 } NODE;
The structure might look a bit strange even if you are familiar with structures because this example uses a pointer to the structure itself as two of its attributes. We’ll clear up any confusion by taking apart this example. The structure is called Node. The name of the structure creates an instance of the structure similar to how you use a constructor to create an instance of a class and data type.
For now, let’s skip the second definition of the structure and turn our attention to the last three statements within the structure. The first statement declares an integer that stores the current data of the node. The next two statements declare pointers to the previous and next nodes in the linked list.
The constructor initializes elements of the node when an instance of the node is created. This works in a similar manner as a class constructor. As you’ll see in “LinkedList Constructor Destructor,” you provide the current data to the structure when you create a new node. This data is assigned to data in the argument list. The value of data is then assigned to the data element of the instance of the structure. Also, reference to the previous and next nodes are initialized to NULL, which tells the program that there are no other elements of the linked list. The NULL is replaced with reference to a node when a new node is added to the linked list.
Single Linked List vs. Doubly Linked List
Programmers call this a doubly linked list or bidirectional (Figure 6-3) because each node contains reference to the previous and next node on the linked list. This enables the programmer to traverse the linked list in both directions by referencing the previous and next nodes. The node can be transformed into a single linked list (Figure 6-3) by only having one pointer in the structure that contains the address of the next node. Typically, a node in a single linked list references the next node and not the previous node, although nothing stops you from creating a backward reference by using only the previous node reference.
The following example is nearly the same as the previous example except this is a single direction node. You’ll notice that reference to the previous node is missing. This means a programmer can only move down the linked list and not in both directions.
  typedef struct Node
 {
  struct Node(int data)
  {
  this->data = data;
  next = NULL;
  }
  int data;
  struct Node* next;
 } NODE;
The Linked List Class
Programmers use a LinkedList class to create and manage a linked list. C++ programmers define their own LinkedList class while Java programmers use the LinkedList collection class. You’ll learn about the LinkedList collection class in the “Linked Lists Using Java” section of this chapter. For now, we’ll focus on defining a LinkedList class in C++.
The LinkedList class definition consists of two data members and six function members, as shown in the example in this section. The two data members are pointers to instances of the Node structure that was defined previously in this chapter. The first pointer, front, references the first node on the linked list. The second pointer, back, references the last node on the linked list.
The six member functions manipulate the linked list. The first member function is the constructor of the LinkedList class and is called when an instance of the class is declared. Following the constructor is the destructor. When you return memory to the operating system by using the delete operator, the destructor is called. If you don’t call the delete operator, then the destructor never gets called and the application causes a memory leak.
The appendNode() member function places a new node at the end of the linked list. The appendNode() requires an integer representing the current data of the node.
The next two member functions display the contents of the linked list. The displayNodes() method displays the linked list in natural order (first to last). The displayNodesReverse() member function displays the linked list in reverse order.
The last member function is destroyList() and is called to remove the instance of the LinkedList from memory.
The LinkedList class specification is defined in the header file, and the implementation is defined in the source file. We’ll take a closer look at the implementation of these member functions in the next few sections of this chapter.
 class LinkedList
 {
  private:
  NODE* front;
  NODE* back;
  public:
  LinkedList();
  ~LinkedList();
  void appendNode(int);
  void displayNodes();
  void displayNodesReverse();
  void destroyList();
 };
LinkedList Constructor Destructor
The LinkedList constructor is a member function that is called when an instance of the LinkedList is declared. The purpose of the constructor in the linked list example is to initialize the front and back pointers as shown in the following definition. Both the front and back pointers are assigned a NULL value, which is used by the appendNode() member function to determine if the linked list is empty. You’ll see how this is done in the next section.
 LinkedList()
 {
  front = NULL;
  back = NULL;
 }
The destructor is a member function called when the instance of the LinkedList class is deleted using the delete operator. In the example shown next, the destructor contains one statement that calls the destroyList() member function.
The destroyList() member function deletes the contents of the linked list but does not delete the linked list itself. That is, it removes all the nodes from the linked list. You’ll see how this is done later in this chapter. The destroyList() also resets the front and back pointers to NULL, signifying the linked list is empty of nodes. The destructor is responsible for deallocating all the memory that was allocated for the linked list. In this case, it would be all the nodes.
You might be wondering why we defined two member functions to perform basically the same task. We do so to enable the programmer to empty the linked list. This way you can reset the contents of the linked list without destroying the instance of the LinkedList class.
 ~LinkedList()
 {
  destroyList();
 }
Appending a Node to a Linked List
The appendNode() member function places a new node at the end of the linked list. There are several steps that must be performed in order to add the node to the list. These are shown in the following definition of the appendNode() member function:
 void appendNode(int data)
 {
  NODE* n = new NODE(data);
  if(back == NULL)
  {
  back = n;
  front = n;
  }
  else
  {
  back->next = n;
  n->previous = back;
  back = n;
  }
 }
The appendNode() member function requires one argument called data, which is the current data for the node. The argument is passed to the instance of the NODE structure. As you’ll recall from previous sections of this chapter, the value passed to the NODE structure is assigned to the data element of the node.
The first statement in the appendNode() member function declares an instance of the NODE structure by using the new operator, which returns a pointer to the instance, which in turn is assigned to a pointer variable called n.
Once the new node is created, the appendNode() member function positions the new node in the linked list. First, it determines if the linked list is empty by comparing the back node to NULL. As you’ll recall, the back node is assigned a NULL when an instance of the LinkedList class is declared and when the destroyList() member function removes all the nodes from the list.
If the linked list is empty, then the new node is assigned to both the back and front pointers. This means that the linked list contains one node after the appendNode() member function is called, which is the new node.
However, if there is at least one node on the linked list, then a little shifting of pointers must be performed. The else statement contains three statements that perform this shifting. The first statement assigns the pointer to the new node to the next pointer of the last node on the linked list. The back pointer is then assigned to the previous pointer of the new node. The new node is then assigned to the back pointer, making the new node the first node on the linked list.
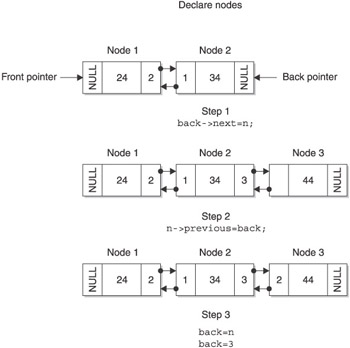
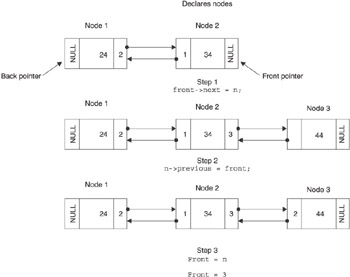
This can be a little confusing, so take a look at Figure 6-4. Figure 6-4 shows nodes of the linked list. Assume that the linked list has two nodes before the new node is appended to the list. This is represented in the top block.
The first step assigns the memory address of the new node to the next member of the back node, which is shown in the second block of memory in Figure 6-4.
The second step assigns the memory address of the back node to the previous member of the new node. This links both nodes.
The third step replaces the memory address of the back node on the linked list with the memory address of the new node. This places the new node at the beginning of the linked list.
Display the Linked List
The displayNodes() member function displays each node of the linked list, beginning with the node at the front of the list and ending with the node at the back of the list. This is shown in the next example:
 void displayNodes()
 {
  cout << "Nodes:";
  NODE* temp = front;
  while(temp != NULL)
  {
  cout << " " << temp->data;
  temp = temp->next;
  }
 }
The displayNodes() member function begins by displaying the word “Nodes:” on the screen and then declares a pointer to a node, which is initialized with the node that appears at the back of the linked list.
Before attempting to display data assigned to the node, displayNodes() determines if there is a node at the back of the linked list. It does so by determining if the node pointed to by the temp pointer is NULL. If so, the linked list is empty and there is nothing to display. If not, the member function proceeds and displays the data assigned to the node located at the back of the linked list.
A space is then displayed, followed by the data assigned the node. The displayNode() member function uses the node’s next member to assign the pointer to the next node to the temp pointer. The process continues by first determining if the node isn’t NULL before displaying the data assigned to the node.
This process ends after the node at the back of the linked list is displayed because the next member of the node at the back of the list is NULL.
Transverse the Linked List
The displayNodesReverse() member function displays the contents of a linked list in reverse order, beginning with the node at the back of the linked list and continuing until the first node is displayed. The following example shows the how this is done:
 void displayNodesReverse()
 {
  cout << "Nodes in reverse order:";
  NODE* temp = back;
  while(temp != NULL)
  {
  cout << " " << temp->data;
  temp = temp->previous;
  }
 }
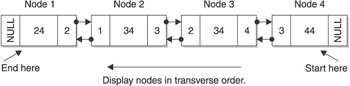
You’ll notice that the displayNodesReverse() member function is nearly the same as the displayNodes() member function described in the previous section. However, there are two important differences between the two member functions. The displayNodesReverse() member function assigns the pointer to the node at the back of the list to the temp pointer, causing the node at the back of the linked list to be displayed first. The displayNodes() member function assigns the back pointer to the temp pointer, causing the last node on the linked list to be displayed.
The other difference between the displayNodesReverse() member function and the displayNodes() member function is that in the displayNodesReverse() member function the previous member of the node is used to determine the next node to display. This enables nodes to be displayed in reverse order. Figure 6-5 illustrates how the linked list is transversed.
Destroying a Linked List
The destroyList() member function removes nodes from the linked list without removing the linked list itself, as shown in the following example. Each node is declared dynamically using the new operator, as you learned previously in this chapter. This enables you to remove the node by using the delete operator.
 void destroyList()
 {
  NODE* temp = back;
  while(temp != NULL)
  {
  NODE* temp2 = temp;
  temp = temp->previous;
  delete temp2;
  }
  back = NULL;
  front = NULL;
 }
The destroyList() member function begins by declaring a temporary pointer that is assigned the pointer to the node that is at the back of the linked list. However, before the node is removed, the member function determines if there is a node at the back of the linked list by testing whether the temp pointer is NULL. If so, then the destroyList() member function assumes there are no nodes on the linked list. If the temp pointer isn’t NULL, then the member function proceeds to delete the node.
Another temporary node is declared and assigned reference to the node pointed to by the temp node. This is done because the temp pointer is assigned the next node that is to be deleted from the linked list in the next statement.
The pointer to the next node is in the next member of the temp node, which is then assigned to the temp pointer. This means that temp2 points to the node at the back of the linked list and temp now points to the node that is immediately previous to the node at the back of the linked list. The node pointed to by temp2 is then deleted, as illustrated in Figure 6-6.
This process continues until all the nodes are removed from the linked list. The final step in the destroyList() member function is to assign NULL values to the front and back of the linked list, which indicates that the linked list is empty of any nodes.
Linked Lists Using C++Now that you know the parts of a linked list and how to create and manipulate the linked list using a class, we’ll put those parts together and create a real-world C++ application that uses a linked list.
Professional programmers organized a linked list C++ application into three files. The first file is the header file that contains the definition of the NODE structure and the LinkedList class definition. The second file is a source code file containing the implementation of member functions of the LinkedList class. The last file is the application file that contains code that creates and uses the LinkedList class.
Let’s begin with the header file. LinkedList.h, shown in the code in this section, is the header file for the C++ linked list example. This file contains two components, the definition of the NODE structure and the definition of the LinkedList class, which programmers called a class specification.
You’ll notice that both components were discussed in detail previously in this chapter. You’ll also notice that the LinkedList class definition does not contain the implementation of member functions. Instead, it contains prototypes of member functions that are implemented in the source file. Keeping the specifications and implementation in separate header and source files is common practice. Parts of the program that use the class only care about the interface functions defined in the header file; they don’t care about the implementation. This also allows you to precompile your source code into library modules so the users of this class need only the headers and modules.
 //LinkedList.h
 typedef struct Node
 {
  struct Node(int data)
  {
  this->data = data;
  previous = NULL;
  next = NULL;
  }
  int data;
  struct Node* previous;
  struct Node* next;
 } NODE;
 class LinkedList
 {
  private:
  NODE* front;
  NODE* back;
  public:
  LinkedList();
  ~LinkedList();
  void appendNode(int);
  void displayNodes();
  void displayNodesReverse();
  void destroyList();
 };
Definitions of member functions for the LinkedList class are contained in the LinkedList.cpp file as shown in the next code in this section. The file begins with a preprocessor statement that tells the preprocessor to reference the contents of the LinkedList.h file during preprocessing. The LinkedList.h file contains the LinkedList class definition and the NODE structure definition, both of which are required to resolve statements in the LinkedList.cpp that refer to the class and node.
Each member function definition is this example is practically the same definition as those discussed in the last several sections of this chapter. The only exception is that reference is made to the LinkedList class in the name of each member function definition. This associates each definition with the LinkedList class for the compiler.
 //LinkedList.cpp
 #include "LinkedList.h"
 LinkedList::LinkedList()
 {
  front = NULL;
  back = NULL;
 }
 LinkedList::~LinkedList()
 {
  destroyList();
 }
 void LinkedList::appendNode(int data)
 {
  NODE* n = new NODE(data);
  if(back == NULL)
  {
  back = n;
  front = n;
  }
  else
  {
  back->next = n;
  n->previous = back;
  back = n;
  }
 }
 void LinkedList::displayNodes()
 {
  cout << "Nodes:";
  NODE* temp = front;
  while(temp != NULL)
  {
  cout << " " << temp->data;
  temp = temp->next;
  }
 }
 void LinkedList::displayNodesReverse()
 {
  cout << "Nodes in reverse order:";
  NODE* temp = back;
  while(temp != NULL)
  {
  cout << " " << temp->data;
  temp = temp->previous;
  }
 }
 void LinkedList::destroyList()
 {
  NODE* temp = back;
  while(temp != NULL)
  {
  NODE* temp2 = temp;
  temp = temp->previous;
  delete temp2;
  }
  back = NULL;
  front = NULL;
 }
The last file is the C++ application that uses the linked list. We call the file LinkedListDemo.cpp, which is shown next. It is amazing that the application itself is so small when compared to all the code used to define the NODE structure and the LinkedList class.
 //LinkedListDemo.cpp
 #include <iostream>
 using namespace std;
 void main(){
  LinkedList * list = new LinkedList();
  list->appendNode(10);
  list->appendNode(20);
  list->appendNode(30);
  list->displayNodes();
  list->displayNodesReverse();
  delete list;}
The application begins by declaring an instance of the LinkedList class. As you recall from earlier in this chapter, the constructor initializes the front and back pointers.
The instance is declared using the new operator. The new operator returns a reference to the memory location of the instance. The same statement declares a pointer to reference a LinkedList. You call this pointer list and assign it the reference to the instance of the LinkedList class.
Next, the appendNode() member function is called three times. The appendNode() member function appends a new node at the back of the linked list and assigns the value passed to the appendNode() member function to the data member of the node.
The last two statements in this example display the data member of each node on the linked list. First, the displayNodes() member function is called to display nodes in natural order, starting with the front of the linked list and ending with the node at the back of the linked list.
Next, the displayNodesReverse() member function is called to do the same as the displayNodes() member function, except it starts with the back node and ends with the front node. The delete operator is then called to delete the instances of the LinkedList class from memory.
Here is the output of the code example:
10
20
30
30
20
10
Chapter 7: Stacks Using Linked Lists
Football fans know that piling on after the whistle will penalize the team (although advertisers love it because it gives broadcasters time to run a few commercials while the officials pull players off the pile). If you are not football fan, “piling on” is the unofficial football term for players jumping on other players during a tackle. If you are a programmer, “piling on” is the unofficial computer term for a stack. You learned about stacks back in Chapter 4 when you discovered how to use an array to create your own stack. However, using arrays presents a problem: you cannot adjust the size of the stack when the program runs. The solution? Use a linked list to create a stack. You learned about linked lists in general in the last chapter. In this chapter, you’ll learn how to use a linked list to create a stack.
A Stack
As you’ll recall from Chapter 4, a stack is a data structure that organizes data similar to how you organize dishes in a stack on your kitchen counter. The newest dish is on top and the oldest is on the bottom of the stack.
When accessing dishes, the last disk on the stack is the first dish removed from the stack. If you want the third dish, you must remove the first two dishes from the top of the stack first so that the third dish becomes the top of the stack and you can remove it. There is no way to remove a dish from anywhere other than the top of the stack. You’d need to use a different kind of data structure (or stacking system) if you wanted to randomly access dishes.
A stack is useful whenever you need to store and retrieve data in last in, first out order. For example, your computer processes instructions using a stack in which the next instruction to execute is at the top of the stack.
LinkedList ClassAlthough we discuss data as being stacked like a stack of dishes, it isn’t physically stacked at all. Instead, data is linked together sequentially in a list, where the last data always appears at the front of the list. Data is removed only from the front of the list.
You create this sequential list by using a linked list. In Chapter 6, you learned that a linked list contains entries called nodes. A node has three subentries, data and two pointers. The data subentry is the data stored on the stack. Pointers point to the previous node and the next node (Figure 7-1). When you enter a new item on a linked list, you allocate the new node and then set the pointers to the previous and next nodes.
A node is defined in C++ by using a structure, which is a user-defined data type. The following structure defines a node:
 typedef struct Node
 {
  struct Node(int data)
  {
  this->data = data;
  previous = NULL;
  next = NULL;
  }
  int data;
  struct Node* previous;
  struct Node* next;
 } NODE;
The structure is called Node. The name of the structure creates an instance of the structure similar to the way a constructor creates an instance of a class and data type. Let’s skip the second definition of the structure and look at the last three statements within the structure because statements at the beginning of the structure actually create an instance of the structure and don’t define the structure. The first statement declares an integer that stores the current data of the node. The next two statements declare pointers to the previous and next nodes in the linked list.
The constructor initializes elements of the node when the node is created, which is similar to the way constructors work in a class definition. You provide the current data to the structure when you create a new node. This data is assigned to data in the argument list, which is then assigned to the data element of the instance of the structure. The previous and next nodes are initialized to NULL , which indicates there are no other elements of the linked list. The NULL is replaced with a reference to a node when a new node is added to the linked list.
As you’ll recall from Chapter 6, a LinkedList class is defined to create and manage a linked list. There are two data members and six function members defined in the LinkedList class. Data members are pointers to instances of the Node structure. The first pointer is called front, and it references the first node on the linked list. The second pointer is called back, and it references the last node on the linked list.
Both the front and back pointers are declared in the protected access specifier area of the class definition because the LinkedList class is inherited by the StackLinkedList class, which you’ll learn about in the “The StackLinkedList Class” section of this chapter. The StackLinkedList class uses the front and back pointers.
The six member functions manipulate the linked list. These function members are the constructor, destructor, appendNode(), displayNodes(), displayReverseNodes(), and destroyNodes(). You learned about them in Chapter 6.
Here is the LinkedList class definition. You’ll notice that this is nearly the same as the LinkedList class definition you saw in Chapter 6, but there is a subtle difference. In Chapter 6, the front and back pointers were declared in the private access specifier area of the class definition. Here they are defined in the protected access specifier area because the StackLinkedList class will use them:
 class LinkedList
 {
  protected:
  NODE* front;
  NODE* back;
  public:
  LinkedList();
  ~LinkedList();
  void appendNode(int);
  void displayNodes();
  void displayNodesReverse();
  void destroyList();
 };
The StackLinkedList ClassAn efficient programmer does not repeat code if possible and instead inherits attributes and behaviors of another class, defining a LinkedList class to create and manipulate a linked list. An efficient programmer might also define a StackLinkedList class to create and manipulate a stack-linked list. The StackLinkedList class inherits attributes and behaviors of the LinkedList class and then defines other behaviors that are necessary to work with a stack-linked list.
In addition to the attributes and behaviors defined in the LinkedList class, the StackLinkedList class requires five behaviors defined as member functions: a constructor and destructor, push(), pop(), and isEmpty(). The StackLinkedList class definition is shown here:
 class StackLinkedList : public LinkedList
 {
  public:
  StackLinkedList();
  virtual ~StackLinkedList();
  void push(int);
  int pop();
  bool isEmpty();
 };
StackLinkedList Constructor and Destructor
The constructor and destructor of the StackLinkedList class may be confusing the first time you look at them because both are empty and there aren’t any instructions specified in the body of the constructor and destructor, as shown here:
 StackLinkedList()
 {
 }
 ~StackLinkedList()
 {
 }
The constructor is empty because the constructor of the LinkedList class is called before the constructor of the StackLinkedList class. You’ll recall that the StackLinkedList class inherits the LinkedList class. The LinkedList class constructor initializes the front and back pointers of the linked list to NULL. Therefore, there is nothing else for the StackLinkedList class constructor to do.
Likewise, the destructor of the LinkedList class is called before the destructor of the StackLinkedList class. The LinkedList class constructor deletes all memory that is associated with the nodes of the linked list. Therefore, the destructor of the StackLinkedList class also has nothing to do.
Pushing a Node onto a Stack-Linked List
In Chapter 4, you learned that data is placed at the top of the stack and removed from the top of the stack. Programmers call this pushing data onto the stack and popping data off the stack. The same steps occur when using a linked list for the stack, but instead of placing data at the next available index in an array, it is placed at the back of the linked list.
You’ll need to define a push() member function for the StackLinkedList class that is called whenever data is added to the stack. Remember that you are really adding a node to the linked list and not simply data. Data is contained in the node.
To add a node to the stack, you use the same steps you use to add a node to a linked list. This means that the appendNode() member function of the LinkedList class can be used to place a new node on the stack. Therefore, all you need is to call the appendNode() member function from the push() member function. Because appendNode() is public, you could just call appendNode directly to push a node onto the stack, but putting a push() function in the stack class makes this more intuitive to somebody using this class. This also helps hide the underlying implementation so using the class is a little more straightforward.
As you’ll recall from Chapter 6, the appendNode() member function requires one argument, which is the data that is assigned to the new node. You must define the push() member function to accept the same data as its argument in order to pass this data to the appendNode() member function. This is illustrated in the following example. The push() member function requires an integer passed as an argument. The integer is then passed to the appendNode() member function within the body of the push() function definition.
 void push(int x)
 {
  appendNode(x);
 }
Popping a Node from a Stack-Linked List
You’ll also need to define a member function to pop a node from the stack. In this example, we’ll call it pop(). Because you’re using the linked list as the stack, the pop() member function must remove the node from the back of the linked list.
Unfortunately, you cannot simply call a member function of the LinkedList class to pop the node off the stack because the LinkedList class doesn’t define a member function that removes a node from the linked list. If you had a member function in the base class for removeBack(), you could call that to pop a node off the list. In this case, you’ll need to define a pop() function in the StackLinkedList class to do this. This will give you a last in, first out access to the stack.
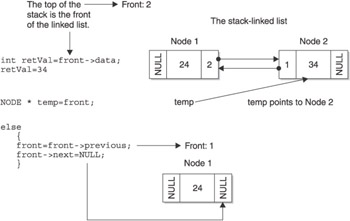
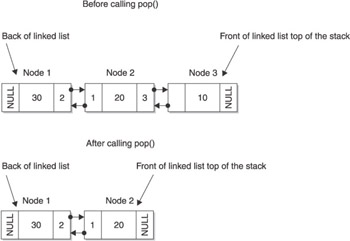
Here is the definition of the pop() member function. Refer to the picture of the stacked linked list in Figure 7-2 as you read to help you understand how the pop() member function works.
 int pop()
 {
  if (isEmpty())
  {
  return -1;
  }
  int retVal = back->data;
  NODE * temp = back;
  if (back->previous == NULL)
  {
  back = NULL;
  front = NULL;
  }
  else
  {
  back = back->previous;
  back->next = NULL;
  }
  delete temp;
  return retVal;
 }
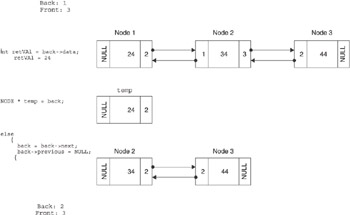
First, you must determine if there is anything on the stack by calling the isEmpty() member function. We’ll show you how this member function works later in this section. For now, understand that the isEmpty() member function returns a Boolean true if the stack is empty, or a Boolean false if it is not. You can see in Figure 7-2 that the stack has two nodes on the stack, so it is not empty. Therefore, the return statement in the if statement is not executed.
The pop() member function refers to the back attribute of the LinkedList class. It is important to remember that the back attribute refers to the top of the stack. Nodes will be removed from the back of the linked list to do a pop operation. Therefore, the value of front is Node 2.
The value of Node 2 is assigned to the retVal variable, which is the value returned by the pop() member function if there is a node on the stack. This pops the value from the stack.
Next, the address of the back node, which is Node 2, is assigned to a temporary pointer. The node that the temporary pointer points to is removed from memory with the delete operator at the end of the pop() member function.
Next, you determine if the node at the back of the stack was the only node on the linked list. You make this determination by seeing if the previous attribute of the node is NULL. If the previous pointer on the back of the list is NULL, this indicates that there’s only one node in the linked list.
Be careful when analyzing the pop() member function. Remember that the back of the linked list is the top of the stack and that the bottom of the stack is the top of the linked list.
If the pop() member function is removing the only node on the stack, then the front and back attributes of the LinkedList class are set to NULL, indicating there are no nodes left on the linked list after the pop() is executed.
However, if there is at least one node on the stack, statements within the else statement are executed, as in Figure 7-2. The first statement within the else statement assigns the previous attribute of the back attribute as the new back. In Figure 7-2, the previous attribute is 1. This tells you that Node 1 comes before Node 2. You then assign Node 1 as the new back of the stack.
Remember that there isn’t a next node on the stack because you are always working with the back of the linked list. Therefore, you need to assign NULL to the next attribute of the back node, which is Node 1. This makes Node 1 at the top of the stack.
The next to last statement removes the node from memory using the delete operator. The temporary pointer points to the memory address of the node that was removed from the stack. The last statement returns the value of the node that was removed from the stack.
Determine If the Stack Is Empty
The pop() member function must determine if the stack is empty, or it will attempt to remove a node that isn’t on the stack. The pop() member function determines if the stack is empty by calling the isEmpty() member function, which you must define as part of the StackLinkedList class.
The isEmpty() member function is a simple function, as shown next. It determines if the stack is empty by seeing if the value of the front attribute of the LinkedList class is NULL. If so, then a Boolean true is returned; otherwise, a Boolean false is returned. If the stack is empty, both front and back are equal to NULL but you only need to check one of them.
 bool isEmpty()
 {
  if(front == NULL)
  {
  return true;
  }
  else
  {
  return false;
  }
 }
StackLinked List Using C++Now that you have an understanding of components, you need to create a stack-linked list. In this section, we’ll focus on assembling them into a working C++ application. Some programmers organize components of a stack-linked list into five files: LinkedList.h, LinkedList.cpp, StackLinkedList.h, StackLinkedList.cpp, and StackLinkedListDemo.cpp. All these files are joined together at compile time to create the executable.
The LinkedList.h file is the header file that contains the definition of the Node structure and the definition of the LinkedList class. The LinkedList.cpp is a source code file that contains the implementation of member functions of the LinkedList class, both of which you learned about in Chapter 6.
The StackLinkedList.h file is the header that contains the definition of the StackLinkedList class. The StackLinkedList.cpp is the source code file that contains the implementation of member functions of the StackLinkedList class.
The StackLinkedListDemo.cpp contains the application. It is here where an instance of the StackLinkedList class is declared and member functions are called.
LinkedList Header File and LinkedList Functions
The LinkedList.h file and the LinkedList.cpp file are shown in the following code. These should look familiar to you because they are the same files described in Chapter 6. However, there is one exception. The front and back attributes defined in the LinkedList class in the LinkedList.h file are defined within the protected access specifier section of the class definition. They appeared within the private access specifier in the sample file in Chapter 6. The StackLinkedList class needs access to these variables, so you protect them so they’re visible to the subclass.
Refer to Chapter 6 for a complete explanation of these files and member functions.
 //LinkedList.h
 typedef struct Node
 {
  struct Node(int data)
  {
  this->data = data;
  previous = NULL;
  next = NULL;
  }
  int data;
  struct Node* previous;
  struct Node* next;
 } NODE;
 class LinkedList
 {
  protected:
  NODE* front;
  NODE* back;
  public:
  LinkedList();
  ~LinkedList();
  void appendNode(int);
  void displayNodes();
  void displayNodesReverse();
  void destroyList();
 };


 //LinkedList.cpp
 #include "LinkedList.h"
 LinkedList::LinkedList()
 {
  front = NULL;
  back = NULL;
 }
 LinkedList::~LinkedList()
 {
  destroyList();
 }
 void LinkedList::appendNode(int data)
 {
 NODE* n = new NODE(data);
  if(back == NULL)
  {
  back = n;
  front = n;
  }
  else
  {
  back->next = n;
  n->previous = back;
  back = n;
  }
 }
 void LinkedList::displayNodes()
 {
  cout << "Nodes:";
  NODE* temp = front;
  while(temp != NULL)
  {
  cout << " " << temp->data;
  temp = temp->next;
  }
 }
 void LinkedList::displayNodesReverse()
 {
  cout << "Nodes in reverse order:";
  NODE* temp = back;
  while(temp != NULL)
  {
  cout << " " << temp->data;
  temp = temp->previous;
  }
 }
 void LinkedList::destroyList()
 {
  NODE* temp = back;
  while(temp != NULL)
  {
  NODE* temp2 = temp;
  temp = temp->previous;
  delete temp2;
  }
  back = NULL;
  front = NULL;
 }
StackLinkedList Header File and StackLinkedList Source File
The StackLinkedList.h file contains the definition of the StackLinkedList class, as shown next. Below the StackLinkedList.h file is the StackLinkedList.cpp file that contains the definitions of member functions.
The class definition and each member function were explained in the “The StackLinkedList Class” section of this chapter.
 //StackLinkedList.h
  class StackLinkedList : public LinkedList
 {
  public:
  StackLinkedList();
  virtual ~StackLinkedList();
  void push(int);
  int pop();
  bool isEmpty();
 };

 //StackLinkedList.cpp
 StackLinkedList.h
 StackLinkedList::StackLinkedList()
 {
 }
 StackLinkedList::~StackLinkedList()
 {
 }
 void StackLinkedList::push(int x)
 {
  appendNode(x);
 }
 int StackLinkedList::pop()
 {
  if(isEmpty())
  {
  return -1;
  }
  int retVal = back->data;
  NODE* temp = back;
  if(back->previous == NULL)
  {
  back = NULL;
  front = NULL;
  }
  else
  {
  back = back->previous;
  back->next = NULL;
  }
  delete temp;
  return retVal;
 }
 bool StackLinkedList::isEmpty()
 {
  if(front == NULL)
  {
  return true;
  }
  else
  {
  return false;
  }
 }
StackLinkedList Application
The StackLinkedListDemo.cpp file contains the actual stack application, as shown in the following code listing. The application begins by declaring an instance of the StackLinkedList class. Remember that this statement also indirectly calls the constructor of the LinkedList class, which is inherited by the StackLinkedList class.
The application then calls the push() member function to push the values 10, 20, and 30 onto the stack. The displayNodes() member function is then called to display the values on the stack. The displayNodes() member function is a member of the LinkedList class and is described in detailed in Chapter 6.
The pop() member function is then called to remove the last node on the stack, which is then displayed on the screen (see Figure 7-3). The program then calls the delete operator to remove the stack from memory.
Here’s the output of this program:
Nodes: 10 20 30 10
 //StackLinkedListDemo.cpp
 #include <iostream>
 using namespace std;
 void main(){
  StackLinkedList* stack = new StackLinkedList();
  stack->push(10);
  stack->push(20);
  stack->push(30);
  stack->displayNodes();
  cout << stack->pop() << endl;
  delete stack;
 }
Chapter 8: Queues Using Linked Lists
Did you ever get ready to queue up to buy tickets for a hot concert, only to stand in the parking lot because there wasn’t room at the ticket counter to accommodate all the fans? This is a common scenario, but you may not realize that programmers experience a similar problem storing data using queues: there is not enough room on the queue for all the data (just like the problem with all the fans) that must be processed. Box office staff still wrestle with this problem, but programmers have arrived with a solution: they use a linked list to create a queue. In this chapter, you’ll learn how and when to use a linked list to queue data.
A Queue
In Chapter 5, you learned that a queue is a sequential organization of data where data is accessible on a first in, first out (fifo) basis, which is similar to the line that you stand in to buy concert tickets.
The queue in Chapter 5 was created using an array to store data. As you’ll recall, the array is separate from the queue. Data is assigned to elements of the array. The queue itself consists of two variables called front and back. Each points to the array element that is at the front of the queue or at the back of the queue. When data is removed from the front of the queue, the program changes the value of the front variable to point to the next array element. However, the data removed from the queue remains assigned to the array. That is, data isn’t removed from memory.
There is a serious problem with using arrays to store data for queues: you must know the size of the array when you write the program. An array can store only a specific maximum number of elements at any point in time, similar to an architect designing a specific space for a box office that can accommodate a maximum number of fans at any point in time.
However, there is a difference between exceeding the number of array elements and overflowing the space around the box office: unlike the stadium, there is no parking lot for fans to gather in while waiting to get in the queue to purchase tickets inside a computer.
Programmers work around the size issue by using a linked list instead of an array when creating a queue. As you learned in previous chapters, a linked list can grow and shrink at runtime based on the needs of the application.
The Linked List QueueConceptually, a linked list queue is the same as a queue built using an array. Both store data. Both place data at the front of the queue and remove data from the front of the queue. However, in an array queue, data is stored in an array element. In a linked list queue, data is stored in a node of a linked list. The linked list queue consists of three major components: the node, the LinkedList class definition, and the QueueLinkedList class definition. Collectively, they are assembled to organized data into a queue.
As you’ll recall from Chapter 6, a node is created in C++ as a user-defined data type structure that contains three elements. These are the data and pointers to the previous node and the next node on the linked list (Figure 8-1). The next code snippet is the user-defined data type structure node that we used in Chapter 6. You’ll be using the following user-defined data type structure in this chapter to create the linked list queue.
The name of the user-defined data structure is called Node in this example and is used within the LinkedList class definition to declare instances of the node. The last three statements in the structure declare an integer that stores the current data and declares two pointers to reference the previous node and the next node on the linked list.
Each time a node is created, the user-defined structure is passed data for the node. Pointers to the previous node and to the next node are assigned NULL, which indicates there isn’t a previous node or next node. NULL is replaced with reference to a node once the new node is added to the linked list.
 typedef struct Node
 {
  struct Node(int data)
  {
  this->data = data;
  previous = NULL;
  next = NULL;
  }
  int data;
  struct Node* previous;
  struct Node* next;
 } NODE;
The LinkedList class creates and manages the linked list. As you’ll remember from Chapter 6, the LinkedList class identifies the node that is the front of the linked list and the node that is at the back of the linked list.
In addition, the LinkedList class defines member functions that manage the linked list. These are the same member functions described in Chapter 6, a constructor and destructor, appendNode(), displayNodes(), displayNodesReverse(), and destroyList().Here is the LinkedList class definition that you’ll use to create the linked list queue:
 class LinkedList
 {
  protected:
  NODE* front;
  NODE* back;
  public:
  LinkedList();
  ~LinkedList();
  void appendNode(int);
  void displayNodes();
  void displayNodesReverse();
  void destroyList();
 };
Programmers usually place the node structure and the LinkedList class definition in the same header file, LinkedList.h. Placing the code needed to create a linked list in one file like this helps keep it organized. Programmers then use the preprocessor directive #include to include LinkedList.h in any program that uses a linked list.
The last component of the linked list queue is the QueueLinkedList class definition. The QueueLinkedList class inherits the LinkedList class and then defines member functions that are specifically designed to manage a queue.
You might wonder why you don’t simply define one class that combines the LinkedList class and the QueueLinkedList class. Intuitively, this seems to be a good idea because everything needed to create a linked list queue is contained in one file. However, doing so repeats code, which is something programmers avoid if possible.
For example, definitions of a node and the LinkedList class would be located in two places. If you needed to upgrade either definition, you’d need to remember all the places where they are defined in your code. A better approach is to place each definition in its own file (for example, LinkedList.h, QueueLinkedList.h) so code won’t be repeated.
Here is the definition of the QueueLinkedList class that you’ll use to create a queue. Programmers save this definition in a file called QueueLinkedList.h. The QueueLinkedList class has five member functions: a constructor and destructor, enqueue(), dequeue(), and isEmpty().
 //QueueLinkedList.h
 #include "LinkedList.h"
 class QueueLinkedList : public LinkedList
 {
  public:
  QueueLinkedList();
  virtual ~QueueLinkedList();
  void enqueue(int);
  int dequeue();
  bool isEmpty();
 };
The constructor and destructor of the QueueLinkedList class are empty, as shown in the next code snippet. The constructor typically initializes data members of an instance of the class. In the case of the linked list queue, initialization is performed by the constructor of the LinkedList class, which is called before the constructor of the QueueLinkedList class. This means there isn’t anything for the constructor of the QueueLinkedList class to do.
The destructor typically frees memory used by an instance of a class. The linked list used for the queue is removed by the destructor of the LinkedList class, which is also called before the destructor of the QueueLinkedList class. Therefore, there isn’t anything for the destructor of the QueueLinkedList to do either.
 QueueLinkedList::QueueLinkedList()
 {
 }
 QueueLinkedList::~QueueLinkedList()
 {
 }
Enqueue
The enqueue() member function of the QueueLinkedList class is called whenever a new node is placed on the queue. As you see from the function definition in the next code snippet, the enqueue() member function is sparse because it contains only one statement, which calls the appendNode() member function of the LinkedList class.
You don’t have to include additional statements in the enqueue() member function because placing a node on the queue is the same process as appending a node to the linked list. Each new node is placed at the back of the linked list. Therefore, the appendNode() member function is all you need.
You may wonder why the new node is being placed on the back of the queue, but it’s just because you’re reusing the same code in the LinkedList class. The new node will be placed on the back of the queue like a line at the grocery store. Nodes will be pulled off the front.
The enqueue() member function has one argument, which is the data that is being assigned to the new node. In this example, the node is used to store an integer. However, you can store any type of data in a node. In fact, the data can be a pointer to a set of data such as student information. To change this example from integer data to another type of data, you’d need to change the data element in the Node structure to reflect the type of data you want to store in the node.
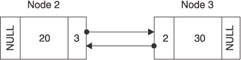
Data received by the enqueue() member function is passed to the appendNode() member function. Figure 8-2 illustrates how the appendNode() member function places a new node at the back of the linked list. At the top of the illustration is a linked list that contains two nodes. The appendNode() is then called to add a new node to the back of this linked list.
The first step in this process assigns a reference to the new node to the next member of the front node. The front node is Node 2 and is assigned the reference Node 3 as the value of the next node in the linked list. This makes Node 3 the back of the linked list.
The second step assigns reference to Node 2 as the value of the previous node in Node 3. This means the program looks at the value of the previous node of Node 3 to know which node comes before Node 3 in the linked list.
The last step is to assign Node 3 as the new value of the back data member of the LinkedList class.
 void enqueue(int x)
 {
  appendNode(x);
 }
Dequeue
The dequeue() member function of the QueueLinkedList class removes a node from the front of the queue. Unfortunately, there aren’t any member functions in the LinkedList class that remove a node from the back of the linked list. Therefore, the dequeue() member function must do the job.
The dequeue() function begins by determining if there are any nodes on the queue by calling the isEmpty(). The isEmpty() member function returns a Boolean true if the queue is empty, in which case the dequeue() returns a –1. A Boolean false is returned if there is at least one node on the queue.
Figure 8-3 shows how the dequeue() member function works. You’ll notice there are three nodes on the queue, so the isEmpty() member function returns a Boolean false, causing the program to remove the front node from the queue.
The removal process starts by assigning the data of the node at the front of the queue to a variable called retVal. The value of the retVal is returned by the dequeue() member function in the last statement of the function.
Next, reference to the front node is assigned to the temp variable pointer. The delete operator later in the function uses the temp variable to remove the back node from memory.
Next, the function determines if there is another node on the queue by examining the value of the next member of the front node. If the value of the next member is NULL, there aren’t any other nodes on the queue. In this case, the front and back members of the LinkedList class are set to NULL, indicating that the queue is empty.
However, if the next member of the front node is not NULL, the value of the next member of the front node is assigned to the front member of the LinkedList class. In this example, Node 2 is the next node following Node 1. Node 2 becomes the new front of the queue.
Notice that the previous member of Node 2 is set to Node 1. However, Node 1 no longer exists. Therefore, the previous member must be set to NULL because there isn’t a previous node. Node 2 is the front of the queue.
The temp node is then deleted from memory. Remember that the temp node is a pointer that points to Node 1, and Node 1 no longer exists in memory. The final statement returns the value of the retVal variable, which is the data that was stored in Node 1.
 int dequeue()
 {
  if(isEmpty())
  {
  return -1;
  }
  int retVal = front->data;
  NODE* temp = front;
  if(front->next == NULL)
  {
  back = NULL;
  front = NULL;
  }
  else
  {
  front = front->next;
  front->previous = NULL;
  }
  delete temp;
  return retVal;
 }
The isEmpty() member function determines if there are any nodes on the queue, which is called by the dequeue() member function. The isEmpty() member function examines the value of the front data member of the LinkedList class. If the value of front is NULL, then the queue is empty; otherwise, the queue has at least one node.
The isEmpty() member function returns a Boolean true if the value of front is NULL, otherwise a Boolean false is returned as shown in the definition of the isEmpty() here:
 bool isEmpty()
 {
  if(front == NULL)
  {
  return true;
  }
  else
  {
  return false;
  }
 }
Linked List Queue Using C++Now that you understand how to create a queue using a linked list, let’s assemble all the pieces and build a working queue in C++. Programmers organize an application into several files, each containing a distinct component of the application.
In the case of the demo queue application illustrated next, there are five distinct components: the driver file (QueueLinkedListDemo.cpp), the header file that contains the definition of the node and the LinkedList class (LinkedList.h), the file that contains the implementation of member functions of the LinkedList class (LinkedList.cpp), the header file that contains the definition of the QueueLinkedList class (QueueLinkedList.h), and the file that contains the implementation of member functions of the QueueLinkedList class (QueueLinkedList.cpp).
The application is called QueueLinkedListDemo, and it uses a linked list to create a queue, as shown in the next code. The application begins by declaring an instance of the QueueLinkedList class using the new operator. It then declares a pointer to an instance of the QueueLinkedList. The pointer is called queue, which is assigned a reference to the instance created by the new operator.
The enqueue() member function is then called three times, each time another node is placed on the queue. The queue shown in Figure 8-4 depicts the queue after the last time the enqueue() method is called.
The dequeue() member function is then called to remove the first node from the queue and display its data member on the screen. Figure 8-5 shows the queue after the dequeue() member function is called.
The last statement in the program removes the queue from memory.
Each of the remaining components of the application was discussed in the previous section.
 //QueueLinkedListDemo.cpp
 #include <iostream>
 using namespace std;
 void main(){
  QueueLinkedList* queue = new QueueLinkedList();
  queue->enqueue(10);
  queue->enqueue(20);
  queue->enqueue(30);
  cout << queue->dequeue() << endl;
  delete queue;
 }

 //LinkedList.h
 typedef struct Node
 {
  struct Node(int data)
  {
  this->data = data;
  previous = NULL;
  next = NULL;
  }
  int data;
  struct Node* previous;
  struct Node* next;
 } NODE;
 class LinkedList
 {
  protected:
  NODE* front;
  NODE* back;
  public:
  LinkedList();
  ~LinkedList();
  void appendNode(int);
  void displayNodes();
  void displayNodesReverse();
  void destroyList();
 };

 //LinkedList.cpp
 #include "LinkedList.h"
 LinkedList::LinkedList()
 {
  front = NULL;
  back = NULL;
 }
 LinkedList::~LinkedList()
 {
  destroyList();
 }

 void LinkedList::appendNode(int data)
 {
  NODE* n = new NODE(data);
  if(front == NULL)
  {
  back = n;
  front = n;
  }
  else
  {
  back->next = n;
  n->previous = back;
  back = n;
  }
 }

 void LinkedList::displayNodes()
 {
  cout << "Nodes:";
  NODE* temp = front;
  while(temp != NULL)
  {
  cout << " " << temp->data;
  temp = temp->next;
  }
 }

 void LinkedList::displayNodesReverse()
 {
  cout << "Nodes in reverse order:";
  NODE* temp = back;
  while(temp != NULL)
  {
  cout << " " << temp->data;
  temp = temp->previous;
  }
 }

 void LinkedList::destroyList()
 {
  NODE* temp = back;
  while(temp != NULL)
  {
  NODE* temp2 = temp;
  temp = temp->previous;
  delete temp2;
  }
  back = NULL;
  front = NULL;
 }

 //QueueLinkedList.h
 #include "LinkedList.h"
 class QueueLinkedList : public LinkedList
 {
  public:
  QueueLinkedList();
  virtual ~QueueLinkedList();
  void enqueue(int);
  int dequeue();
  bool isEmpty();
 };

 //QueueLinkedList.cpp
 #include "QueueLinkedList.h"
 QueueLinkedList::CQueueLinkedList()
 {
 }
 QueueLinkedList::~CQueueLinkedList()
 {
 }
 void QueueLinkedList::enqueue(int x)
 {
  appendNode(x);
 }

 int QueueLinkedList::dequeue()
 {
  if(isEmpty())
  {
  return -1;
  }
  int retVal = front->data;
  NODE* temp = front;
  if(front->next == NULL)
  {
  back = NULL;
  front = NULL;
  }
  else
  {
  front = front->next;
  front->previous = NULL;
  }
  delete temp;
  return retVal;
 }

 bool QueueLinkedList::isEmpty()
 {
  if(front == NULL)
  {
  return true;
  }
  else
  {
  return false;
  }
 }
Chapter 9: Stacks and Queues: Insert, Delete, Peek, Find
When you began learning about programming, you probably started with a bare-bones computer and then, once you learned how to program, you probably traded up for a system that had all the bells and whistles. Learning how to use the LinkedList class works in a similar way. The LinkedList class has basic functionality that is useful when working with stacks and queues. However, it lacks powerful features that are required to build industrial-strength applications. Now it is time to learn how to use those features and upgrade the LinkedList class. We’ll teach you how to do that in this chapter by introducing insert, peek, delete, and find functionality to the LinkedList class and showing you how to use them in your stack and queue applications.
The Enhanced LinkedList Class
You might wonder why you need to enhance the LinkedList class that was defined in previously chapters. The simple answer is that you can increase the efficiency of the LinkedList class and make it easier to use if you increase the functionality of the class.
As you’ll recall, the LinkedList class creates an instance of the structure Node that is defined in LinkedList.h. The Node structure has three elements: the data stored in the node, a reference to the next node, and the previous node on the linked list.
The LinkedList class that you used in previous chapters contains two data members and six member functions. The data members are references to the node that is at the front of the linked list and reference to the node that is at the back of the linked list.
The LinkedList class has member functions that append a node to the linked list and display data assigned to nodes in forward or reverse order, as well as a function to destroy the linked list. In addition, the LinkedList class has a constructor and destructor.
These data members and member functions are the barebones that are necessary for the LinkedList class to operate. Now you’ll take a few steps forward and increase the functionality of the LinkedList class to make it more useful when working with a linked list application.
The first enhancement is to define a new data member called size. The size data member is an integer that represents the number of nodes that are in the linked list. (The index is used, but size determines whether the list is empty or you passed an invalid index.) It can be used any time the application needs to know the size of the linked list.
Next, you need to define additional member functions, the first of which is the removeNode() function. The removeNode() function enables you to easily remove a node from the linked list by specifying a reference to the node. The removeNode() function then removes the node and relinks the link list. This function is protected because it’s only used internally. The user of this class would not know the pointers to the individual nodes. This is a convenient function to remove nodes.
Another useful function that you’ll define is removeNodeAt(), which removes a node at a particular location in the linked list. The order in which nodes appear on the list is referred to as the index order. The position of a node on the linked list is referred to as the node’s index. The index is passed to the removeNodeAt() function to specify the node that is to be removed from the linked list. The removeNodeAt() function then removes the node and relinks the linked list. The node on the front of the list is index 0; it then increments by one, moving toward the back of the list. The appendNode() function adds nodes to the back of the linked list, so you can think of this as a dynamic array moving from front to back.
Sometimes you may not know the index of the node that you want to remove from the linked list. In that case, you need to define another function that removes a node based on the data of the node, not the node’s index. You can call this function deleteNode(). The deleteNode() differs from the removeNodeAt() function by the way the function identifies the node to remove from the linked list. The removeNodeAt() function locates the node to remove by using the node’s index value. The deleteNode() locates the node to remove by using the value of the data of the node, which is passed to the deleteNode() function.
So far in this book, you’ve accessed nodes on a linked list in sequential order. However, nodes are accessed randomly in some real-world applications. The next new function that you’ll define for the LinkedList class enables you to access a specific node. This function is called findNode(), and it is used when you know the data contained in the node but you don’t know the position of the node on the linked list. To locate the node, you provide the function with the data stored in the node. The findNode() function returns the index of the node.
The original LinkedList class is capable of appending a new node to the linked list. There will be situations when you’ll want to insert a new mode somewhere in the middle of the linked list. To do this, you need to define the insertNodeAt() function. The insertNodeAt() function will require two parameters. The first parameter is the index of the node that will be moved in the linked list to make room for the new node. This becomes the index of the new node. The second parameter is the data that will be assigned to the new node. The insertNodeAt() function creates the new node and adjusts references within the linked list to link the new node to other nodes in the linked list.
Another major enhancement to the LinkedList class is to retrieve data that is stored at a specific node. Previously, two display functions were the only functions that you could use to see the data in the linked list (these function didn’t return anything, they just count all the nodes). Both functions print out all the data stored in a linked list. Call the new function peek(). The peek() function requires that you pass it the index of the node that contains the data you want to retrieve. It then returns the data stored at that node.
The last enhancement that you’ll make to the LinkedList class is to define a function that returns the number of nodes contained on the linked list. Call this function getSize() and use it whenever you need to determine the size of the linked list.
The following example is the revised LinkedList.h file that contains the definitions of the node structure and the enhanced LinkedList class. Notice that the size data member and the removeNode() member function are placed within the protected access specifier area of the class definition. This is because neither is directly used by the application. Instead, they are used by member functions of the LinkedList class and by member functions that inherit from the LinkedList class.
All the other member functions are placed in the public access specifier area of the LinkedList class definition and are available for direct use by the application. You’ll learn how each new member function works in forthcoming sections of this chapter.
//LinkedList.h
 typedef struct Node
 {
  struct Node(int data)
  {
  this->data = data;
  previous = NULL;
  next = NULL;
  }
  int data;
  struct Node* previous;
  struct Node* next;
 } NODE;
 class LinkedList
 {
  protected:
  NODE* front;
  NODE* back;
  int size;
  void removeNode(NODE* node);
  public:
  LinkedList();
  virtual ~LinkedList();
  void appendNode(int);
  void displayNodes();
  void displayNodesReverse();
  void destroyList();
  void removeNodeAt(int);
  int findNode(int);
  void deleteNode(int);
  void insertNodeAt(int,int);
  int peek(int);
  int getSize();
 };
removeNode(), removeNodeAt(), anddeleteRemove()
Removing a node from a linked list is a tricky operation. First, you must disconnect the node from the linked list. However, doing so breaks the link. There is no longer anything connecting the previous node and the next node because the node you removed was the link between them. This means that after removing a node, you must link together the previous node and the next node.
You can enhance the LinkedList class to include three member functions that remove a node from a linked list and then connect the previous node and next node to each other. These functions are removeNode(), removeNodeAt(), and deleteNode().
The removeNode() function is passed a reference to the node that is to be removed from the linked list and is called by the removeNodeAt() function and the deleteNode() function. You cannot call the removeNode() function directly from the application because it is a protected member of the class.
The removeNodeAt() function uses the index of a node to locate the node that is to be removed. Once the node is found, its reference is passed to the removeNode() function. Similarly, the deleteNode() uses the data value of a node to locate the node. Once found, the deleteNode() retrieves the reference of the node, which is then passed to the removeNode() function.
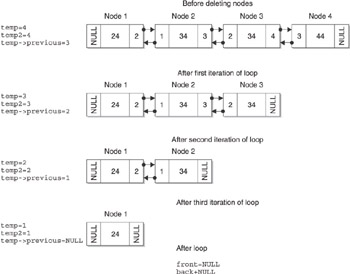
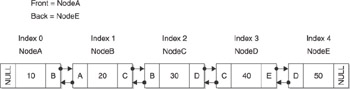
For examples in this section, you’ll use the linked list, shown in Figure 9-1, which has five nodes, NodeA through NodeE, respectively. Each node holds a position in the linked list, and each position is identified by an index value. Index values begin with zero and are shown above the name of each node in Figure 9-1.
Begin by defining the removeNode() function, which is illustrated in the next code listing. Reference to the node being removed is passed to the removeNode() function. The removeNode() function must determine which of four processes to use to remove the node.
The first process is for the removeNode() to determine if the node is the only node on the linked list. It makes this determination by evaluating if the previous and the next node are NULL. If so, the node being deleted is the only node on the list. The node is then removed by assigning NULL to the back and front data members of the LinkedList class. As you’ll recall from previous chapters, functions that retrieve data from a linked list always examine the front and back data members to determine if each is NULL. If so, then the function knows the linked list does not contain any nodes.
If the node is not the only node on the linked list, the removeNode() function must next determine if the node being removed is at the front of the linked list. It determines this by examining the previous member of the node. If the node is at the front of the linked list, then the previous member is NULL, and the removeNode() function takes the following steps to remove the node:
-
The node pointed to by the deleted node’s next member is assigned to the front data member of the LinkedList class. This makes it the front of the linked list.
-
The previous member of the node that is now at the front of the linked list is assigned a NULL value, indicating there is no previous node because you removed its previous node. Here’s how this is done. It might look a little confusing, but it’s easy to understand if you take apart this statement:
node->next->previous = NULL;
-
Say that you’re removing Node D. The next node is Node E. Now substitute the numbers for the terms in this statement:
Node D->Node E->previous = NULL;
It’s clear that the previous member belongs to Node E.
In the third process, the removeNode() function determines if the node being removed is at the back of the linked list. It does this by comparing the value of the next member of the node to NULL. If the next member is NULL, then the node being removed is the last node on the linked list.
The value of the previous member of the node is then assigned to the back member of the LinkedList class. This moves the previous node to the back of the list and in effect removes the node that is passed to the removeNode() function from the linked list.
The value of the next member of the previous node is then set to NULL, indicating there isn’t another node because it is at the back of the list. The statement that performs this operator might seem confusing, but replacing references to node and previous with the node number should clear up any confusion. Here’s the statement:
node->previous->next = NULL;
Say that you’re removing NodeC. The previous node is NodeB. Now substitute the numbers for the terms in this statement:
NodeC->NodeB->next = NULL;
If the node being deleted isn’t the only node on the linked list and isn’t the node at the front or back of the linked list, the only other possibility is that the node is somewhere in the middle of the linked list.
The fourth process is to remove a node in the middle of the linked list and then link together the previous and next nodes. I’ll illustrate this with an example because this operation can be confusing.
Say that you’re removing NodeC. The previous node is NodeB and the next node is NodeD. First, link NodeB to NodeD by using the following statement:
node->previous->next = node->next;
Replace node, previous, and next with the name of the actual node to better understand this operation:
NodeC->NodeB->next = NodeC->NodeD;
Now that NodeB is linked to NodeD, you need to link NodeD to NodeB:
node->next->previous = node->previous;
Again, replace the node, shown next, and previous with names of nodes to see how this operation works:
NodeC->NodeD->previous = NodeC->NodeB;
Both NodeB and NodeD are linked to each other, and NodeC is removed from the linked list.
Although the node passed to the removeNode() function is no longer on the linked list, it remains in memory. Therefore, you need to remove the node from memory by calling delete. The final step is to adjust the value of the size member of the LinkedList class to reflect one less node on the linked list. You do this by decrementing the value of the size.
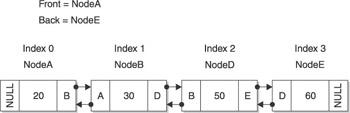
Figure 9-2 shows the linked list after the removeNode() function executes. Notice that NodeC is no longer on the linked list, and the index values are adjusted to reflect the new number of nodes on the linked list.
void removeNode(NODE* node)
 {
  if(node->previous == NULL && node->next == NULL)
  {
  back = NULL;
  front = NULL;
  }
  else if(node->previous == NULL)
  {
  front = node->next;
  node->next->previous = NULL;
  }
  else if(node->next == NULL)
  {
  back = node->previous;
  node->previous->next = NULL;
  }
  else
  {
  node->previous->next = node->next;
  node->next->previous = node->previous;
  }

  delete node;
  size--;
 }
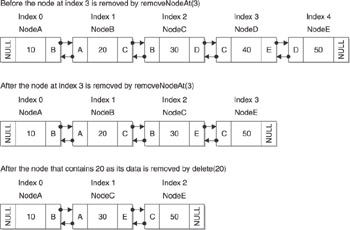
removeNodeAt()
The removeNodeAt() function removes a node by using the node’s index rather than the reference to the node in memory. Remember, the index is the position of the node on the linked list. Say you want to remove the third node of the linked list. You simply pass the index 2 to the removeNodeAt() function, and removeNode() performs the operation internally. You can’t call removeNode() directly, partly because it’s protected, but also because outside this class you don’t have any knowledge of the actual pointer values. Remember that the index begins with zero. Therefore, you don’t need to know the actual reference of the node you want removed. This is illustrated in the next code.
The first step in the removeNodeAt() function is to determine if the index is valid. To do that, the removeNodeAt() function determines if the index is less than zero or greater than one less than the size of the linked list. It uses the value of the size member of the LinkedList class to determine the size of the linked list. If either is true, then the index is invalid and no attempt is made to remove the node.
However, if both are false, the removeNodeAt() function begins the process of removing the node from the list. This process has two steps. First, the index locates a reference to the corresponding node, and second, the removeNode() function is called and passed the reference.
The removeNodeAt() function begins searching for reference to the node by declaring a temporary pointer to a node called temp_node and assigning it the reference to the node at the front of the linked list. Next, a for loop iterates through each node on the linked list until the node represented by the index is found. During each iteration, the temp_node is assigned the node referenced by the next member of the current temp_node.
When the index is reached, the value of the temp_node is reference to the node that corresponds to the index that is passed to the removeNodeAt() function. The removeNode() function is called and passed the temp_node.
void removeNodeAt(int index)
 {
  if(index < 0 || index > size-1)
  {
  return;
  }

  NODE* temp_node = front;

  for(int i=0; i<index; i++)
  {
  temp_node = temp_node->next;
  }

  removeNode(temp_node);
 }
deleteNode()
The deleteNode() function uses data stored in a node to find and remove a corresponding node from the linked list. The deleteNode() function then searches the linked list to locate and remove the node.
Here’s how this process works. First, a temporary node called temp_node is declared and assigned reference to the node that is located at the front of the linked list. If the temp_node is not NULL, then the list is not empty and the function determines if the data matches the data member of the current node.
If it does, the temp_node is passed to the removeNode() function, and the function is completed. If the data doesn’t match, the next node is assigned to the temp_node, and the process continues until either the node containing the data is found or the deleteNode() function reaches the end of the linked list.
void deleteNode(int data)
 {
  NODE* temp_node = front;

  while(temp_node != NULL)
  {
  if(temp_node->data == data)
  {
  removeNode(temp_node);
  return;
  }
  else
  {
  temp_node = temp_node->next;
  }
  }
 }
findNode()
Let’s say that you need to access a particular node on a linked list, but you don’t know the reference to the node or the position the node has on the linked list, although you do know the data is stored in the node. You can locate the node by calling the findNode() function.
The findNode() function requires that you pass it the data stored in the node. It then uses the data to locate the node and return to you the index of the node, as shown in the following example.
The process of finding a node begins when you declare an index variable that will eventually be assigned the index of the node if the node is found. A temporary node is also declared and assigned a reference to the node at the front of the linked list.
As long as the temp_node isn’t NULL, the findNode() function iterates through the linked list. With each iteration, the data member of the current node is compared to the data passed as an argument to the findNode() function.
If both are equal, then the current value of the index is returned, which is the index of the node. If they are not equal, then the value of the next member of the current node is assigned to temp_node and the index is incremented. A –1 is returned if the data isn’t found in the linked list because the value –1 can never be a valid return value.
int findNode(int data)
 {
  int index = 0;
  NODE* temp_node = front;

  while(temp_node != NULL)
  {
  if(temp_node->data == data)
  {
  return index;
  }
  else
  {
  temp_node = temp_node->next;
  index++;
  }
  }

  return -1;
 }
 int findNode(int data)
insertNodeAt()
The insertNodeAt() function places a new node at a specific location in the linked list. Previously in this chapter, you learned that each position in a linked list is identified by an index. The first location has the index value of 0, the second location is index 1, and so on. You use the index to specify the location within the linked list where you want to insert the new node.
The insertNodeAt() function requires two arguments, the location where the node will be inserted within the linked list, and the data that will be stored in the node. The following example shows how the new node is placed within the linked list.
The first step is for the insertNodeAt() function to determine if the index passed to the function is valid. It does so by determining if the index is less than zero or greater than the size of the linked list (this information is contained in the size member of the LinkedList class). If the index is invalid, then the insertNodeAt() terminates and returns to the statement that called it. There’s a subtle difference in the index checking here compared to removeNodeAt(). If the index were equal to size, this would append a node onto the linked list. The index is out of range by 1, but that’s okay because you’re going to add a new node onto the linked list, whereas removeNodeAt() needs a valid index so it checks (size –1), which is the last node in the linked list.
Once the insertNodeAt() knows that that index is valid, it proceeds to create the new node and then insert the node in the linked list. This process begins by creating an instance of the node structure and assigning it the data passed to the function as an argument. The instance is then assigned to the new_node pointer.
Next, it must be determined if there are any nodes in the linked list. You do this by evaluating the value of the size member of the LinkedList class. If the value is zero, then the linked list is empty and the new node will become the only node in the list.
You place the new node in the list by assigning the new_node pointer to both the front member of the LinkedList class and to the back member of the LinkedList class. The previous and next members of the node are already set to NULL by default, so you don’t have to do anything to the new node.
front = new_node;
 back = new_node;
If the linked list has one or more nodes, then the insertNodeAt() function determines if the new node is to be inserted into the first position in the linked list by evaluating the value of the index passed to the function. If the index value is zero, then the new node will become the first node on the linked list.
Here’s how this is done. The new_node is assigned to the previous member of the node assigned to the front member of the LinkedList class. Next, the next member of new_node is assigned the node assigned to the front member of the LinkedList class. Finally, the new_node is assigned the front member.
front->previous = new_node;
 new_node->next = front;
 front = new_node;
If the new node isn’t going to become the first node on the linked list, the insertNodeAt() function decides if the node will become the last node on the linked list by comparing the index to the size member of the LinkedList class. If these values are equal, then the new node is placed at the back of the linked list. Remember that index 0 is the front of the list and index (size –1) is the back of the list.
Here’s how this is done. The new_node is assigned to the next member of the node that is currently the back of the linked list. Next, the node at the back is assigned to the previous member of the new_node. Finally, the new_node is assigned to the back member of the LinkedList class.
back->next = new_node;
 new_node->previous = back;
 back = new_node;
At this point, if the new node hasn’t been inserted in either the front or back of the linked list, then the insertNodeAt() function assumes that the new node is to be inserted into the middle of the linked list.
This process begins by declaring a pointer called temp and assigning it the node at the front of the linked list. Next, the function finds the node at the index. This node will be moved to the right. However, it’s not set to the node previous, it’s set to the index position and the node in that position is moved to the right. It does this by using a for loop. For each iteration, the node assigned to the next member of the temp node is assigned to the temp node. This sounds confusing, but will become clearer if you examine what is happening.
Say there are five nodes on the linked list, as shown in Figure 9-1. The front node is NodeA, and the initial value of temp is NodeA. Say you want to insert NodeN at index 2.
Before the first iteration, front = NodeE. During the first iteration, here’s what happens:
temp = temp->next
 temp = NodeA->NodeB
 temp = NodeB
After the first iteration, temp is assigned NodeB and the value of i is 1, which is less than the value of the index, so another iteration executes. Here’s what happens:
temp = temp->next
 temp = NodeB->NodeC
 temp = NodeC
The temp pointer now points to NodeC, and the value of i is 2, which is equal to the value of the index, so there are no additional iterations and the temp pointer points to NodeC.
Now that you’re at the desired location within the linked list, it is time to switch pointers around to insert the new node into the list. Here’s how to do it:
new_node->next = temp;
 new_node->previous = temp->previous;
 temp->previous->next = new_node;
 temp->previous = new_node;
Confused? If so, you’re not alone, because what is happening isn’t intuitive. I’ll clarify the code by substituting nodes for pointers.
new_node->next = NodeC;
 new_node->previous = NodeC->NodeB;
 NodeC->NodeB->next = new_node;
 NodeC->previous = new_node;
Figure 9-3 shows the linked list after the new node is inserted into index 2 position of the list. I’ve called the new node NodeN.
The final step is to increment the size member of the LinkedList class to reflect the new node. Following is the complete definition of the insertNodeAt() function:
void insertNodeAt(int index, int data)
 {
  if(index < 0 || index > size)
  {
  return;
  }

  NODE* new_node = new NODE(data);

  if(size == 0)
  {
  front = new_node;
  back = new_node;
  }
  else if(index == 0)
  {
  front->previous = new_node;
  new_node->next = front;
  front = new_node;
  }
  else if(index == size)
  {
  back->next = new_node;
  new_node->previous = back;
  back = new_node;
  }
  else
  {
  NODE* temp = front;

  for(int i=0; i<index; i++)
  {
  temp = temp->next;
  }

  new_node->next = temp;
  new_node->previous = temp->previous;

  temp->previous->next = new_node;
  temp->previous = new_node;
  }

  size++;
 }
peek()
The peek() function retrieves data stored in a node specified by the index passed to the peek() function. The peek() function requires one argument, which is the index of the position within the linked list that contains the data you want to retrieve. The data is then returned by the peek() function. In the following example, you’ll store and retrieve an integer, but you can also store and retrieve any kind of data by simply changing the data type in the node definition.
Let’s take a closer look and see how the peek() function works. It begins by validating the index using the same validation procedures as discussed in the removeNodeAt() function section of this chapter, except peek() checks that the index is valid. If the index is invalid, then a zero is returned by the function.
If the index is valid, then a pointer called temp is declared and assigned the node that is at the front of the linked list. The peek() function then proceeds to step through the linked list, stopping at the node you’re interested in. This search process is the same as in the insertNodeAt() function section.
When the peek() function exits the for loop, the temp pointer points to the node that contains the data that must be returned by peek(). You then point to the data member of the node in the return statement to return the data to the statement that called the peek() function.
Here is the complete definition of the peek() function:
int peek(int index)
  {
  if(index < 0 || index > size-1)
  {
  return 0;
  }

  NODE* temp = front;

  for(int i=0; i<index; i++)
  {
  temp = temp->next;
  }

  return temp->data;
 }
getSize()
The getSize() function retrieves the value of the size member of the LinkedList class. You’ll notice that the getSize() function contains one statement that simply returns the value of the size member.
You might be wondering why you need the getSize() function since you could make the size member accessible to the application by placing it in the public access specifier of the LinkedList class.
As you’ll recall from your programming classes, most data members of a class should be only accessible by a function member within the class or by a derived class. This way, you always control access to the data and thereby protect the data from inadvertent changes caused by the application. Allowing it to be changed externally by a user of this class could lead to errors.
int getSize()
 {
  return size;
 }
Enhanced LinkedList Class Using C++You’ve seen how enhancements to the LinkedList class individually work; now we’ll take a look at the entire application. I’ve divided the following application into three files: the demo.cpp file, the LinkedList.h file, and the LinkedList. file. All three files are shown in the following code listing. You can use the LinkedList.h file and the LinkedList.cpp file, along with the specific files for queues and stacks that you learned about in Chapter 7 and Chapter 8.
The demo.cpp file contains the C++ application that uses the enhanced LinkedList class to create and manipulate a linked list. The LinkedList.h file contains definitions of the node and of the LinkedList class. The LinkedList.cpp file contains the definitions of member functions of the LinkedList class. All three files are shown next.
The demo.cpp file is where all the action takes place. As you’ll see in the following example, the application begins by declaring an instance of the LinkedList class and then assigning the instance to a reference call list.
Next, the appendNode() function is called five times. The appendNode() function is an original member function of the LinkedList class and appends a new node to the linked list. The linked list shown at the top of Figure 9-4 is the linked list after the last appendNode() function is called.
Once the linked list is created, the application calls the removeNodeAt(3) function to remove the node located at index 3. The middle linked list in Figure 9-4 shows the status of the linked list after the removeNodeAt(3) function executes.
The application then calls the findNode(20) function to locate the index of the node that contains 20 as its data element. Based on the linked list shown at the bottom of Figure 9-4, the findNode(20) function returns the index value 1.
The deleteNode(20) function is then called and removes the node from the linked list that has 20 as the value of its data element. The linked list shown at the bottom of Figure 9-4 illustrates the linked list after the deleteNode(20) function is called.
A new node is then inserted into the linked list by calling the insertNodeAt(1, 35) function. This function inserts a new node at index 1 in the linked list and assigns 35 to the data element of the node. Figure 9-5 is the linked list after the insertNodeAt(1, 35) function is called.
The peek(3) function is called to retrieve the value of the node in the third index position of the linked list. Based on the linked list shown in Figure 9-5, the peek(3) function returns 50 as the data value of the node in index position 3.
The last function called is getSize(), which returns the size of the linked list. As seen in Figure 9-5, the linked list has four nodes; therefore, the getSize() function returns the value 4.
The last statement in the demo application uses the delete operator to remove the instance of the LinkedList class from memory.
//demo.cpp
 #include <iostream>
 using namespace std;
 void main(){
  LinkedList* list = new LinkedList();
  list->appendNode(10);
  list->appendNode(20);
  list->appendNode(30);
  list->appendNode(40);
  list->appendNode(50);
  list->removeNodeAt(3);
  int index = list->findNode(20);
  list->deleteNode(20);
  list->insertNodeAt(1, 35);
  int data = list->peek(3);
  int size = list->getSize();
  delete list;
 }
 //LinkedList.h
 typedef struct Node{
  struct Node(int data)
  {
  this->data = data;
  previous = NULL;
  next = NULL;
  }
  int data;
  struct Node* previous;
  struct Node* next;
 } NODE;
 class LinkedList
 {
  protected:
  NODE* front;
  NODE* back;
  int size;
  void removeNode(NODE* node);
  public:
  LinkedList();
  virtual ~LinkedList();
  void appendNode(int);
  void displayNodes();
  void displayNodesReverse();
  void destroyList();
  void removeNodeAt(int);
  int findNode(int);
  void deleteNode(int);
  void insertNodeAt(int,int);
  int peek(int);
  int getSize();
 };
 //LinkedList.cpp
 #include "LinkedList.h"
 CLinkedList::CLinkedList()
 {
  front = NULL;
  back = NULL;
  size = 0;
 }

 CLinkedList::~CLinkedList()
 {
  destroyList();
 }

 void CLinkedList::appendNode(int data)
 {
  NODE* n = new NODE(data);

  if(back == NULL)
  {
  back = n;
  front = n;
  }
  else
  {
  back->next = n;
  n->previous = back;
  back = n;
  }

  size++;
 }

 void CLinkedList::displayNodes()
 {
  cout << "Elements: ";
  NODE* temp = front;
  while(temp != NULL)
  {
  cout << temp->data << " ";
  temp = temp->next;
  }

  cout << endl;

 }

 void CLinkedList::displayNodesReverse()
 {
  cout << "Elements: ";
  NODE* temp = back;
  while(temp != NULL)
  {
  cout << temp->data << " ";
  temp = temp->previous;
  }

  cout << endl;
 }

 void CLinkedList::destroyList()
 {
  NODE* temp = back;
  while(temp != NULL)
  {
  NODE* temp2 = temp;
  temp = temp->previous;
  delete temp2;
  }

  back = NULL;
  front = NULL;
 }

 void CLinkedList::removeNode(NODE* node)
 {
  if(node->previous == NULL && node->next == NULL)
  {
  back = NULL;
  front = NULL;
  }
  else if(node->previous == NULL)
  {
  front = node->next;
  node->next->previous = NULL;
  }
  else if(node->next == NULL)
  {
  back = node->previous;
  node->previous->next = NULL;
  }
  else
  {
  node->previous->next = node->next;
  node->next->previous = node->previous;
  }

  delete node;
  size--;
 }

 void CLinkedList::removeNodeAt(int index)
 {
  if(index < 0 || index > size-1)
  {
  return;
  }

  NODE* temp_node = front;

  for(int i=0; i<index; i++)
  {
  temp_node = temp_node->next;
  }

  removeNode(temp_node);
 }

 int CLinkedList::findNode(int data)
 {
  int index = 0;
  NODE* temp_node = front;

  while(temp_node != NULL)
  {
  if(temp_node->data == data)
  {
  // return the index of the node
  return index;
  }
  else
  {
  temp_node = temp_node->next;
  index++;
  }
  }

  return -1;
 }

 void CLinkedList::deleteNode(int data)
 {
  NODE* temp_node = front;

  while(temp_node != NULL)
  {
  if(temp_node->data == data)
  {
  removeNode(temp_node);
  return;
  }
  else
  {
  temp_node = temp_node->next;
  }
  }
 }

 void CLinkedList::insertNodeAt(int index, int data)
 {
  if(index < 0 || index > size)
  {
  return;
  }

  NODE* new_node = new NODE(data);

  if(size == 0)
  {
  front = new_node;
  back = new_node;
  }
  else if(index == 0)
  {
  front->previous = new_node;
  new_node->next = front;
  front = new_node;
  }
  else if(index == size)
  {
  back->next = new_node;
  new_node->previous = back;
  back = new_node;
  }
  else
  {
  NODE* temp = front;

  for(int i=0; i<index; i++)
  {
  temp = temp->next;
  }

  new_node->next = temp;
  new_node->previous = temp->previous;

  temp->previous->next = new_node;
  temp->previous = new_node;
  }

  size++;
 }

 int CLinkedList::peek(int index)
 {
  if(index < 0 || index > size-1)
  {
  return 0;
  }

  NODE* temp = front;

  for(int i=0; i<index; i++)
  {
  temp = temp->next;
  }

  return temp->data;

 }

 int CLinkedList::getSize()
 {
  return size;
 }
|
| benjie | this is very helpfull..
2012-02-18 10:33:17 | | benjie | this is very helpfull..
from philippines..
2012-02-18 10:34:40 | | Яковлев Сергей | >> from philippines..
Wow !
2012-02-18 11:58:40 | |
|
|

 LINUX
LINUX 
 Books
Books