Что такое дерево?
Когда вы идете в институт,перед вами встает выбор:
свернуть направо или свернуть налево.
Древовидная структура данных похожа на дорогу с разветвлениями.
В этом разделе мы рассмотрим концепцию деревьев и построение древовидной структуры.
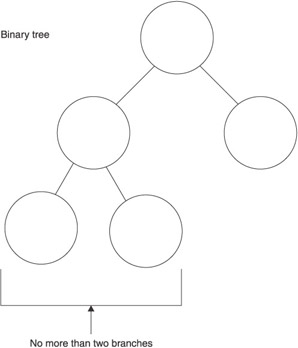
Дерево
При упоминании слова дерево вы сразу представляете себе реальное дерево в убранстве листьев.
Давайте представим дерево,лишенное листьев,с одними голыми ветками.
Причем каждая ветка раздваивается.
Это пример бинарного дерева.
В винарном дереве каждая ветка может иметь два,одно или вообще без разветвлений.
Где используют бинарное дерево?
Programmers use a binary tree as a model to create a data structure to encode logic used to make complex decisions. Here’s how this works. Let’s say that a stem consists of a set of program instructions. At the end of the stem, the program evaluates a binary expression. You’ll recall that a binary expression evaluates to either a Boolean true or false. Based on the evaluation, the program proceeds down one of two branches. Each branch has its own set of program instructions.
The basic concept of a binary tree isn’t new to you because it uses Boolean logic that you learned to implement using an if statement in your program. An if statement evaluates an expression that results in a Boolean value. Depending on the Boolean value, the if statement executes one of two sets of instructions. However, a binary tree is much more than an if statement, as you’ll learn in this chapter.
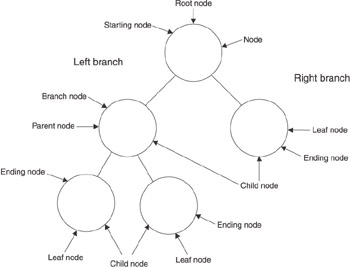
Составные бинарного дереваAlthough we introduced the concept of a binary tree with terms commonly used when referring to a tree, programmers established different terms to refer to parts of a binary tree. Let’s take a moment to become familiar with those terms.
“Node” is the term used to describe a termination point. There are three kinds of termination points in a binary tree (see Figure 10-2): the starting node, the ending node, and the branch node. The starting node is called the root node, which is the top-level node in the tree. The stem leading from the root node leads to the branch node. The branch node is the fork in the road that links the root node to two branches. Each branch terminates with a child node. Programmers call these the left branch and the right branch.
As you can see, a binary tree defines a strong parent-child relationship among nodes. A parent-child relationship is relative to a node. All nodes except the root node have a parent node. However, some nodes have no children, while other nodes have one or two child nodes. Programmers determine the parent-child relationship by selecting a node, which is called the current node. The node that spawns the current node is called the current node’s parent node. The node or nodes spawned by the current node is called the child node.
The child node is also referred to as the left node or the right node, depending on which direction the node branches from the current node. If the current node doesn’t have any child nodes, then the current node is referred to as the leaf node. A leaf node is located at the bottom of the tree. If you look at your favorite tree, you’ll notice that the end of nearly every branch is either another branch (child node) or a leaf, and that’s why programmers call a node with no child nodes a leaf node.
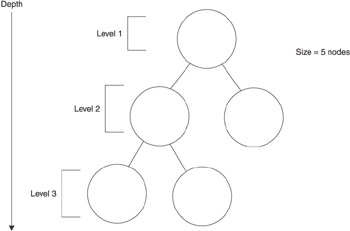
Depth and Size
A binary tree is described by using two measurements: tree depth and tree size (see Figure 10-3). Tree depth is the number of levels in the tree. A new level is created each time a current node branches to a child node. For example, one level is created when the root node branches into child nodes.
The size of a tree is the number of nodes in the tree. For example, the first level in Figure 10-3 has one node, which is the root node. The second level has up to two nodes, which are the child nodes of the root. The third level may have up to four nodes. Programmers estimate the size of a tree by using the following formula.
size 2 depth
Let’s say the binary tree has five levels, which is a depth of 5. Here’s how you estimate the size of the tree:
32 2 5
The size is an approximation because the tree may or may not be balanced. A balanced tree is a binary tree where each current node has two child nodes. An unbalanced tree is a binary tree where one or more current nodes have fewer than two child nodes. This formula gives you a rough idea of how well balanced the tree is. Binary trees are usually used for very large data sets. The formula is not terribly accurate for the small tree shown in Figure 10-3.
Why Use a Binary Tree?
Programmers use a binary tree to quickly look up data stored at each node on the binary tree. Let’s say that you need to find a student ID in a list of a million student IDs. What is the maximum number of comparisons that you’ll need to make before finding the student ID?
You could make a maximum of a million comparisons if you sequentially searched the list of a million student IDs. More than a million comparisons are necessary if you randomly selected student IDs from the list and then replaced those that didn’t match back into the list.
However, you’d need to make a maximum of only 20 comparisons if student IDs were stored in a binary tree. This is because of the way data is organized in a binary tree. Data stored on the left node is less than data stored on all the right nodes at any current node.
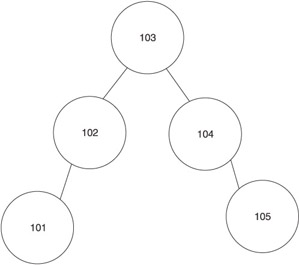
This might sound a little confusing, but an example will make this concept clear. Suppose you had a list of five student IDs: 101, 102, 103, 104, and 105. These student IDs are stored in a binary tree so that the center student ID is the root node, the student ID that is less than the current node is stored on the left child node, and the student ID that is more than the current node is stored on the right child node, as shown in Figure 10-4.
The same pattern is applied to each child node. Thus, student ID 101 is the left child of the node that contains student ID 102 because student ID 101 is less than student ID 102. Likewise, student ID 105 is the right node of student ID 104 because student ID is greater than student ID 105.
Let’s say you want to locate student ID 101 on the binary tree. First, you compare the value of the root node to student ID 101. There’s no match. Because student ID 101 is less than student ID 103, your next comparison uses the left child node. This eliminates the need to compare all the nodes to the right of the node that contains student ID 103. You can ignore half the student IDs because you know that student ID 101 isn’t the right node or a child of the right node.
After comparing student ID 101 to student ID 102, you notice two things. First, they don’t match. Second, student ID 102 is greater than student ID 101. This means you compare the left child node to student ID 101. You ignore the right child node and subsequent child nodes because they are greater than student ID 101. There aren’t any right child nodes of student ID 102 in this example. The next comparison results in a match. So, in a large binary tree, each time you do a comparison, you eliminate another half of the remaining nodes from the search. If you had 1 million nodes in the tree, you would divide 1 million by 2 about 20 times to reduce it down to one node (2 ^ 20 is about 1 million). This way, you can find the node you’re looking for by doing about 20 comparisons.
Programmers think of every node as the root node and all subsequent nodes as its own subtree. They approach nodes in this way because functions that deal with trees are recursive. A function works on a child node and performs the same functionality as if the child node is the root node of the entire tree. That is, the value of the child node is compared to the value of its left node and right node to determine which branch of the tree to pursue.
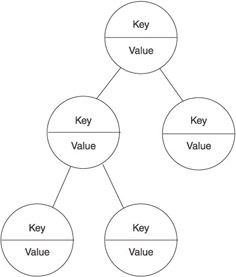
The Key
Each node of a tree contains a key that is associated with a value similar to the relationship between a primary key of a database and a row within a table of the database. A key is a value that is compared to search criteria. If the index and the search criteria match, then the application retrieves data stored in the row that corresponds to the key. The data is referred to as the value of the node, as shown in Figure 10-5.
Any data type can be used as the key. We use a string as the key in examples in this chapter, but we could have chosen any data type. Unlike the primary key of a database, the key to the tree doesn’t have to be in natural order. That is, the key doesn’t have to be in alphabetical order or numerical order. In a typical tree implementation, you would define a comparator to tell the tree how to order the nodes. In our case, we’ll use the natural ordering sequence of a string so we can keep our focus on the internal workings of the tree.
Creating a Binary Tree
Let’s create a binary tree by first defining a structure. Call the structure Metadata because it describes data that is used in the binary tree, and “metadata” refers to data that describes other data, such as how an employee ID can be used to get the employees name. Metadata typically refers to name/value pairs, or in our case, key/value pairs.
Each instance of the data structure is a node on the binary tree and contains four data elements. The first two data elements are the key and the value. In this example, both the key and value are char arrays. The size of these arrays is determined by the #define preprocessing directive at the top of this example. You set the array size by using the preprocessing directive because you can easily change its value in one place within the application without having to locate every place in the code where the array sizes are used.
The other two data elements of the metadata structure are pointers called left and right. Each of these points to a metadata structure. In other words, they point to the next node on the left and on the right of the current node. This enables the application to do two things. First, the application can move to the next level of the tree. It can also access both the key and the value of nodes at the next level.
You might become confused when looking at the example of the structure definition because the structure uses itself to initialize data elements of the structure. Here’s what’s happening. A key and related value are passed to the metadata structure when an instance of the metadata structure is declared, that is, when a new node is inserted into the binary tree. Both of these are passed as char pointers because they are arrays.
The application copies the key and the value to the data elements of the instance of the metadata structure by using the strcpy() function. The strcpy() function copies the second parameter to the first parameter. Notice the this operator is used in this example. As you’ll recall from your programming course, the this operator tells the compiler that you want to refer to the data element of this instance of the structure instead of the parameter that was passed in.
The last two data elements to be initialized are the left and right pointers. Both of these are set to NULL because the new node doesn’t have a child node when the new node is created. Later in this chapter, you’ll define a function that adds a child node and replaces the NULL with reference to an actual node.
 #include <string.h>
 #define SIZE_KEY 32
 #define SIZE_VALUE 256
 typedef struct Metadata
 {
  struct Metadata(char* key, char* value)
  {
  strcpy(this->key, key);
  strcpy(this->value, value);
  left = NULL;
  right = NULL;
  }
  char key[SIZE_KEY];
  char value[SIZE_VALUE];
  struct Metadata* left;
  struct Metadata* right;
 } METADATA;
In addition to defining a structure, you’ll also define the BinarySearchTree class. The BinarySearchTree class defines data members and member functions that create and manipulate a node. As illustrated in the code that follows, the class definition is organized into two areas, the private access specifier and the public access specifier. As you’ll recall from your object-oriented programming class, the application can only access data and member functions defined within the public access specifier; members defined within the private access specifier area of the class definition can only be accessed by member functions of the class. The private access specifier section of the BinarySearchTree class defines two data members, size and root. The size is an integer that stores the number of nodes on the tree. The root is a pointer to an instance of the metadata structure. In other words, root is the first node on the tree.
The private access specifier also contains nine member functions:
  addNode()
  getNode()
  removeAllNodes()
  processNodesInOrder()
  getTreeDepth()
  containsNode()
  removeNode()
  removeRootNode()
  moveLeftMostNode()
These functions are used by functions defined in the public access specifier of the class definition to manipulate nodes on the tree. You’ll learn how each of these functions works later in this chapter.
The public access specifier contains the constructor and destructor for the class and several member functions that enable the application to create and remove nodes and manipulate nodes on the tree. Here is a list of those member functions. You’ll learn how they work later in this chapter.
 BinarySearchTree();
  ~BinarySearchTree()
  add()
  remove()
  removeAll()
  get()
  contains()
  displayInOrder()
  getSize()
  getDepth()

 class BinarySearchTree
 {
  private:
  int size;
  METADATA* root;
  bool addNode(METADATA** current_node, METADATA* new_node);
  bool getNode(METADATA* current_node, char* key, char* value);
  void removeAllNodes(METADATA* node);
  void processNodesInOrder(METADATA* node);
  int getTreeDepth(METADATA* node);
  bool containsNode(METADATA* node, char* key);
  bool removeNode(METADATA** node, char* key);
  void removeRootNode(METADATA** node);
  void moveLeftMostNode(METADATA** node, METADATA* root);
  public:
  BinarySearchTree();
  virtual ~BinarySearchTree();
  bool add(char* key, char* value);
  bool remove(char* key);
  void removeAll();
  bool get(char* key, char* value);
  bool contains(char* key);
  void displayInOrder();
  int getSize();
  int getDepth();
 };
Constructor and Destructor
The constructor of the BinarySearchTree class initializes the root data member of the BinarySearchTree class with a NULL value. As you’ll recall from the previous section, root is a pointer to an instance of the metadata structure and points to the root node for the binary search tree once a node is added to the tree.
The constructor also initializes the size data member to zero. This means there are no nodes on the tree. The size data member is incremented each time a new node is inserted into the tree and decremented when a node is removed from the tree. You’ll see how these steps are done later in this chapter.
The destructor removes all the nodes from the tree and releases memory used by those nodes. The destructor doesn’t directly remove the nodes. Instead, it calls the removeAll() member function that actually handles deleting nodes and releasing memory.
The following are definitions of the constructor and the destructor for the BinarySearchTree class:
 BinarySearchTree()
 {
  root = NULL;
  size = 0;
 }
  ~BinarySearchTree()
 {
  removeAll();
 }
add() and addNode()
You add a new node to the tree by calling the add() member function of the BinarySearchTree class as shown in the next code snippet. The add() function requires two arguments, a pointer to the key of the new node and another pointer to the node’s value. In this example, we call these key and value.
Before the node is added to the tree, the add() function validates both the key and the value with two tests. First, it makes sure that the key and the value don’t have a NULL value. Next, it tests to be sure that neither the key nor the value is larger than the array size allocated for the key. It does so by comparing the length of the key and the length of the value to the corresponding value defined in the #define preprocessor directive. If any of these tests fail, then the add() function returns a Boolean false to the statement in the application that calls the add() function.
If the key and value are valid, then the add() function proceeds to create the new node. First, it declares an instance of the metadata structure and passes the key and value to the instance. Previously in this chapter you learned that the key and value become the initial values for corresponding data elements in the metadata structure.
The final step in the process of adding a new node to the tree is to call the addNode() function. The addNode() function is defined within the private access specifier in the BinarySearchTree class and is responsible for placing the new node into the tree.
 bool add(char* key, char* value)
 {
  if(key == NULL || value == NULL || strlen(key) > SIZE_KEY-1
  || strlen(value) > SIZE_VALUE-1)
  {
  return false;
  }
  METADATA* new_node = new METADATA(key, value);
  return addNode(&root, new_node);
 }
The addNode() function shown in the next code requires two arguments. The first argument is a pointer to a pointer that points to the current node. The other argument is a pointer to the new node. The process of adding a new node to the tree begins by the addNode() function determining if the new node passed to is NULL. When the value of current_node is NULL, then you’ve reached a leaf node on the tree. This is where the addition takes place. All nodes are added as leaf nodes. If this is the first node being added to the tree, then the leaf node also happens to be the root node. The new node is assigned to the pointer field of current_node, and the size data member is incremented. This adds the new node to the tree. The addNode() function then returns a Boolean true, indicating that the operation is successful. You need to pass a pointer to a pointer as the first argument because you’re going to alter the data in that node. What you’re really passing is the address of the pointer field in the parent node. By passing the address of the pointer, you can change the pointer value in the parent. The pointer in the parent is changed to point to this new child node that’s being added.
If the current node isn’t NULL, the next step is to find where in the tree the node is to be added. This process is tricky because the new node must be located in a position where it will be either less than or greater than its parent node.
Here’s how it works. The addNode() function compares the key of the current node to the key of the new node using the strcmp() function. If the return value of the strcmp() function is less than zero, then the key of the new node is less than the key of the current node. Then addNode() is called again recursively, but this time reference to the left node of the current node is passed as the first argument to the addNode() function. As you’ll recall, the first argument is considered by the addNode() function as the current node. In this case, the left node of the current node is considered the current node. The second argument is the new node. Notice that the addNode() function is recursively called until the addNode() function finds a place for the new node. The first call to addNode() passes the first argument as the root node of the tree. Each subsequent call passes a root node of a subtree. Remember that each node in the tree can be considered a root node for all the nodes below it. The same rules apply at every node—all the nodes on the left are less than and all the nodes on the right are greater than.
If the key of the new node is greater than the key of the current node, then a similar process occurs except the current node’s right node is used instead of the left node when addNode() is subsequently called.
This recursive process continues until the first argument to addNode() points to NULL, which indicates a leaf node where the addition takes place.
If the key of the new node equals an existing node, then the new node is deleted and the addNode() function returns a Boolean false. This is because all keys must be unique: duplicate keys are not permitted on the tree.
 bool addNode(METADATA** current_node, METADATA* new_node)
 {
  if(*current_node == NULL)
  {
  *current_node = new_node;
  size++;
  return true;
  }
  else
  {
  if(strcmp(new_node->key, (*current_node)->key) < 0)
  {
  return addNode(&((*current_node)->left), new_node);
  }
  else if(strcmp(new_node->key, (*current_node)->key) > 0)
  {
  return addNode(&((*current_node)->right), new_node);
  }
  else
  {
  delete new_node;
  return false;
  }
  }
 }
remove(), removeNode(), and removeRootNode()
Removing a node from the tree is a multiple-step process that begins when the application calls the remove() member function as shown in the next code snippet The remove() function requires the key of the node being removed. It then calls the removeNode() member function. The removeNode() function is a private member of the BinarySearchTree class and therefore cannot be called directly by the application.
The removeNode() function requires two parameters. The first is a reference to the current node being evaluated, which is where the search begins. You begin the search by passing the root node of the tree, then subsequent calls will pass the root of a subtree. You always have to think about the tree as being a set of subtrees—each node is a root for all the nodes below it. The second parameter is the key received by the remove() function.
 bool remove(char* key)
 {
  return removeNode(&root, key);
 }
The removeNode() function shown in the next code snippet uses the value passed by the remove() function to locate the node that is being deleted. Before the search begins, the removeNode() determines if a root node passed to it by the remove() function is NULL. This may be the root node of the tree if this is the first call to the function, or it may be the root of a subtree. If it’s NULL, then the Boolean value false is returned because the node to remove was not found.
If the root node isn’t NULL, the search continues. The objective of the removeNode() function is to find a key of a node in the tree that matches the key passed by the remove() function. Once found, reference to the node that contains the key is passed to the removeRootNode(), which actually removes the node from the tree. The removeRootNode() may be removing the root node of the tree or a root of a subtree.
The search begins by comparing the key of the root node passed by the remove() function to the key passed by the remove() function. If the keys match, then the root node is passed to the removeRootNode() function where the node is removed. The size data member is decremented to reflect that a node has been removed from the tree. A Boolean true is then returned by the removeNode() function.
If there isn’t a match, then the removeNode() function determines if the key of the root node is less than the key passed by the remove() function. If so, then the removeNode() function compares the key of the left node to that of the key passed by the remove() function. The removeNode() function is called recursively until a match is found, at which time the removeRootNode() function is called and passed the reference to the matching node.
If the key is greater than the key of the root node, then the key of the right node of the root node is compared to the key. Again, the removeNode() function is called recursively until there is a match, at which time the removeRootNode() function is called and passed a reference to the matching node.
 bool removeNode(METADATA** node, char* key)
 {
  if(*node != NULL)
  {
  if (strcmp(key, (*node)->key) == 0)
  {
  removeRootNode(node);
  size--;
  return true;
  }
  else if(strcmp(key, (*node)->key) < 0)
  {
  return removeNode(&((*node)->left), key);
  }
  else
  {
  return removeNode(&((*node)->right), key);
  }
  }
  else
  {
  return false;
  }
 }
The removeRootNode() member function is the function that actually removes a node from the tree. The term “root node” can sometimes be confusing because you intuitively assume that the root node is the first node on the tree. In reality, any node can be a root node for all the nodes below it in the tree. Even if the node is a leaf node, it’s still a root node of the subtree. It just so happens that this subtree contains only one node. Therefore, we use the term root node in the name of this function.
The removeRootNode() function requires one argument, which is a pointer to a pointer for the node being removed. The removal process begins by declaring a pointer to the metadata structure. We call this pointer temp in the code example shown next.
Before removing the node, the removeRootNode() function determines if the node has a right child and left child node. If both the left and right child nodes are NULL, then no children exist and the delete operator is called to release the memory associated with this node. Then the pointer field in the parent node is set to NULL because this child node was removed. Note that if this were the only node in the tree, this call would set the root node of the tree to NULL, which makes sense because the tree would be empty.
If one child isn’t NULL, then the right child is compared to NULL. This would be the case if the node being deleted doesn’t have a right child. In this case, you change the pointer field in the parent to the node on the left of the one being deleted. The root node is assigned to the temp pointer to remember the location of the node that is being removed from the tree. Next, reference to the left node is assigned to the parent node. The delete operator then removes the node referenced by the temp pointer to release the memory associated with the node being deleted.
If the right node isn’t NULL, then the removeRootNode() determines if the left node is NULL. This follows similar logic to the previous example, except the node being deleted doesn’t have a left child, so the pointer in the parent node is set to the node on the right of the one being deleted. The reference to the root node is assigned to the temp pointer. Reference to the right node is then assigned to the parent node. The delete operator then releases the memory associated with the node being removed.
The last—and most complex—scenario is if the node being removed has both a left child and right child node. In this case, the removeRootNode() calls the moveLeftMostNode() function and passes it the address of the right node.
 void removeRootNode(METADATA** root)
 {
  METADATA* temp;
  if((*root)->left == NULL && (*root)->right == NULL)
  {
  delete(*root);
  *root = NULL;
  }
  else if((*root)->right == NULL)
  {
  temp = *root;
  *root = (*root)->left;
  delete(temp);
  }
  else if((*root)->left == NULL)
  {
  temp = *root;
  *root = (*root)->right;
  delete(temp);
  }
  else
  {
  moveLeftMostNode(&((*root)->right), *root);
  }
 }
The objective of the moveLeftMostNode() function is to find the node that will replace the current root node of the subtree. To achieve this goal, you must move once to the right and then go down the tree as far left as possible until you find the smallest node on the right. The move to the right occurs when the moveLeftMostNode() is called the first time. You then move left subsequent calls to the function. Once the smallest value on the right is found, the node containing the smallest value becomes the new root node.
Let’s see how this works by walking through the following definition of the moveLeftMostNode() function. This function requires two arguments, the current node being evaluated and the node that will be replaced. Remember, this function will copy the key and value from the smallest node on the right subtree to the node that’s being removed. This replaces the node that’s being removed with one of the leaf nodes, and then the leaf node is deleted.
If reference to the node being moved is not NULL and the left pointer of the node being moved is NULL, then you’ve found the node that will be moved up to the position of the one that’s to be removed. A pointer is declared and assigned to the node being moved. Next, the key and the value of the node are copied to the key and value of the root node. The root node in this case is the node that’s being removed from the tree. Because you’re moving the leftmost child of the right subtree, this leftmost child may have nodes to the right of it. The pointer value in the parent of the node that is being moved is set to the right pointer in the one that’s being moved. This keeps these subnodes intact. Finally, the delete operator removes the node.
If you haven’t found the leftmost node of the right subtree, then moveLeftMostNode() is called again. This time, the left child node is passed as the node to be moved to the root position. The root position is the node that is being removed.
 void moveLeftMostNode(METADATA** node, METADATA* root)
 {
  if(*node != NULL && (*node)->left == NULL)
  {
  METADATA* temp = *node;
  strcpy(root->key, (*node)->key);
  strcpy(root->value, (*node)->value);
  *node = (*node)->right;
  delete(temp);
  }
  else
  {
  moveLeftMostNode(&((*node)->left), root);
  }
 }
removeAll() and removeAllNodes()
The previous section showed you several functions that remove one node from the tree. There are occasions when you’ll need to clear the entire tree of nodes. To do this, you’ll need to call the removeAll() function.
The removeAll() function is shown in the next code snippet and performs two operations. First, it calls the removeAllNodes() function, which is defined in the private access specifier section of the BinarySearchTree class. This is the function that actually removes all the nodes from the tree. The second operation is to reset the root and size data members of the BinarySearchTree class. The root data member is set to NULL, indicating there aren’t any nodes on the tree. The size data member is set to zero, indicating that the tree is empty. The removeAll() function is also called by the destructor.
 void removeAll()
 {
  removeAllNodes(root);
  root = NULL;
  size = 0;
 }
The removeAllNodes() function, shown next, requires one argument, which is a reference to the root node. As long as the root node isn’t NULL, the removeAllNodes() function calls itself each time, passing it first the left child node and then the right child node as the root node. The ordering of these calls is important. Remember that the root node is either the root node of the tree or the root of a subtree. You must remove all the child nodes before removing the parent. You recurse the left tree, recurse the right tree, then, when it returns to the caller, it’s safe to delete the current node (root node) because all the children have been deleted. As with all recursive functions, you have to define a stopping point. In this case, if you are at a leaf node, the left and right pointers would be NULL and the calls to removeAllNodes() would return (they would not continue the recursion) because the node would be NULL.
A message is displayed on the screen stating the key and the value of the node that is being removed from the tree. The delete operator is then used to remove the node.
 void removeAllNodes(METADATA* node)
 {
  if(node != NULL)
  {
  removeAllNodes(node->left);
  removeAllNodes(node->right);
  cout << "Removing node - key: " << node->key << "\t"
  << node->value << endl;
  delete node;
  }
 }
get() and getNode()
The get() member function of the BinarySearchTree class is called within the application whenever you want to retrieve the value of a node. To retrieve a value, you must provide the get() function with the search key and with the variable that will store the value once the key is found.
Here’s how this works. As illustrated in the next code snippet, you pass the get() function two arguments. The first argument is a reference to the search key. In this example, the key is a string. Therefore, you pass the get() function a pointer to a char, which you’ll recall from your programming class actually points to the first character of the string. The second argument is also a char pointer. This points to the first element of a character array that the get() function uses to store the value of the node that is associated with the search key.
Let’s say that the search key is student ID “1234” and the value associated with the key is “Bob Smith.” You pass the get() function “1234” and the get() function copies “Bob Smith” to the value char array if the search key “1234” is found in a node of the tree. You then use the value char array throughout your application.
The get() function is defined in the public access specifier section of the BinarySearchTree class and is therefore accessible to an application. However, the get() function simply calls the getNode() member function, which is defined in the private access specifier section of the class. The getNode() function returns a Boolean true if the search key is found; otherwise, a Boolean false is returned. The return value also becomes the return value of the get() function.
 bool get(char* key, char* value)
 {
  return getNode(root, key, value);
 }
The getNode() function is where all the action occurs. Here the search is conducted and the value of the node is copied to the value array. As illustrated next, the getNode() function requires three arguments. The first argument is a reference to the root node. The root node is the starting point of the search and is usually the uppermost node of the tree, but it can be any node. The second argument is a reference to the search key, which is a char pointer in this example. The third argument is a reference to the variable that stores the value of the node that contains the search key. Both the search key and the value variable are the same as those passed to the get() function.
The getNode() begins processing by validating the root node. If the root node is NULL, then the value argument is set to an empty string (it sets the first character to NULL) and a Boolean false is returned by the getNode() function to indicate that the key was not found in the tree.
If the root node isn’t NULL, then the search continues. The getNode() function is called recursively. Each time it is called, it compares the search key with the key of the root node. If they match, then the value of the root node is copied to the value variable and a Boolean true is returned by the function.
If the search key doesn’t match the key of the root node, then the getNode() function determines if the search key is less than or greater than the key of the root node. Depending on the results of this comparison, the getNode() function calls itself and uses either the left child or the right child of the root node as the root node argument of the getNode() function. This process continues until either the search key matches the key of the root node or the root node is NULL, indicating the key doesn’t exist in the tree. This type of search is where the power of binary trees comes into play. Notice that each time the function is called, by doing one comparison on the key, you eliminate half the remaining nodes from the search, so you’re able to find the key very quickly even in a large data set.
 bool getNode(METADATA* node, char* key, char* value)
 {
  if(node == NULL)
  {
  value[0] = '\0';
  return false;
  }
  else
  {
  if(strcmp(key, node->key) == 0)
  {
  strcpy(value, node->value);
  return true;
  }
  else if(strcmp(key, node->key) < 0)
  {
  return getNode(node->left, key, value);
  }
  else
  {
  return getNode(node->right, key, value);
  }
  }
 }
contains() and containsNode()
Previously in this chapter, you learned that a key in a tree must be unique. You cannot have two keys with the same key value. Don’t confuse key value with the value stored in a node. A key value is the value of the key itself.
Before adding a new node to the tree, you should determine if the key of the new node already exists in the tree. It is possible to construct a binary tree that allows duplicate keys, but this is not a common implementation and goes beyond the scope of this chapter. In this case, you’ve defined a rule for the tree that states all the keys must be unique.
You determine if the key already exists in the tree by calling the contains() member function of the BinarySearchTree class, which is illustrated next. The contains() function requires one argument, a reference to the key. It returns a Boolean true if the key exists; otherwise, a Boolean false is returned.
You’ll notice that the contains() function is a simple function in that it has one statement. This statement calls the containsNode() member function. The containsNode() function searches the tree for the key and returns a Boolean true if the key is found; otherwise, a Boolean false is returned, which is then used as the return value of the contains() function.
The contains() function is defined in the public access specifier section of the BinarySearchTree class. The containsNode() function is defined in the private access specifier section of the same class.
 bool contains(char* key)
 {
  return containsNode(root, key);
 }
The containsNode() member function, as shown next, requires two arguments. The first argument is a reference to the root node. Any node can be the root node, but typically the first node of the tree is the root node because you want the search for the key to begin at the top of the tree. The second argument is reference to the key, which is the same key that is passed to the contains() function.
The process begins by determining if the root pointer is NULL. If the pointer is NULL, then the key doesn’t exist and a Boolean false is returned; otherwise, the key is compared and the search continues.
First, the containsNode() function compares the key to the key of the root node. If there is a match, then a Boolean true is returned and the search ends. If they are different, then the containsNode() determines if the key is less than the key of the root node. If so, then the containsNode() calls itself and uses the left child node of the root node as the new root node.
If the key isn’t less than the key of the root node, then the containsNode() determines if the key is greater than the key of the root node. If so, then the containsNode() calls itself using the right child node of the root node as the new root node.
The containsNode() is called recursively until either the key is found or until the value of the root node is NULL, indicating that you’ve reached the end of the tree without finding the key.
 bool containsNode(METADATA* node, char* key)
 {
  if(node == NULL)
  {
  return false;
  }
  else
  {
  if(strcmp(key, node->key) == 0)
  {
  return true;
  }
  else if(strcmp(key, node->key) < 0)
  {
  return containsNode(node->left, key);
  }
  else
  {
  return containsNode(node->right, key);
  }
  }
 }
displayInOrder() and processNodesInOrder()
You can display the contents of the tree by calling the displayInOrder() member function of the BinarySearchTree class. As the name implies, the displayInOrder() function is a public function that displays the key and the value of all the left nodes followed by all the right nodes for each node in the tree.
As shown next, the displayInOrder() function has one statement that calls the processNodesInOrder() member function of the BinarySearchTree class. The processNodesInOrder() function is defined in the private access specifier section of the class and is therefore unavailable to the application.
You must pass the processNodesInOrder() function one argument, which is a reference to the root node. The root node is typically the first node of the tree, but you can start displaying the contents of the tree from any node by passing it as the argument to the processNodesInOrder() function.
 void displayInOrder()
 {
  processNodesInOrder(root);
 }
The definition of the processNodesInOrder() member function is illustrated next. You’ll notice that this is a recursive function and is called multiple times in order to print nodes contained on the left and right branches of the tree.
Processing begins by determining if the root node is NULL. If so, you’re at the end of tree. If it is not NULL, then the processNodesInOrder() is called again and passed the left child of the root node. The key and value of the node is then displayed on the screen.
This continues until keys and values of all the left nodes appear on the screen. A similar process is followed to display the right children of the root node. For any given node, all the left nodes will be printed first, then the node itself is printed, then all the right nodes.
 void processNodesInOrder(METADATA* node)
 {
  if(node != NULL)
  {
  processNodesInOrder(node->left);
  cout << "key: " << node->key << "\tvalue: " << node->value << endl;
  processNodesInOrder(node->right);
  }
 }
getSize(), getDepth(), and getTreeDepth()
Previously in this chapter, you learned that a tree is measured by its number of nodes and levels. The number of nodes in a tree is called the size of the tree, and the number of levels is the depth of the tree. We’ve defined member functions that you can use to determine the size and the depth of a tree.
The first of these functions is called the getSize() member function, which is shown next. This function simply returns the value of the size data member of the BinarySearchTree class. Functions that add and remove nodes adjust the value of the size data member so the size data member always reflects the current number of nodes in a tree.
 int getSize()
 {
  return size;
 }
The getDepth() member function determines the number of levels in the tree. This function calls the getTreeDepth() member function and passes it reference to the root node that is used as the starting level when calculating the depth of the tree. It returns an integer that represents the number of levels of the tree.
The getDepth() function and the getSize() function are both defined in the public access specifier section of the BinarySearchTree class. The getTreeDepth() function is defined in the private access specifier.
 int getDepth()
 {
  return getTreeDepth(root);
 }
The getTreeDepth() function is shown next and performs all the calculations to determine the total number of levels in a tree. The getTreeDepth() function requires one argument, which is a reference to the root node. This should be the first node in the tree, although you can use any node. If you do use a node other than the top node, the function calculates levels from that node to the end of the tree. Levels previous to this node are not considered in the calculation.
The process starts by determining if the tree is empty. If so, then the root node is NULL and a zero is returned. If the root node isn’t NULL, then the getTreeDepth() function drills down each level of the tree by recursively calling itself. You get a NULL parameter when you reach a leaf node. This doesn’t mean the tree is empty, it just means you reached a leaf node. Then the recursive calls return, incrementing the count value through each recursion to add up the levels.
Each time the getTreeDepth() function is called, the left child node and the right child node are passed to the getTreeDepth() function and the function returns an integer representing the level, which is assigned to either the depth_left variable or the depth_right variable.
The depth_left and the depth_right variables are compared. If the value of the depth_left variable is greater than the depth_right variable, the depth_left variable is incremented and returned by the getTreeDepth() function; otherwise, the depth_right variable is incremented and returned.
 int getTreeDepth(METADATA* node)
 {
  int depth_left;
  int depth_right;
  if(node == NULL)
  {
  return 0;
  }
  else
  {
  depth_left = getTreeDepth(node->left);
  depth_right = getTreeDepth(node->right);
  if(depth_left > depth_right)
  {
  return depth_left + 1;
  }
  else
  {
  return depth_right + 1;
  }
  }
 }
Binary Tree Using C++Now that you’ve learned the pieces of the BinarySearchTree class, let’s assemble them into a working application. You’ll organize the application into three files, BinaryTreeDemo.cpp, BinarySearchTree.h, and BinarySearchTree.cpp. BinaryTreeDemo.cpp is the application file that contains the code that creates and manipulates the tree. BinarySearchTree.h contains the definition of the structure used to build a node and the definition of the BinarySearchTree class. BinarySearchTree.cpp contains the definition of member functions of the BinarySearchTree class. All these files are listed in the next code snippet.
Previously in this chapter, we discussed the structure used to create a node and the BinarySearchTree class definition. In addition, each member function was discussed in the preceding section of this chapter.
All that remains is for you to take a close look at how the application creates and manipulates a tree. To do this, you’ll explore the BinaryTreeDemo application, which creates a tree and stores two nodes: IDs (keys) and first names (values). It then manipulates these nodes. Here is the application:
 //BinaryTreeDemo.cpp
 #include <iostream.h>
 #include <time.h>
 #include <stdlib.h>
 #include <string.h>
 #include <stdio.h>
 #include "BinarySearchTree.h"
 void main()
 {
  BinarySearchTree* tree = new BinarySearchTree();
  char key[SIZE_KEY];
  char value[SIZE_VALUE];
  int i;
  cout << "Adding three keys and values into the tree." << endl;
  for(i=0; i<3; i++)
  {
  if (i==0)
  {
  strcpy(key,"345");
  strcpy(value,"Bob");
  }
  if (i==1)
  {
  strcpy(key,"123");
  strcpy(value,"Mary");
  }
  if (i==2)
  {
  strcpy(key,"999");
  strcpy(value,"Sue");
  }
  if (!tree->contains(key))
  {
  cout << "Adding node - key: " << key << " value: " << value
  << endl;
  tree->add(key, value);
  }
  else
  {
  cout << "Generated duplicate key: " << key << endl;
  }
  }
  cout << "\nIn order traversal of tree:" << endl;
  tree->displayInOrder();
  cout << "\nDepth of tree before removing nodes: " << tree->getDepth()
  << endl;
  cout << "Size of tree before removing nodes: " << tree->getSize()
  << endl;
  cout << "\nRetrieving one value from the tree:" << endl;
  if(tree->get("123", value))
  {
  cout << " Value: " << value << endl;
  }
  cout << "\nRemoving one node from the tree:" << endl;
  if(tree->contains("123"))
  {
  tree->remove("123");
  }
  cout << "\nIn order traversal of tree:" << endl;
  tree->displayInOrder();
  cout << "\nDepth of tree after removing nodes: " << tree->getDepth()
  << endl;
  cout << "Size of tree after removing nodes: " << tree->getSize()
  << endl;
  cout << "\nDestroying the tree:" << endl;
  delete tree;
 }
The application begins by declaring an instance of the BinarySearchTree class and assigns it to a reference called tree. Next, two char arrays are declared and an int is declared. The char arrays are called key and value, and the size of these arrays is established by using the macro defined in the BinarySearchTree.h file. The arrays store an ID and a first name that is assigned to a node on the tree. The int controls the for loop.
The for loop then adds each ID and first name to the tree. For each iteration, the strcpy() function is called to copy a string that contains either an ID or a first name to the key and value array. You use an if statement to determine which set of ID and first name to copy to the arrays.
Once the set of strings is copied to the arrays, the application calls the contains() member function to determine if the key already exists in the tree. Remember that each key must be unique. The contains() function returns a Boolean true if the key is contained in the tree. You reverse the logic with the not operator so that a Boolean true is treated as a Boolean false. This means that statements within the if statement will not execute if the key already exists in the tree.
If the key doesn’t exist, then the application displays the key and value on the screen before calling the add() member function to place the key and value on the tree, as shown here:
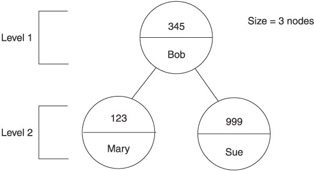
 Adding three keys and values into the tree.
 Adding node - key: 345 value: Bob
 Adding node - key: 123 value: Mary
 Adding node - key: 999 value: Sue
Figure 10-6 illustrates keys and values organized on the tree.
If the key does exist, then a message is displayed on the screen telling everyone that the key is a duplicate key.
After all three IDs and first names are placed on the tree, the application manipulates nodes on the tree. The first manipulation is to call the displayInOrder() member function that displays keys and values of each node, as shown next:
 In order traversal of tree:
 key: 123 value: Mary
 key: 345 value: Bob
 key: 999 value: Sue
Next, the application displays the depth and the size of the tree by calling the getDepth() and getSize() member functions. The result is displayed on the screen, as shown here:
 Depth of tree before removing nodes 2
 Size of tree before removing nodes 3
Remember that the depth of a tree is the number of levels on the tree. In this example, there are two levels. The first level contains the root node, and the second level contains the left child node and the right child node.
Next, the application retrieves the value associated with key 123 by calling the get() member function. The get() member function returns a Boolean value true if the key is found; otherwise, a Boolean false is returned. If the key is found, then the value is displayed on the screen, as shown here. Remember that the first name associated with the key 123 is assigned to the value array by the get() function.
 Retrieving one value from the tree:
 Value Mary
Next, the application removes the node that contains the key 123. First, the contains() function is called to determine if the tree contains a key that has the value 123. If so, a Boolean true is returned; otherwise, a Boolean false is returned. Because there is a node containing 123 as a key, the remove() member function is called and passed the string 123 to remove the node.
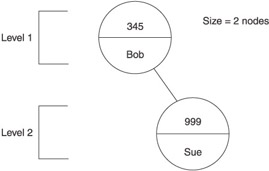
The displayInOrder() function is called once again to display the tree after the node is removed. Here’s what is displayed on the screen. Notice that the node containing 123 no longer exists in the tree (see Figure 10-7).
 Removing one node from the tree:
 In order traversal of tree:
 key: 345 value: Bob
 key: 999 value: Sue
Finally, the application calls the getDepth() and getSize() functions to display the depth and size of the tree after the node is removed. Here’s what is displayed:
 Depth of tree after removing nodes 2
 Size of tree after removing nodes 2
The application finishes removing the tree by calling the delete operator. Remember that the destructor of the BinarySearchTree class calls the removeAllNodes() member function that displays keys and values of nodes that are removed. Here’s what is displayed:
 Removing node - key: 345 Bob
 Removing node - key: 999 Sue

 // BinarySearchTree.h"
 #include <string.h>
 #define SIZE_KEY  32
 #define SIZE_VALUE 256
 typedef struct Metadata
 {
  struct Metadata(char* key, char* value)
  {
  strcpy(this->key, key);
  strcpy(this->value, value);
  left = NULL;
  right = NULL;
  }
  char key[SIZE_KEY];
  char value[SIZE_VALUE];
  struct Metadata* left;
  struct Metadata* right;
 } METADATA;
 class BinarySearchTree
 {
  private:
  int size;
  METADATA* root;
  bool addNode(METADATA** current_node, METADATA* new_node);
  bool getNode(METADATA* current_node, char* key, char* value);
  void removeAllNodes(METADATA* node);
  void processNodesInOrder(METADATA* node);
  int getTreeDepth(METADATA* node);
  bool containsNode(METADATA* node, char* key);
  bool removeNode(METADATA** node, char* key);
  void removeRootNode(METADATA** node);
  void moveLeftMostNode(METADATA** node, METADATA* root);
  public:
  BinarySearchTree();
  virtual ~BinarySearchTree();
  bool add(char* key, char* value);
  bool remove(char* key);
  void removeAll();
  bool get(char* key, char* value);
  bool contains(char* key);
  void displayInOrder();
  int getSize();
  int getDepth();
 };

 // BinarySearchTree.cpp
 #include <iostream.h>
 #include "BinarySearchTree.h"
 BinarySearchTree::BinarySearchTree()
 {
   root = NULL;
  size = 0;
 }
 BinarySearchTree::~BinarySearchTree()
 {
  removeAll();
 }
 bool BinarySearchTree::add(char* key, char* value)
 {
  if(key == NULL || value == NULL || strlen(key) > SIZE_KEY-1
     || strlen(value) > SIZE_VALUE-1)
  {
    return false;
   }
  METADATA* new_node = new METADATA(key, value);
   return addNode(&root, new_node);
 }
 bool BinarySearchTree::addNode(METADATA** current_node, METADATA* new_node)
 {
   if(*current_node == NULL)
   {
   *current_node = new_node;
   size++;
   return true;
  }
   else
   {
    if(strcmp(new_node->key, (*current_node)->key) < 0)
    {
    return addNode(&((*current_node)->left), new_node);
   }
  else if(strcmp(new_node->key, (*current_node)->key) > 0)
   {
   return addNode(&((*current_node)->right), new_node);
   }
    else
   {
   delete new_node;
    return false;
   }
  }
 }
 bool BinarySearchTree::remove(char* key)
 {
  return removeNode(&root, key);
 }
 function
 bool BinarySearchTree::removeNode(METADATA** node, char* key)
 {
  if(*node != NULL)
  {
   if (strcmp(key, (*node)->key) == 0)
    {
    removeRootNode(node);
    size--;
    return true;
   }
   else if(strcmp(key, (*node)->key) < 0)
   {
    return removeNode(&((*node)->left), key);
   }
    else
   {
    return removeNode(&((*node)->right), key);
   }
  }
  else
  {
    return false;
   }
 }
 void BinarySearchTree::removeRootNode(METADATA** root)
 {
  METADATA* temp;
  if((*root)->left == NULL && (*root)->right == NULL)
   {
    delete(*root);
   *root = NULL;
  }
  else if((*root)->right == NULL)
  {
    temp = *root;
    *root = (*root)->left;
    delete(temp);
   }
  else if((*root)->left == NULL)
  {
   temp = *root;
   *root = (*root)->right;
   delete(temp);
   }
  else
   {
   moveLeftMostNode(&((*root)->right), *root);
  }
 }
 void BinarySearchTree::moveLeftMostNode(METADATA** node, METADATA* root)
 {
   if(*node != NULL && (*node)->left == NULL)
  {
   METADATA* temp = *node;
    strcpy(root->key, (*node)->key);
   strcpy(root->value, (*node)->value);
    *node = (*node)->right;
    delete(temp);
  }
  else
  {
   moveLeftMostNode(&((*node)->left), root);
  }
 }
 void BinarySearchTree::removeAll()
 {
  removeAllNodes(root);
  root = NULL;
   size = 0;
 }
 void BinarySearchTree::removeAllNodes(METADATA* node)
 {
  if(node != NULL)
  {
   removeAllNodes(node->left);
   removeAllNodes(node->right);
   cout << "Removing node - key: " << node->key << "\t" << node->value
     << endl;
    delete node;
  }
 }
 bool BinarySearchTree::get(char* key, char* value)
 {
  return getNode(root, key, value);
 }
 bool BinarySearchTree::getNode(METADATA* node, char* key, char* value)
 {
   if(node == NULL)
   {
   value[0] = '\0';
   return false;
   }
  else
   {
    if(strcmp(key, node->key) == 0)
    {
     strcpy(value, node->value);
      return true;
  }
   else if(strcmp(key, node->key) < 0)
   {
    return getNode(node->left, key, value);
    }
    else
   {
    return getNode(node->right, key, value);
   }
   }
 }
 bool BinarySearchTree::contains(char* key)
 {
  return containsNode(root, key);
 }
 bool BinarySearchTree::containsNode(METADATA* node, char* key)
 {
  if(node == NULL)
  {
   return false;
   }
  else
  {
    if(strcmp(key, node->key) == 0)
   {
     return true;
    }
    else if(strcmp(key, node->key) < 0)
   {
     return containsNode(node->left, key);
    }
    else
    {
     return containsNode(node->right, key);
   }
  }
 }
 void BinarySearchTree::displayInOrder()
 {
   processNodesInOrder(root);
 }
 void BinarySearchTree::processNodesInOrder(METADATA* node)
 {
   if(node != NULL)
  {
   processNodesInOrder(node->left);
   cout << "key: " << node->key << "\tvalue: " << node->value << endl;
    processNodesInOrder(node->right);
  }
 }
 int BinarySearchTree::getSize()
 {
  return size;
 }
 int BinarySearchTree::getDepth()
 {
  return getTreeDepth(root);
 }
 int BinarySearchTree::getTreeDepth(METADATA* node)
 {
  int depth_left;
  int depth_right;
   if(node == NULL)
   {
    return 0;
  }
  else
   {
    depth_left = getTreeDepth(node->left);
    depth_right = getTreeDepth(node->right);
    if(depth_left > depth_right)
   {
    return depth_left + 1;
    }
   else
    {
    return depth_right + 1;
    }
   }
 }
Chapter 11: What Is a Hashtable?
Hashtable is one of those programming terms whose definition is illusive. Hash means “mishmash,” and a table is the organization of data into columns and rows, but a table containing mishmash data seems useless to an application. Not necessarily! Programmers use a hashtable to store and retrieve large amounts of information efficiently. You’ll learn how this is done and how to use hashtables in your application in this chapter.
A Hashtable
Object-oriented applications that mimic real life must store and retrieve large amounts of information. Previously in this book, you learned that information is associated with an object and stored in an instance of a class that represents the object within the application.
Objects are stored using one of a number of data structures. The choice of data structure depends on the nature of the application. A hashtable is a common data structure to store objects that have a key/value relationship.
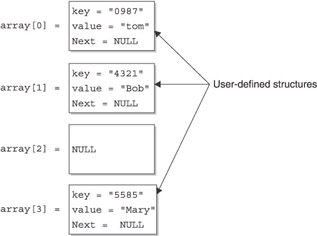
A hashtable is an array of pointers to data. Data takes the form of a user-defined structure that consists of up to three elements: the key, the value, and a pointer to the instance of the next structure in the hashtable. The pointer is used only if your collisions are handled in the manner described in this chapter; otherwise, it is not required.
The key uniquely identifies the value. Each user-defined structure in the hashtable must have a unique key. The value is data that is associated with the key, and it can appear more than once in the hashtable. Think of a key as a student ID and the corresponding value as a student’s name. Each student is assigned a unique student ID, but two or more students can have the same name.
What makes a hashtable interesting is the way in which the program assigns a user-defined structure to an array element of the hashtable. The program hashes the key of a user-defined structure to determine which array element is assigned the user-defined structure.
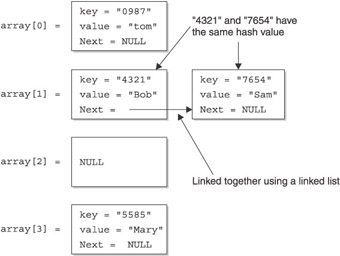
A bit confused? If so, you’re not alone, because this concept isn’t intuitive. To clear up any confusion, look at Figure 11-1, which shows three entries in the hashtable. I simplified this illustration by using blocks to represent each instance of the user-defined structure that contains the key/value of the entry. Later in this chapter, you’ll see the actual user-defined structure used for hashtable entries.
Figure 11-1 also shows the index that represents the hashtable. Notice that each array element points to a user-defined structure. The user-defined structure contains the actual data for the entry of the hashtable.
Each user-defined structure is assigned to a specific array element based on the user-defined structure’s key. The key is translated into a number that is the array index. This number is called a hash value and is created by using the process called hashing. The hash value becomes the array index of the array element that points to the user-defined structure whose key is hashed. Each index in Figure 11-1 is the hash value of the key of the user-defined structure.
You can think of hashing as a way to come up with the index of the array element associated with an entry in the hashtable. You’ll learn how to perform hashing in your application later in this chapter.
Hashing achieves an even distribution of index values, which makes finding information faster than if a string of bits is in a natural order. In a natural order, words and names follow a predictable pattern. By shuffling the bits that make up words and names, a program no longer treats those bits as a text string and instead randomizes the bits to make them more efficient to search.
Hashing is a high-speed scheme for taking a key that has natural sequence (alphabetical or numerical order) and pseudo-randomizing it. If the key is a name, certain letters appear more often than other letters, and certain sequences of characters occur more frequently than other characters. Hashing moves the bits around to produce an even distribution of hash values, which is needed to quickly search a hashtable.
The result of hashing is a number that has no real significance, but it is used as an array index to store and retrieve information that is associated with an entry that is stored in a hashtable. Indexes shown in Figure 11-1 are hash values of the corresponding key of the user-defined structure pointed to by the array element.
Problems with Hashing
Hashing is not perfect. Occasionally, a collision occurs when two different keys hash into the same hash value and are assigned to the same array element. Programmers have come up with various techniques for dealing with this conflict.
A common way to deal with a collision is to create a linked list of entries that have the same hash value. For example, say that the key of each entry hashes to the same hash value, and this results in both being assigned to the same array element of the hashtable, as shown in Figure 11-2.
Because two entries cannot be assigned the same array element, the programmer creates a linked list. The first user-defined structure is assigned to the pointer in the array element. The second isn’t assigned to any array element and is instead linked to the first user-defined structure, thereby forming a linked list.
As you’ll see later in this chapter, the program locates an entry in a hashtable by referencing the hashed value of the entry. The hash value is the index of the array element that points to the entry. You can probably see the dilemma: the index points only to the first entry, not the second.
Programmers work around this problem by having the program read the key of the first entry. If the key isn’t the one the program seeks, the program looks at the next entry in the linked list. It continues down the linked list until the program finds the desired entry or reaches the end of the linked list.
Developing a HashtableCreating and using a hashtable in your application is a two-step process. The first step is to define a user-defined structure similar to the way you defined nodes in a tree or a linked list. The second step is to define a Hashtable class. The Hashtable class declares an instance of the user-defined structure and defines member data and member functions that are used to add, remove, and manipulate information stored in the hashtable.
The Hashtable Class
The first step to using a hashtable in your application is to define a user-defined structure and then define the Hashtable class, which interacts with the hashtable within the application.
Begin by defining the user-defined structure, as shown here:
 typedef struct Metadata
 {
  struct Metadata(char* key, char* value)
  {
  strcpy(this->key, key);
  strcpy(this->value, value);
  next = NULL;
  }
  char key[SIZE_KEY];
  char value[SIZE_VALUE];
  struct Metadata* next;
 } METADATA;
I called this structure metadata because metadata is data that describes data, similar to a column name on a spreadsheet. You’ll assign data to the structure once an instance of metadata is declared in the Hashtable class.
The metadata structure has three members. The first member is a char array called key that stores the key of a key/value pair. The second member is a char array called value because it stores the corresponding value of the key/value pair. The last member is a pointer to another metadata structure, which is called next. This enables the application to link together structures at a given index.
The size of both character arrays is determined by the value of the #define macro called SIZE_KEY and SIZE_VALUE. These are defined in the HashTable.h header file (see “Hashtable Using C++”).
You’ll notice that a constructor is defined inside the structure definition. This enables the application to pass the structure initial values for the key and value, which are then assigned the corresponding character arrays. It also initializes the pointer to the next node in the linked list. You’ll see how this is used later.
Once the metadata structure is defined, you need to define the Hashtable class, which declares an instance of the metadata structure and defines member functions that interact with the metadata structure.
Here’s the definition of the Hashtable class:
 class Hashtable
 {
  private:
  int tablesize;
  METADATA** table;
  int size;
  METADATA* current_entry;
  int current_index;
  long hashString(char* key);
  METADATA* find(char* key);
  public:
  Hashtable(int tablesize = DEFAULT_TABLESIZE);
  virtual ~Hashtable();
  bool put(char* key, char* value);
  bool get(char* key, char* value);
  bool contains(char* key);
  bool remove(char* key);
  void removeAll();
  int getSize();
  void initIterator();
  bool hasNext();
  void getNextKey(char* key);
 };
The Hashtable class is organized into the private access specifier and public access specifier sections. The private access specifier section contains five data members and two member functions.
The first data member is an integer called tablesize, which is later assigned the size of the array of pointers that stores entries in the hashtable. Next is a pointer to a pointer called table, an array of metadata pointers that will store information in the hashtable. Each entry in the table is a pointer to a linked list of entries. NULL indicates there isn’t an entry at this index.
The third data member of the Hashtable class is an integer called size that is later assigned the number of entries in the hashtable. The last two data members are current_entry and current_index. The current_entry data member is a pointer to the current entry in the metadata structure, and the current_index is an integer representing the current key. Both iterate entries in the hashtable.
Two functions are declared within the private access specifier of the Hashtable class: hashString() and find(). The hashString() function hashes a key in a key/value pair and returns the hash code. The returned hash code is the index where the entry resides in the hashtable, the index in the array of metadata pointers. The find() function searches a hashtable for a particular key and returns a pointer to the metadata structure that contains that key. Both functions are called by other member functions and are described in detail later in this chapter.
The public access specifier section of the Hashtable class contains member functions that create and interact with the hashtable. Each of these functions is discussed in forthcoming sections of this chapter.
Constructor and Destructor
The constructor of the Hashtable class initializes data members and creates the hashtable, as illustrated in the following code snippet. The size of the array of pointers (tablesize) is passed to the constructor when the application declares an instance of the Hashtable class. The value passed to the constructor must be an integer, which is assigned to the tablesize data member of the Hashtable class.
The constructor allocates an array of metadata pointers, which will store the data in the hashtable. This array is assigned to the table member of the class. Previously, you learned that the table data member is an array of pointers that point to metadata structures.
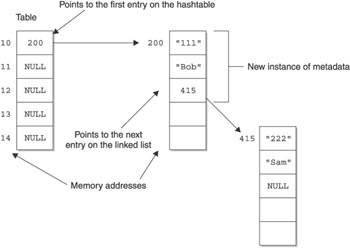
Once the instance of the Hashtable class is declared, the constructor uses a for loop to initialize elements of the table array to NULL. The size data member is initialized to zero, indicating there aren’t any entries in the hashtable. However, you can increase the size of the hashtable by passing the tablesize to the constructor. In Figure 11-3, the hashtable size is five elements.
 Hashtable(int tablesize)
 {
  size = 0;
  this->tablesize = tablesize;
  table = new METADATA*[tablesize];
  for(int i=0; i<tablesize; i++)
  {
  table[i] = NULL;
  }
 }
The destructor of the Hashtable class is shown in the next code snippet. It performs two actions. First, the destructor calls the removeAll() member function to remove all entries from the hashtable. After entries are deleted, the constructor deletes the array of pointers referenced by the table data member. It does this by using the delete operator.
 ~Hashtable()
 {
  removeAll();
  delete[] table;
 }
Inserting a New Entry
You insert a new entry into the hashtable by calling the put() member function, which is available directly to the application because it is declared in the public access specifier section of the Hashtable class.
The put() function is shown in the following code snippet. It requires two arguments. The first argument is a char pointer called key that contains the key of the new entry. The second argument is a char pointer called value that references the value of the new entry. The put() function returns a Boolean true if the new entry is inserted into the hashtable; otherwise, a Boolean false is returned.
As you’ll recall, each key must be unique. Before the new entry is placed in the hashtable, the put() function determines if the key already exists by calling the find() member function and passing find() the key.
The keys stored in the hashtable are exactly the same as the key passed into the find() function. The hash determines which bucket it goes in, and then find() compares keys to find the desired key. You’ll learn how the find() function works later in this chapter.
The find() function returns a NULL if the key isn’t found; otherwise, the find() function returns a pointer to the metadata structure that contains the key. If the find() function doesn’t return a NULL, the key is already in the hashtable, and the put() function returns a false.
However, if the find() function returns a NULL, a new entry is placed in the hashtable by first declaring a new instance of the metadata structure, which is then passed the key and the value of the new entry. Reference to the instance is assigned to a pointer called entry.
Next, the hashString() member function is called and passed the key of the new entry. The hashString() function hashes the key and returns a hash number that is used as the array index for the entry in the hashtable. The hash number is assigned to the integer called bucket. You’ll learn how the hashString() function operates later in this chapter.
The bucket integer is then used as the array index of the table data member of the Hashtable class. As you’ll remember from the previous section of this chapter, the table data member is an array of metadata pointers. This means that the table[bucket] references the element of the hashtable that will be assigned the new entry.
Before the entry is assigned to this element, the current element in that bucket is assigned to the next member of the instance of the metadata called entry that is declared in the put() function. After this assignment, the new entry is assigned to the table[bucket] element of the hashtable. In effect, what this does is make the new entry the first entry in a linked list defined at this point in the array. If there was no entry at this index, the value of the index would be NULL. This would assign NULL to the next pointer of the new entry, which is okay because the new entry is the only entry in the linked list.
The put() function then increments the size data member of the Hashtable class, indicating an additional entry has been placed in the hashtable. The put() function then returns a Boolean true. Figure 11-4 illustrates the hashtable if you pass 111 as the key and Bob as the value to the put() function.
 bool put(char* key, char* value)
 {
  if(find(key) != NULL)
  {
  return false;
  }
  METADATA* entry = new METADATA(key, value);
  int bucket = hashString(key);
  entry->next = table[bucket];
  table[bucket] = entry;
  size++;
  return true;
 }
Retrieving a Value
You can retrieve a value stored in a hashtable by calling the get() member function, which is illustrated in the next code snippet. The get() function requires two arguments. The first argument is a char pointer that references the key of the entry that you want to retrieve. The second argument is a char pointer that references the value of the entry. The get() function copies the value of the entry from the hashtable to this char pointer if the key is found in the hashtable. If the key is found, then a Boolean true is returned by the get() function; otherwise, a Boolean false is returned.
The get() function searches the hashtable by calling the find() function and passing it the key received as the first argument to the get() function. The find() function hashes the key before searching for the key in the hashtable. The find() function then either returns a reference to the metadata structure that contains the key, or returns a NULL.
The get() function assigns the return value of the find() function to a pointer called temp, which is a pointer to a metadata structure. The get() function then determines if the temp pointer is NULL. If so, then the first array element of the value argument is assigned the NULL character (sets value to an empty string) and the get() function returns a Boolean false, indicating that this key does not exist in the hashtable.
If temp isn’t NULL, it means the find() function found the key in the hashtable and it returns a reference to the metadata that contains the entry. The value of the entry is then copied to the value argument, and the get() function returns a Boolean true.
 bool get(char* key, char* value)
 {
  METADATA* temp = find(key);
  if(temp == NULL)
  {
  value[0] = '\0';
  return false;
  }
  else
  {
  strcpy(value, temp->value);
  return true;
  }
 }
find()
You called the find() member function several times in other member functions. Now let’s take a close look at how the find() member function works. As you’ll recall, the purpose of the find() function is to search the hashtable for a key. If the key is found, then the find() function returns a reference to the metadata structure that contains the key and the corresponding value. If the key isn’t found, then find() returns a NULL.
The find() function requires one argument, a reference to the key. The key is then passed to the hashString() member function, which hashes the key and returns a hash number that corresponds to the key. It does this because keys stored in the hashtable are hash number representations of the actual key. Therefore, the key must be converted to its corresponding hash number for the find() function to locate the entry in the array of pointers.
The hash number returned by the hashString() function is assigned to the bucket integer, which is used as the index to identify the entry in the table array that is the hashtable. The value of the table array element is a reference to a metadata structure, which is then assigned to the temp pointer of the metadata structure.
As long as the temp pointer isn’t NULL, the find() function uses the strcmp() function to compare the key element of the metadata structure pointed to by temp with the key passed to the find() function. At this point, the temp variable is being used to iterate the linked list. If there is a match, then the metadata structure pointed to by the temp pointer is returned. If there isn’t a match, then the next member of the temp metadata structure is assigned to the temp pointer, and the find() function continues by making another comparison.
If there isn’t a match after the find() function has examined all the entries in the hash index, then the find() function returns a NULL.
 METADATA* find(char* key)
 {
  int bucket = hashString(key);
  METADATA* temp = table[bucket];
  while(temp != NULL)
  {
  if(strcmp(key, temp->key) == 0)
  {
  return temp;
  }
  temp = temp->next;
  }
  return NULL;
 }
contains()
The purpose of the contains() member function is to determine if a key exists in the hashtable. As you can see by the following definition, the contains() function is simple to construct, but it has a critical role in working with hashtables.
As you learned previously in this chapter, each key of a hashtable must be unique. The contains() function enables your application to ensure that keys are unique by determining if the key already exists in the hashtable.
The contains() function requires one argument, which is a reference to the key that you want to know exists in the hashtable. The contains() function returns a Boolean true if the key exists or a Boolean false if the key isn’t found.
The contains() function determines if the key exists by calling the find() function and passing it the key. In the previous section of this chapter, you learned that the find() function returns either a reference to the metadata that contains the key or a NULL. The contains() function determines which of these is returned.
If a NULL is returned by the find() function, then the contains() function returns a Boolean false; otherwise, if the find() function returns reference to the metadata that contains the key, a Boolean true is returned.
 bool contains(char* key)
 {
  if(find(key) == NULL)
  {
  return false;
  }
  else
  {
  return true;
  }
 }
Remove an Entry
You’ll need to call the remove() member function whenever your application needs to remove an entry from the hashtable. The remove() function, shown in the next code snippet, requires one argument, which is a reference to the key of the entry that you want to remove from the hashtable. If the key is found and the entry successfully removed, then the remove() function returns a Boolean true; otherwise, a Boolean false is returned.
The remove() function hashes the key of the entry you want to remove by calling the hashString() function and passing it a reference to the key received as the argument to the remove() function. The hashString() function returns the hash number for this key, which is then assigned to an integer called bucket.
The bucket is used as the array index of the table data member of the Hashtable class. The table[bucket] references the element of the hashtable that contains the linked list, which must be searched to find the entry. This value is assigned to a temp pointer that will be used to iterate the list.
The remove() function then determines if the entry exists by comparing the temp pointer to NULL. If it is NULL, then a Boolean false is returned to the statement that calls the remove() function. If temp isn’t NULL, then at least one entry exists in the linked list, and the remove() function determines where the entry appears in the hashtable linked list.
First, the remove() function determines if the entry is the first node on the linked list by using the strcmp() function to compare the key of the entry to the key passed to the remove() function. If they match, then the strcmp() function returns a zero, and the remove() function knows that the entry is the first node on the linked list. If the entry isn’t the first node, then the remove() function must iterate through the linked list to locate the entry.
If the entry is the first node, then the remove() function switches entries on the linked list. As you learned earlier in this chapter, the temp metadata contains three elements: the key, the value, and a reference to the next entry called next.
Reference to the next entry is assigned to the table[bucket] array element, which currently contains reference to the entry that is being removed from the hashtable. This makes the next entry the first entry in the linked list because the current entry is the first entry in the linked list.
After this switch is made, the remove() function uses the delete operator to deallocate the current entry, which is pointed to by the temp pointer. It is at this point the entry is removed from the hashtable. The remove() function then decrements the size data member to reflect the removal of the entry and returns a Boolean true, indicating that the entry was successfully removed.
If the entry isn’t the first node on the linked list, the remove() function must step through the entire linked list looking for the entry. It does this by assigning reference to the next metadata structure, which is the next entry, to the temp_next pointer. As long as the temp_next pointer isn’t NULL, the remove() function calls the strcmp() function to compare the key member of the temp_next metadata structure to the key passed as an argument to the remove() function.
If they match, the entries are switched using the same steps as if the entry is the first node on the linked list. If they don’t match, then the next entry (metadata structure) is assigned to the temp_next pointer and the search continues. If the key cannot be located in the linked list after the search is exhausted, the remove() function returns a Boolean false.
 bool remove(char* key)
 {
  int bucket = hashString(key);
  METADATA* temp = table[bucket];
  if(temp == NULL)
  {
  return false;
  }
  else if(strcmp(key, temp->key) == 0)
  {
  table[bucket] = temp->next;
  delete temp;
  size--;
  return true;
  }
  else
  {
  METADATA* temp_next = temp->next;
  while(temp_next != NULL)
  {
  if(strcmp(key, temp_next->key) == 0)
  {
  temp->next = temp_next->next;
  delete temp_next;
  size--;
  return true;
  }
  temp = temp->next;
  temp_next = temp_next->next;
  }
  }
  return false;
 }
Another way to remove entries from a hashtable is to call the removeAll() function. The removeAll() function, shown in the next code snippet, deletes all entries in the hashtable. To do this, the removeAll() function uses a for loop to iterate all the entries in the hashtable. At each entry, the while loop executes to transverse the linked list to delete all entries that are linked to the hashtable entry. Once entries on the linked list are deleted, the for loop moves to the next entry in the hashtable and repeats the process until all linked entries and all entries on the hashtable are removed.
It begins by declaring a pointer called temp that points to a metadata structure. The temp pointer is then assigned the first element in the hashtable array, which is called table.
As long as the temp pointer isn’t NULL, the removeAll() function assigns reference to the next metadata associated with the current entry (metadata structure) to the next pointer. The key and value of the current entry are then displayed on the screen before the delete operator is called to remove the entry pointed to by the temp pointer.
The entry pointed to by the next pointer is then assigned to the temp pointer, and the removeAll() function returns to the top of the while loop and continues by removing the next entry from the hashtable. This continues until the temp pointer is NULL, which means that the hashtable is empty. (When temp is NULL, one linked list is finished, then Java returns to the outer loop again to process the next linked list.) The removeAll() function then sets the size data member of the Hashtable class to zero, indicating there are no entries in the hashtable.
 void removeAll()
 {
  for(int i=0; i<tablesize; i++)
  {
  METADATA* temp = table[i];
  while(temp != NULL)
  {
  METADATA* next = temp->next;
  cout << "Removing node - key:" << temp->key <<
  "\t" << temp->value << endl;
  delete temp;
  temp = next;
  }
  }
  size = 0;
 }
getSize()
The getSize() member function is the simplest function of the Hashtable class because it reads the size data member of the Hashtable class and returns its value to the statement that calls the getSize() function. The getSize() function definition is listed in the next code snippet.
Why should you use the getSize() function instead of giving the application access to the size data member? To protect the integrity of the data. If you gave the application direct access to the size data member, statements within the application could assign an incorrect value to size. By controlling access to size to only function members of the hashtable, you protect the integrity of the data.
 int getSize()
 {
  return size;
 }
hashString()
The hashString() member function is another function called by other member functions of the Hashtable class whenever a function needs to convert a key to a hash number key. The hashString() function requires one argument, a char pointer to the key that is being hashed. The hash number that corresponds to the key is then returned by the hashString() function as a long.
The definition of the hashString() function is listed in the next code snippet. The hashing process begins by first determining the length of the key by calling the strlen() function. The length is assigned to an integer that we call n. You’ll also declare a long called h and initialize it to zero to store intermediate values of the hash key during the hashing process.
The hashing process works at the bit level of the key and, in effect, randomizes bits that comprise the key. The hashString() function iterates through each character of the key by using the for loop. During each iteration, the bits that comprise the value of the h variable are shifted (h << 2), and the bits of the current character of the key are added to the shifted bits. The result is then assigned to the h variable. This process continues until the last character of the key is hashed.
The hashString() then calculates the modulus value, the final hashed value (h), and the table size (h % tablesize). The modulus value can be either a positive or negative value. However, the hashed key must be a positive value. Therefore, the hashString() function returns the absolute value of the hashed key (abs(h % tablesize)).
 long hashString(char* key)
 {
  int n = strlen(key);
  long h = 0;
  for(int i=0; i<n; i++)
  {
  h = (h << 2) + key[i];
  }
  return abs(h % tablesize);
 }
| Note |
The goal of hashing is to take a data set of keys and produce a nicely distributed sequence of indices. Although programmers agree that the hashtable size should be a prime number, there are various algorithms for hashing. However, all hashing algorithms have one thing in common: they use bit shifting.
There isn’t a perfect hashing function. Some hashing functions work better on a given dataset than others. Programmers typically test a wide variety of hash functions on a dataset before settling on the best one to use for a specific dataset.
|
|
initIterator()
The initIterator() member function initializes some class variables that traverse all the entries in the linked list. The initIterator() function doesn’t require any arguments and doesn’t return any value, as shown in the next code snippet. The initIterator() is called by the displayAll() function that is defined by the application to display the content of the hashtable. You’ll learn more about the displayAll() function in the “Hashtable Using C++” section of this chapter.
When called, the initIterator() function assigns values to two data members of the Hashtable class. The current_entry data member is assigned NULL, and the current_index data member is assigned the value of the tablesize data member.
Next, a for loop finds the first entry in the hashtable. During each loop, the current element of the table array is compared to NULL. If the element is NULL, the search continues to search for the element of the table array that isn’t NULL. The first element that isn’t NULL is the first entry in the hashtable.
Once the first entry is found, the value of the corresponding element of the table array is assigned to the current_entry. This value is a reference to the metadata structure that contains the key and value for that entry. The index of the element is then assigned to the current_index data member. The initIterator() function then returns.
The initIterator() function is used by the displayAll() function to determine the first entry in the hashtable before the hasNext() and getNextKey() member functions are called. Both these functions directly access the current_entry and current_index data members of the Hashtable class. These functions are discussed in detail in the next section of this chapter.
 void initIterator()
 {
  current_entry = NULL;
  current_index = tablesize;
  for(int i=0; i<tablesize; i++)
  {
  if(table[i] == NULL)
  {
  continue;
  }
  else
  {
  current_entry = table[i];
  current_index = i;
  break;
  }
  }
 }
hasNext() and getNextKey()
An application iterates the hashtable by calling the hasNext() and getNextKey() member functions. These two functions are used together with initIterator() to retrieve all the keys from a hashtable. The hasNext() function determines if there is another entry in the hashtable based on the current state of the iterator. As illustrated next, the hasNext() function doesn’t require any arguments and returns a Boolean true if another entry exists or a Boolean false if the end of the hashtable is reached.
The hasNext() function makes this determination by comparing the value of the current_entry data member to NULL. If the value of the current_entry is NULL, then the hasNext() function returns a Boolean false; otherwise, a Boolean true is returned.
 bool hasNext()
 {
  if(current_entry == NULL)
  {
  return false;
  }
  else
  {
  return true;
  }
 }
As you’ll recall from the “initIterator()” section, the current_entry and current_index are data members of the Hashtable class. The current_entry data member contains a reference to the current entry in the hashtable, and the current_index holds the index value of the table array that references the current entry.
The getNextKey() function retrieves the key of the entry pointed to by the current_entry data member. The getNextKey() function then moves to the next entry in the hashtable by first trying to go to the next element in the linked list. If the next element is NULL, it moves to the next array index and iterates the array to find the next entry.
The following code snippet is the definition of the getNextKey() function. In it, the getNextKey() function requires one argument. The argument is a char pointer to an array called key. The getNextKey() function copies the key of the current entry to this array, which is then accessed by the statement that calls the getNextKey() function.
Before the process begins, the getNextKey() function determines if the value of the current_entry is NULL. If so, a NULL character is assigned to the first element of the key array (it sets key to an empty string), and the getNextKey() returns without further processing.
If the value of the current_entry data member isn’t NULL, then the key of the metadata structure that contains the current entry is copied to the key pointer by calling the strcpy() function. Once copied, the getNextKey() function sets out to locate the next entry. It does this by referencing the next member of the metadata structure that contains the current entry.
The value of the next member is compared to NULL in an if statement. If the next member isn’t NULL, indicating there is another entry in the linked list at this index, the value of the next member is assigned to the current_entry data member, making the next entry the current entry of the hashtable.
However, if the value of the next member is NULL, then the getNextKey() function steps through each element of the table array to find an array element whose value isn’t NULL. When it finds one, the getNextKey() function copies the value of the array element to the current_entry data member and copies the index of that array element to the current_index data member. The getNextKey() function then returns to the statement that called it.
If the remaining elements of the table array are NULL, there are no more entries in the hashtable. The getNextKey() function then assigns a NULL value to the current_entry and assigns the value of the tablesize data member to the current_index data member. These keys and values are pulled from the hashtable in no particular order; generally, hashtables do not support ordering of the data.
 void getNextKey(char* key)
 {
  if(current_entry == NULL)
  {
  key[0] = '\0';
  return;
  }
  strcpy(key, current_entry->key);
  if(current_entry->next != NULL)
  {
  current_entry = current_entry->next;
  }
  else
  {
  for(int i=current_index+1; i<tablesize; i++)
  {
  if(table[i] == NULL)
  {
  continue;
  }
  current_entry = table[i];
  current_index = i;
  return;
  }
  current_entry = NULL;
  current_index = tablesize;
  }
 }
Hashtable Using C++
Now that you understand how the components of the Hashtable class work, it is time to assemble them into a working C++ application. I organized the application into three files: the HashtableDemo.cpp file that contains the application; the HashTable.h file that contains the definitions of the metadata structure and the Hashtable class, and the Hashtable.cpp file that contains the implementation of member functions. You’ll find all three files in the code at the end of this section. In this section, we’ll focus on how to use the Hashtable class in an application. You already learned how member functions and data members of the Hashtable class work.
The application begins by declaring an instance of the Hashtable class and assigning reference to it to the hashtable pointer. You then declare two char arrays using the SIZE_KEY and SIZE_VALUE macro defined to set the size of the array. These arrays store strings that contain the key and the value of data that you’ll be entering into the hashtable.
Next, the strcpy() function is called to copy the key and value to the key and value arrays. Before you can insert these into the hashtable, you must first determine if the key already exists in the hashtable by calling the contains() member function of the Hashtable class. The contains() member function returns a Boolean true if the key already exists; otherwise, a Boolean false is returned. Notice the not operator (!) reverses the logic of the return value. You do this to execute statements contained within the if statement.
If the key doesn’t exist in the hashtable, then the application displays a message on the screen telling that the key and value are being inserted. The actual insertion occurs by calling the put() member function of the Hashtable class. The put() function requires that the key and the value be passed as arguments.
This process is repeated in order to insert two additional key/value pairs into the hashtable. Each of these is also displayed on the screen as shown here. Figure 11-5 illustrates the hashtable.
 Adding node - key: 389 value: Mary
 Adding node - key: 415 value: Henry
 Adding node - key: 999 value: Joe
Once all three new entries have been inserted into the hashtable, the application calls the displayAll() function. The displayAll() function is a stand-alone function and not a member of the Hashtable class. Its sole purpose is to display the content of the hashtable. The displayAll() function is defined beneath the main() function in this example.
Here’s what is displayed on the screen when this function is called:
 Current nodes in hashtable:
 key: 415 value: Henry
 key: 999 value: Joe
 key: 389 value: Mary
The application then calls the remove() member function of the Hashtable class to remove the entry that has 415 as its key. Once again, the displayAll() function is called to demonstrate that the entry was actually removed from the hashtable.
 After removing 415:

 Current nodes in hashtable:
 key: 999 value: Joe
 key: 389 value: Mary
In its final step, the application destroys the hashtable by using the delete operator. The destructor is automatically called before the hashtable is destroyed. The destructor calls the removeAll() member function of the Hashtable class, which displays each entry before removing them from the hashtable. Here’s what is displayed on the screen when all the entries are removed:
 Destroying hashtable:
 Removing node - key:999 Joe
 Removing node - key:389 Mary
//HashtableDemo.cpp
 #include <iostream.h>
 #include <time.h>
 #include <stdlib.h>
 #include <string.h>
 #include <stdio.h>
 #include "Hashtable.h
 void displayAll(Hashtable* hashtable);
 void main()
 {
  Hashtable* hashtable = new Hashtable();
  char key[SIZE_KEY];
  char value[SIZE_VALUE];
  strcpy(key, "389");
  strcpy(value, "Mary");
  if(!hashtable->contains(key))
  {
  cout << "Adding node - key: " << key << " value: "
  << value << endl;
  hashtable->put(key, value)
  }
  strcpy(key, "415");
  strcpy(value, "Henry");
  if(!hashtable->contains(key))
  {
  cout << "Adding node - key: " << key << " value: "
  << value << endl;
  hashtable->put(key, value);
  }
  strcpy(key, "999");
  strcpy(value, "Joe");
  if(!hashtable->contains(key))
  {
  cout << "Adding node - key: " << key << " value: "
  << value << endl;
  hashtable->put(key, value);
  }
  displayAll(hashtable);
  hashtable->remove("415");
  cout << "After removing 415:" << endl;
  displayAll(hashtable);
  cout << "\nDestroying hashtable:" << endl;
  delete hashtable;
 }
 void displayAll(Hashtable* hashtable)
 {
  char key[SIZE_KEY];
  char value[SIZE_VALUE];
  cout << "\nCurrent nodes in hashtable:" << endl;
  hashtable->initIterator();
  while(hashtable->hasNext())
  {
  hashtable->getNextKey(key);
  hashtable->get(key, value);
  cout << "key: " << key << "\tvalue: " << value << endl;
  }
 }
//HashTable.h
 #include <string.h>
 #define SIZE_KEY    32
 #define SIZE_VALUE    256
 #define DEFAULT_TABLESIZE    101
 typedef struct Metadata
 {
  struct Metadata(char* key, char* value)
  {
  strcpy(this->key, key);
  strcpy(this->value, value);
  next = NULL;
  }
  char key[SIZE_KEY];
  char value[SIZE_VALUE];
  struct Metadata* next;
 } METADATA;
 class Hashtable
 {
  private:
  int tablesize;
  METADATA** table;
  int size;
  long hashString(char* key);
  METADATA* find(char* key);
  METADATA* current_entry;
  int current_index;
  public:
  Hashtable(int tablesize = DEFAULT_TABLESIZE);
  virtual ~Hashtable();
  bool put(char* key, char* value);
  bool get(char* key, char* value);
  bool contains(char* key);
  bool remove(char* key);
  void removeAll();
  int getSize();
  void initIterator();
  bool hasNext();
  void getNextKey(char* key);
 };
 //Hashtable.cpp
 #include <iostream.h>
 #include <stdlib.h>
 #include "HashTable.h"
 Hashtable::Hashtable(int tablesize)
 {
  size = 0;
  this->tablesize = tablesize;
  table = new METADATA*[tablesize];
  for(int i=0; i<tablesize; i++)
  {
  table[i] = NULL;
  }
 }
 Hashtable::~Hashtable()
 {
  removeAll();
  delete[] table;
 }
 bool Hashtable::put(char* key, char* value)
 {
  if(find(key) != NULL)
  {
  return false;
  }
  METADATA* entry = new METADATA(key, value);
  int bucket = hashString(key);
  entry->next = table[bucket];
  table[bucket] = entry;
  size++;
  return true;
 }
 bool Hashtable::get(char* key, char* value)
 {
  METADATA* temp = find(key);
  if(temp == NULL)
  {
  value[0] = '\0';
  return false;
  }
  else
  {
  strcpy(value, temp->value);
  return true;
  }
 }
 bool Hashtable::contains(char* key)
 {
  if(find(key) == NULL)
  {
  return false;
  }
  else
  {
  return true;
  }
 }
 bool Hashtable::remove(char* key)
 {
  int bucket = hashString(key);
  METADATA* temp = table[bucket];
  if(temp == NULL)
  {
  return false;
  }
  else if(strcmp(key, temp->key) == 0)
  {
  table[bucket] = temp->next;
  delete temp;
  size--;
  return true;
  }
  else
  {
  METADATA* temp_next = temp->next;
  while(temp_next != NULL)
  {
  if(strcmp(key, temp_next->key) == 0)
  {
  temp->next = temp_next->next;
  delete temp_next;
  size--;
  return true;
  }
  temp = temp->next;
  temp_next = temp_next->next;
  }
  }
  return false;
 }
 void Hashtable::removeAll()
 {
  for(int i=0; i<tablesize; i++)
  {
  METADATA* temp = table[i];
  while(temp != NULL)
  {
  METADATA* next = temp->next;
  cout << "Removing node - key:" << temp->key <<
  "\t" << temp->value << endl;
  delete temp;
  temp = next;
  }
  }
  size = 0;
 }
 int Hashtable::getSize()
 {
  return size;
 }
 METADATA* Hashtable::find(char* key)
 {
  int bucket = hashString(key);
  METADATA* temp = table[bucket];
  while(temp != NULL)
  {
  if(strcmp(key, temp->key) == 0)
  {
  return temp;
  }
  temp = temp->next;
  }
  return NULL;
 }
 long Hashtable::hashString(char* key)
 {
  int n = strlen(key);
  long h = 0;
  for(int i=0; i<n; i++)
  {
  h = (h << 2) + key[i];
  }
  return abs(h % tablesize);
 }
 void Hashtable::initIterator()
 {
  current_entry = NULL;
  current_index = tablesize;
  for(int i=0; i<tablesize; i++)
  {
  if(table[i] == NULL)
  {
  continue;
  }
  else
  {
  current_entry = table[i];
  current_index = i;
  break;
  }
  }
 }
 bool Hashtable::hasNext()
 {
  if(current_entry == NULL)
  {
  return false;
  }
  else
  {
  return true;
  }
 }
 void Hashtable::getNextKey(char* key)
 {
  if(current_entry == NULL)
  {
  key[0] = '\0';
  return;
  }
  strcpy(key, current_entry->key);
  if(current_entry->next != NULL)
  {
  current_entry = current_entry->next;
  }
  else
  {
  for(int i=current_index+1; i<tablesize; i++)
  {
  if(table[i] == NULL)
  {
  continue;
  }
  current_entry = table[i];
  current_index = i;
  return;
  }
  current_entry = NULL;
  current_index = tablesize;
  }
 }
|
 QUESTIONS:

 1. What is a numbering system?
 2. What is the binary numbering system?
 3. What is the purpose of an abstract data type?
 4. What is a variable?
 5. What is the integer abstract data type group?
 6. What does the term “floating-point” mean?
 7. What is a character?
 8. What is the difference between single and double precision?
 9. What is an instance of a structure?
 10. What kind of data type is a structure?
 11. How do you reference an element of an instance of a structure?
 12. What are three major elements of every class definition?
 13. What is the difference between a class definition and a structure definition?
 14. What is the hexadecimal numbering system?
 15. How do you assign an address to a pointer?
 16. What value is stored in a pointer variable?
 17. Why do you use pointer arithmetic?
 18. What is a pointer-to-pointer variable?
 19. What is an array of elements?
 20. What is an index?
 21. What is an array of pointers?
 22. What is a multidimensional array?
 23. What is the purpose of using a multidimensional array?
 24. What is the relationship between a pointer and an array?
 25. What is the relationship between a stack and an array?
 26. What is the action called that places data on a stack?
 27. What is the action called that removes data from a stack?
 28. Using an array, how do you determine whether the stack is empty?
 29. Using an array, how do you determine whether the stack is full?
 30. What is a queue?
 31. Where is data organized in a queue stored?
 32. What does the term “circular queue” mean?
 33. What is the modulus operator used for with respect to circular queues?
 34. When would you implement a queue using a linked list instead of an array?
 35. What is the action called that places data on a queue?
 36. What is the action called that removes data from a queue?
 37. What is a linked list?
 38. What is an entry in a linked list called?
 39. How are nodes linked together in a linked list?
 40. What is a doubly linked list?
 41. What is the purpose of a doubly linked list?
 42. What is used to define a node of a linked list?
 43. How do you delete an element from the middle of a linked list?
 44. How do you delete a node from the front of a linked list?
 45. How do you append a node onto a linked list?
 46. How do you put a new node onto the front of the linked list?
 47. What condition tells you the linked list is currently empty?
 48. What condition tells you there’s only one node on the linked list?
 49. What is the size limitation on a linked list?
 50. What is the destructor typically used for in a linked list?
 51. What is a hashtable?
 52. What is the key used for in a hashtable?
 53. What is hashing?
 54. What is the result of hashing?
 55. What is the significance of a hash value?
 56. What major problem occurs with hashing?
 57. How do you overcome the major problem that occurs with hashing?
 58. Ideally, how should a hash function behave with respect to the values it generates?
 	If you feed in a list of keys, what would you expect for the output?
 59. Many different hashing algorithms have been developed to provide a more even distribution
 	of hash values. What is the essence of the hashing algorithm—in other words,
 	what do these functions typically have in common?
 60. With a hashtable, suppose your dataset gets unexpectedly large and you have
 	an excessive number of collisions. How could you deal with this?
 61. How do you insert a node into a hashtable?
 62. How do you delete a node from a hashtable?
 63. How do you look up a value in a hashtable?
 64. How do you list out all the values in a hashtable?
 65. How would you check if a hashtable is empty?
 66. What is a binary tree?
 67. What is the purpose of a branch node in a binary tree?
 68. What is the starting node of a binary tree called?
 69. What is the node in a binary tree called that spawns another node?
 70. What are nodes at the end of a binary tree called?
 71. If you have 1,000 nodes in a balanced binary tree, approximately how many comparisons
 	do you need to do to find a particular node?
 72. How is the maximum depth of a tree defined?
 73. If a binary tree is well balanced, approximately how many nodes are in the tree given
 	the depth of the tree?
 74. What condition do you check for to see if a node in a binary tree is a leaf node?
 75. How do you delete a node from a binary tree that has two child nodes?
 76. How do you delete a node from the binary tree that has one child node?
 77. How do you delete a leaf node from a binary tree?
 78. What is the basic rule for where the nodes get placed into a binary tree?
 79. How do you insert a node into a binary tree?
 80. How would you check if a binary tree is empty?
 81. What is a recursive function?
 82. When searching for a key in a binary tree, what stops the recursive function calls?
 83. What is the sequence of function calls to do an “in order” traversal of a binary tree?
 84. What is a pointer?
 85. What is memory allocation?
 86. What does the new operator return?
 87. Does Java use pointers?
 88. How do you declare an array of pointers?
 89. How do you declare an array of pointers to pointers?
 90. If an int pointer is incremented using pointer arithmetic, how many bytes is the pointer incremented?
 91. How is a binary tree’s depth defined?
 92. What is a balanced binary tree?
 93. Must all binary trees be balanced?
 94. What is the purpose of a key in a binary tree?
 95. What is metadata?
 96. What is the purpose of the this operator?
 97. What does a private access specifier do?
 98. If next and previous are pointers to the next and previous nodes, then what does this statement do?
     node->next->previous = NULL;
 99. What is fifo?
 100. What is the purpose of a public access specifier?


 ANSWERS :

 1. A numbering system is a way to count things and perform arithmetic.
 2. The binary numbering system is a number system that uses two digits to count things
 	and perform arithmetic.
 3. The purpose of an abstract data type is to specify the amount of memory needed to store
 	data and the kind of data that will be stored in that memory location.
 4. A variable is a reference to the memory location that you reserved using the declaration statement.
 5. The integer abstract data type group consists of four abstract data types used to reserve memory
 	to store whole numbers.
 6. The term “floating-point” refers to the way in which decimals are referenced in memory.
 	There are two parts of a floating-point number. The first part is the real number,
 	which is stored as a whole number.
 	The second part is reference to the position of the decimal point within the whole number.
 7. A character is represented as an integer value that corresponds to a character set.
 	A character set assigns an integer value to each character, punctuation,
 	and symbol used in a language.
 8. Single precision refers to the accuracy of the first 7 numbers to the right of the decimal point.
 	Double precision refers to the accuracy of the first 15 numbers to the right of the decimal point.
 9. A structure definition is like a cookie cutter in that it describes the shape of something.
 	A cookie cutter describes the shape of a cookie.
 	A structure definition describes the size and data type of a group of primitive data types.
 	You use a cookie cutter to make cookies.
 	You use a structure to declare an instance of the structure in memory.
 10. A structure is a user-defined data type.
 11. An element of an instance of a structure is referenced by using the dot operator,
 	such as myStudent.grade.
 12. Keyword class, class name, and class body.
 13. A class definition defines both data and methods/functions.
 	A structure definition defines only data.
 14. The hexadecimal numbering system consists of 16 digits that are represented as 0 through 9 and A through F.
 15. An address of a variable is assigned to a pointer variable by using the address operator (&).
 16. A pointer variable stores the address of another memory location.
 17. Pointers are used to step through memory sequentially by using pointer arithmetic and the incremental (++)
 	or decremental (- -) operator.
 	The incremental operator increases the value of a variable by 1 and the decremental operator decreases the value
 	of a variable by 1.
 18. A pointer to a pointer is also a variable that contains a memory address except a pointer to a pointer
 	contains the memory address of another pointer variable.
 19. An array element is similar to one variable except it is identified by the name of the array and an index value.
 20. An index value is a number used to identify an array element.
 21. An array of pointers is nearly identical to a pointer variable except each array element contains a memory address.
 22. A multidimensional array consists of two or more arrays defined by sets of array elements. Each set of array elements is an array.
 23. A multidimensional array is useful in some situations to organize subgroups of data within an array.
 24. There is a close-knit relationship between a pointer and an array. The array name is like a pointer variable in
 	that the array name by itself references the address of first element of the array.
 25. A stack and an array are two different things. An array stores values in memory. A stack tracks which of the array elements
 	is at the top of the stack.
 26. Push is the action that places data on a stack.
 27. Pop is the action that removes data from a stack.
 28. The value of the top index is –1.
 29. The value of the top index is equal to the number of elements in the array minus 1.
 30. A queue is a sequential organization of data. A queue is like the checkout line at the supermarket where the first customer
 	is at the front of the line and the second customer is next in line,
 	and so on, until you reach the last customer who is at the back of the line.
 31. Data organized in a queue is stored in an array or a linked list.
 32. A circular queue is a queue implemented using an array. When the elements at the end of the array are used up, you start over
 	at the beginning so the queue chases itself around in a circle.
 33. The modulus operator can be used to make a linear pattern into a circular pattern. When the last element is used up,
 	the modulus operator will take you back to the first element.
 34. When you don’t know the number of nodes ahead of time. The linked list implementation is only limited by the amount of memory on the machine.
 35. Enqueue is the action that places data on a queue.
 36. Dequeue is the action called that removes data from a queue.
 37. A linked list is a data structure that makes it easy to rearrange data without having to move data in memory.
 38. An entry in a linked list is called a node.
 39. Each member of a node points to the next node in the linked list.
 40. A doubly linked list is a linked list where each member of a node points to the previous node and to the next node in the linked list.
 41. A doubly linked list is used to enable a program to move up and down the linked list.
 42. A structure definition is used to define a node of a linked list.
 43. Declare a temporary pointer to the node being deleted.
 	Change the next pointer in the previous node to the value of the next pointer in the node being deleted.
 	Change the previous pointer in the next node to the value of the previous pointer in the node being deleted.
 	Delete the node.
 44. Declare a temporary pointer to the front node.
 	Change the value of the front pointer to the next pointer in the node being deleted.
 	Change the value of the previous pointer in the next node to NULL.
 	Use the temporary pointer to delete the node.
 45. Use the back pointer to get a reference to the last node on the linked list.
 	Change the value of the next pointer in the back node to the address of the new node.
 	Set the previous pointer of the new node to the current back node.
 	Change the back pointer to the address of the new node.
 46. Use the front pointer to get a reference to the first node on the linked list.
 	Change the value of the previous pointer in the front node to the address of the new node.
 	Set the next pointer of the new node to the current front node.
 	Change the front pointer to the address of the new node.
 47. The front and back pointers are both NULL. You only need to check one of them.
 48. The front and back pointers both point to the same node.
 49. The size is limited by the amount of memory on the machine.
 50. The destructor typically releases all the memory that was allocated for the linked list.
 51. A hashtable is a common data structure used to store objects that have a key value relationship.
 52. A key is translated into a number that is used as the array index of the array element
 	that references the value that is associated with the key.
 53. Hashing is the process of translating the key into the array index of the array element
 	that references the value that is associated with the key.
 54. Hashing produces a hash value.
 55. There is no real significance of a hash value other than it is a number used as an array index.
 56. Hashing is not perfect. Occasionally, a collision occurs when two different keys hash
 	into the same hash value and therefore are assigned to the same array element.
 57. A common way to deal with a collision is to create a linked list of entries
 	that have the same hash value.
 58. In the most ideal case, the hash function should produce an even distribution of values
 	for a given set of keys. The result is a minimum number of collisions.
 59. Hashing typically uses bit shifting to pseudo-randomize the generated values.
 	How could you deal with this?
 60. You could make the hashtable array larger, then rehash all the keys and insert them accordingly into the new hashtable.
 61. Call the hashing algorithm with the key. Go to the array and see if the value in the array index is NULL.
 	If it is, then change this value to the address of the new node.
 	If the array index is not NULL, then set the next pointer in the new node to the value at the array index
 	and set the array index to the address of the new node.
 	This makes the new node the first entry in the linked list.
 62. Call the hashing algorithm with the key. Go to that index in the array.
 	Traverse the linked list and find the value, and then delete this entry from the linked list.
 	The entry is deleted by setting the next pointer in the previous node to the next pointer of the node being deleted.
 63. Call the hashing algorithm with the key. Go to that array index and traverse the linked list until you find
 	that key. Return the associated value.
 64. Iterate the array. At each index, if it contains a value other than NULL, iterate the linked list and list out the values.
 65. Iterate the hashtable array and see if all the values are NULL. If all the values are NULL, the hashtable is empty.
 66. A binary tree is a tree where each stem has not more than two branches Typically the stem has two branches,
 	but there can be situations when the stem has one branch or simply terminates resulting in no additional branches.
 67. The branch node is the fork in the road that links the root node to two branches.
 68. The starting node is called the root node, which is the top-level node in the tree.
 69. A parent node spawns another node in a binary tree.
 70. Nodes at the end of a binary tree are called leaf nodes.
 71. Ten. 2^10 ~= 1000.
 72. The depth is the number of hops to get to the “lowest” node in the tree.
 73. 2^n – 1 where n is the depth of the tree.
 74. Both the child node pointers are set to NULL.
 75. Replace the node being deleted with the leftmost child of the right subtree.
 	You could also replace it with the rightmost child of the left subtree.
 76. Change the value of the pointer in the parent node to the value of the child node, and then delete the node.
 77. Change the value of the pointer in the parent node to NULL, and then delete the node.
 78. All the nodes to the right have a key greater than the current node and all the nodes to the left have a key less than the current node.
 	This rule applies to each and every node of the tree.
 79. Start at the root of the tree. If the key is greater than this node, move to the right.
 	If the key is less than this node, move to the left.
 	Continue until a NULL pointer is found, and then change the value of this pointer to the address of the new node.
 80. The tree is empty if the root node of the tree is NULL.
 81. A recursive function is a function that calls itself.
 82. One of two conditions—either the key is found or a NULL pointer is found.
 83. For each node, look to the left, process the node, and then look to the right.
 84. A pointer is a variable whose value is an address of a location in memory.
 85. Memory allocation is the task of reserving memory in order to store data in memory.
 86. The new operator returns an address of memory.
 87. It is a misnomer that Java doesn’t use pointers. Java does use pointers, but a programmer doesn’t explicitly declare pointers.
 	You can declare an array whose data type is a Java Object—an array of pointers.
 	The value of each array element is an Object. When you switch those values to other array elements, you are moving memory addresses and not the Object itself.
 88. An array of pointers is declared by preceding the array name with an asterisk.
 89. An array of pointers to pointers is declared by preceding the array name with two asterisks.
 90. An int pointer is incremented by the number of bytes of an int.
 91. The number of nodes on the tree defines a binary tree’s depth.
 92. A balanced binary tree is where each node except for a leaf node has two children nodes.
 93. No.
 94. The key and the search criteria are compared to each other.
 95. “Metadata” is the term that refers to data that describes other data such as how an employee ID
 	can be used to get the employee’s name.
 96. The this operator tells the compiler that you want to refer to the data element of this instance of the structure
 	instead of the parameter that was passed in.
 97. Members defined within the private access specifier area of the class definition can only be accessed by member functions of the class.
 98. This statement assigns the NULL value to the next node’s previous pointer.
 99. First in, first out.
 100. Members defined within the public access specifier area of a class definition can be accessed by member functions of the class and from outside the class.
|
|

 LINUX
LINUX 
 Books
Books