Kernel Rebuild Guide
Kwan Lowe
IntroductionCopyright and License This document, Kernel Build HOWTO, is copyrighted
(c) 2004 by Kwan L. Lowe. Permission is granted
to copy, distribute and/or modify this document under the terms of
the GNU Free Documentation License, Version 1.2 or any later version
published by the Free Software Foundation; with no Invariant Sections,
with no Front-Cover Texts, and with no Back-Cover Texts. A copy of
the license is available at
http://www.gnu.org/copyleft/fdl.html
.
Linux is a registered trademark of Linus Torvalds.
Зачем Rebuild?
Основная причина - это оптимизация ядра под ваше железо.
Также нужно заметить , что ядро 2.6.5 оптимизировано с точки зрения десктопа
хотя бы по причине того , что кардинально переписан шедулятор .
Данное руководство описывает шаги , необходимые для компиляции как 2.4.x , так и 2.6.x версий ядра.
Что есть ядро?
Ядро часто сравнивают с дирижером оркестра . Помимо всего прочего , он гарантированно поддерживает
корректную параллельную одновременную работу нескольких процессов .
ПодготовкаЖелезо
Требования к железу могут существенно отличаться от версии к версии .
Так , 2.4 может грузиться менее чем при 8 метрах памяти , но лучше хотя бы 64 метра .
Для компиляции исходников нужно метров 500 на харде . Откомпилированное ядро с модулями
может занимать до 4 метров . Ядро можно компилировать вообще на другой машине .
Требования к софту
Минимальные требования для компиляции ядра можно найти в ./Documentation/Changes
. Они следующие :
2.4.x series
 o  Gnu C                  2.91.66     # gcc --version
 o  Gnu make               3.77        # make --version
 o  binutils               2.9.1.0.25  # ld -v
 o  util-linux             2.10o       # fdformat --version
 o  modutils               2.4.2       # insmod -V
 o  e2fsprogs              1.19        # tune2fs
 o  reiserfsprogs          3.x.0b      # reiserfsck 2>&1|grep reiserfsprogs
 o  pcmcia-cs              3.1.21      # cardmgr -V
 o  PPP                    2.4.0       # pppd --version
 o  isdn4k-utils           3.1pre1     # isdnctrl 2>&1|grep version
|
2.6.x series
		o  Gnu C                  2.95.3       # gcc --version
 o  Gnu make               3.78         # make --version
 o  binutils               2.12         # ld -v
 o  util-linux             2.10o        # fdformat --version
 o  module-init-tools      0.9.10       # depmod -V
 o  e2fsprogs              1.29         # tune2fs
 o  jfsutils               1.1.3        # fsck.jfs -V
 o  reiserfsprogs          3.6.3        # reiserfsck -V 2>&1|grep reiserfsprogs
 o  xfsprogs               2.1.0        # xfs_db -V
 o  pcmcia-cs              3.1.21       # cardmgr -V
 o  quota-tools            3.09         # quota -V
 o  PPP                    2.4.0        # pppd --version
 o  isdn4k-utils           3.1pre1      # isdnctrl 2>&1|grep version
 o  nfs-utils              1.0.5        # showmount --version
 o  procps                 3.1.13       # ps --version
 o  oprofile               0.5.3        # oprofiled --version
|
Тестирование железа Once you have determined that your hardware and software meet the minimum
requirements for the kernel build, we will need to collect more detailed
information about the system. This is needed during the configuration process
when we decide which hardware will be supported under our new kernel. Among
the information we will gather include: Processor, Drive type and Controller
(SCSI, IDE), Ethernet devices, Graphics and Sound Cards, USB HUB.
We start by running the /sbin/lspci utility to print
information about our hardware:
 00:00.0 Host bridge: Silicon Integrated Systems [SiS] 735 Host (rev 01)
 00:01.0 PCI bridge: Silicon Integrated Systems [SiS] 5591/5592 AGP
 00:02.0 ISA bridge: Silicon Integrated Systems [SiS] 85C503/5513
 00:02.2 USB Controller: Silicon Integrated Systems [SiS] 7001 (rev 07)
 00:02.3 USB Controller: Silicon Integrated Systems [SiS] 7001 (rev 07)
 00:02.5 IDE interface: Silicon Integrated Systems [SiS] 5513 [IDE] (rev d0)
 00:02.7 Multimedia audio controller: SiS7012 PCI Audio Accelerator (rev a0)
 00:03.0 Ethernet controller: [SiS] SiS900 10/100 Ethernet (rev 90)
 01:00.0 VGA compatible controller: ATI Technologies Inc Rage 128 RF/SG AGP
|
Next, we must determine our processor type if not known. Some Linux systems
contain a /proc filesystem that allows a user to view
raw information about the system. If /proc exists you
can issue the following command to get CPU information:
 processor       : 0
 vendor_id       : AuthenticAMD
 cpu family      : 6
 model           : 6
 model name      : AMD Athlon(tm) XP 1800+
 stepping        : 2
 cpu MHz         : 1526.870
 cache size      : 256 KB
 fdiv_bug        : no
 hlt_bug         : no
 f00f_bug        : no
 coma_bug        : no
 fpu             : yes
 fpu_exception   : yes
 cpuid level     : 1
 wp              : yes
 flags           : fpu vme de pse tsc msr pae mce cx8 sep mtrr pge
 bogomips        : 3047.42
|
Acquiring the Sources There are many ways to acquire the Linux kernel sources. If you are using a
packaged distribution then most likely the distributor will bundle a kernel
source package. These are installable via the package installation method,
whether RPM, apt, YAST, portage, etc.. If you decide to go this route, please
consult your distribution's documentation for specifics.
The other option is to use the "pristine" sources, either the
"official" sources from Linus Torvalds himself, or one of the
regularly maintained trees from people such as Alan Cox, Robert Love, Andrew Morton, et al..
These sources are often on the bleeding-edge of kernel development, full of
new features and untested code.
Untested code? This is a feature of the distributed development model of Linux
and Open Source (??) in general. The traditional model of a software release is
somewhat antithetical to this model, as new code must be released to allow
all developers to test and improve the code. However, because Linux is used in
production environments throughout world it is necessary to separate the unstable
development tree from the tested, stable tree. This is done through the version
number of the kernel. There are three main numbers associated with the kernel --
the Major, Minor, and PatchLevel fields. The Major number rarely changes, and
then only when/if the entire architecture is revamped. The Minor number changes
more frequently, perhaps once every couple years. Kernels with an odd Minor number
are considered unstable, testing branches. Kernels with an even Minor number are
generally rock solid. The PatchLevel is updated frequently, sometimes more than
once a week in extreme cases.
To recap, you can build either from your distribution's modified kernel
sources or from the stable or unstable branch of the offical sources. If you
are making minor modifications to the configuration, it is perhaps safest to
install your distributor's version. These kernels usually include stability
and feature patches that may be missing from the stock kernels. For example,
some distributors will include low-latency or security patches and do the
more difficult work of integrating these into their system. The downside
is that the distributors tend to lag behind the bleeding-edge kernels. If
you would like to test features that are available in the newest tree then
you will likely need to build from the "pristine" source from Linus or the
tree maintainer of your choice..
FIXME: NO LONGER really true -- 2.6 based distributions are out there / will
be (e.g., SuSE 9.1) by the end of April 2004.
Download the Source Though the latest sources are always available from http://kernel.org, to be kind to the Internet, always
use one of the mirrors listed at http://kernel.org/mirrors. In general, geographically
close mirrors will tend to be fastest. You can either browse the sites with an
Internet browser or with a dedicated FTP client.
You will see several links to /pub/linux on
the mirror site. Select the kernel directory,
then the kernel version that you would like to install. As of
this writing, 2.4.22 is the latest stable version and 2.6.0 is in
pre-release state. Once you select a kernel version you will see
several files.
		ChangeLog-2.6.0-test9          25-Oct-2003 14:51    41k
 		LATEST-IS-2.6.0-test9          25-Oct-2003 14:51     0k
 		linux-2.6.0-test9.tar.bz2.sign 25-Oct-2003 15:14     1k
 		linux-2.6.0-test9.tar.gz       25-Oct-2003 15:14  39.7M
 		linux-2.6.0-test9.tar.gz.sign  25-Oct-2003 15:14     1k
 		linux-2.6.0-test9.tar.sign     25-Oct-2003 15:14     1k
 		patch-2.6.0-test9.bz2.sign     25-Oct-2003 15:14     1k
 		patch-2.6.0-test9.gz           25-Oct-2003 15:14   123k
 		patch-2.6.0-test9.gz.sign      25-Oct-2003 15:14     1k
 		patch-2.6.0-test9.sign         25-Oct-2003 15:14     1k
|
The Changelog files detail the differences between versions. The
linux- files are the compressed sources for the entire Linux kernel.
Most sites will contain both gzip and bzip packages. The bzip
packages tend to be about 20% smaller than the GZIP versions, so
they are usually the best option since all modern Linux distributions contain
BZIP utilities.
The patch files are a list of differences
between versions of the kernel. If you have previously downloaded
an earlier source package, you will only need to download the much
smaller patch file to bring those up to date. We will discuss patch application
in the next section.
There are also some .sign files
that contain GPG checksum information which are useful for
verifying that the sources you downloaded have not been corrupted or
maliciously modified. For more information on verifying the GPG signature,
see
http://www.kernel.org/signature.html
.
The http://kernel.org
website is not the only place to retrieve patches. Many other vendors
and individuals have developed patches to improve aspects of the kernel's
performance, support new hardware, or introduce features that are too esoteric
or experimental to make it to the stock kernel. For example, kernel hacker
Robert Love had developed the pre-emptible kernel
modifications that made dramatic improvements to the responsiveness of a Linux
system. These patches were not part of the standard 2.4.x kernel but were of
such usefulness that they were officially adopted into the 2.6.0 series. For
the most part these third-party patches are stable but do use your judgment when
downloading and applying them.
Extract and Patch Once you have retrieved the kernel sources and patches, you will need to
extract them and apply the patches. The pristine 2.4.x and 2.6.x sources can be
built as a regular, unprivileged user and this is recommended.
[3]
We will begin by creating a directory to hold all the source tarballs and patches,
then proceed to extract the sources. For these examples we will assume that you
have previously downloaded an earlier release of the kernel and will now need to
patch to bring it up to the current version.
If your Linux sources are in BZIP compressed format (that is, end with a
.bz2 extenstion, then use the following command:
$ tar xfvj /path/to/linux-2.6.0-test7.tar.bz2
|
Otherwise, use the options for GZIP compressed data:
$ tar xfvz /path/to/linux-2.6.0-test7.tar.gz
|
You should see a list of filenames scroll by as they are being extracted. Verify that
the new kernel source directory is created:
		total 4
 drwxr-xr-x   18 kwan   users   4096 Oct  8 15:24 linux-2.6.0-test7
 -rw-r--r--    1 kwan   users 276260 Nov 15 02:05 patch-2.6.0-test8.gz
 -rw-r--r--    1 kwan   users 126184 Nov 15 02:07 patch-2.6.0-test9.gz
|
Next we must apply the patches in order. Patch files are created by the
diff program, and can selectively modify one or more files
by adding, deleting, or modifying lines in the source code. Because they contain only
the differences between files it is usually a lot faster (and better for the Internet
in general) if you patch to the current release. (TBF unclear). Appendix TBF shows
a typical patch file. Like the kernel sources, the patch files are also compressed.
			$ gunzip patch-2.6.0-test8.gz
 			$ gunzip patch-2.6.0-test9.gz
 			$ ls -l
|
		-rw-r--r--    1 kwan  users  1072806 Nov 15 02:05 patch-2.6.0-test8
 		-rw-r--r--    1 kwan  users   486902 Nov 15 02:07 patch-2.6.0-test9
|
Once the patches are uncompressed we can apply them to the kernel sources. Remember
that it is important to apply them in order.
			$ cd linux-2.6.0-test7
 			$ patch -p1 <../patch-2.6.0.test8
 			$ patch -p1 <../patch-2.6.0.test9
|
If it is successful you will see messages similar to the following scroll by:
		patching file Documentation/filesystems/jfs.txt
 		patching file Documentation/filesystems/xfs.txt
 		patching file Documentation/ia64/fsys.txt
 		patching file Documentation/ide.txt
 		patching file Documentation/x86_64/boot-options.txt
 		patching file Makefile
|
If unsuccessful you will get a warning and be prompted for a file to patch. If
this occurs, press Ctrl- C
to break out of the patch utility and verify that you are using the correct
patch and applying them in the correct order.
Once all the patches are applied you might consider backing up the directory.
			$ cd ..
 			$ mv linux-2.6.0-test7 linux-2.6.0-test9
 			$ tar cfvj linux-2.6.0-test9.tar.bz2 linux-2.6.0-test9
|
ConfigurationThe Configuration Process The configuration process is the most strenous portion of the kernel
rebuild process. In this step you are deciding which features will be
included in the final kernel and it can require lots of hardware
knowledge. In truth, it is not too onerous. The current kernels have
graphical configuration programs and though not perfect, provide help
screens for most of the configuration options.
Many changes were made to the configuration subsystem in the 2.6.x kernel
series. It is easier to add modules and much more robust than before.
It has also changed dramatically in appearance especially when using the
X-based configuration tool, xconfig. For this reason the configuration
steps for the different branches have been split into two sections in this
chapter.
As mentioned, both configuration tools provide context sensitive help
screens for the different options. Because this help is readily available
to the user (and more importantly, because there are several hundred
options) this guide will only cover a fraction of the choices.
Compile Modules or Static One of the first choices you will make is whether or not to build device
support directly into the kernel or as a module. In the early days of Linux,
when module support was in its infancy, it was possible that static (i.e.,
compiled in) drivers were faster. With any modern CPU, the time to load and
unload the modules and the memory required for the module loader subsystem
is negligible even to benchmarking utilities. Some devices, notably the disk
controller, can be built directly into the kernel in order to simplify
the boot process.
[4]
You may also choose to disable some options entirely. Though you will not have any
performance increases, there are advantages to disabling features that are not
required. For one, the compile times will be drastically reduced depending on
which subsystem is disabled. For another, the final kernel and installed modules
will require less space. On modern hard drives of 40G, 60G, and even 250G, an
extra 20M or so is negligible but is significant on embedded or older systems.
The disadvantage is that you will not have support for those features until you
recompile the kernel. One other thing to keep in mind, as noted in
KERNELTRAP.ORG (http://www.kerneltrap.org/node/view/799):
| Havingunnecessarydriverswillmakethekernelbigger,andcanundersome
circumstancesleadtoproblems:probingforanonexistentcontrollercardmay
confuseyourothercontrollers.
| | | --kerneltrap.org | |
Assign Unique Name We have so far extracted and patched the Linux sources. During our preparation
we also determined what hardware is installed in the system so that we will
know which modules will need compilation. Before we proceed to actually configuring
the kernel there are a couple minor but important details to complete.
Inside the Linux source directory is the default Makefile. This
file is used by the make utility to compile the Linux
sources. The first few lines of the Makefile contains some
versioning information:
		VERSION = 2
 		PATCHLEVEL = 4
 		SUBLEVEL = 22
 		EXTRAVERSION = -1
|
Note that there is an additional EXTRAVERSION field. To prevent overwriting any
existing kernel modules on the system we will change this EXTRAVERSION to something
unique. When the final installation steps are run, kernel module files will then get
written to
/lib/modules/$VERSION.$PATCHLEVEL.$SUBLEVEL-$EXTRAVERSION.
Backup .config Finally, before we begin, please note that the configuration choices are kept in the
../linux/.config file. If you have not already run any configurations,
this file will not exist. If you have, and would like to save your configuration, copy the
.config to another file:
			$ cd linux
 			$ cp .config config.save
|
If you are using the sources from a vendor, then the default configuration
files are usually included in the configs or in the
./arch/i386/defconfig (for i386 machines) file. You
can use these configurations as a starting point for your customizations.
The .config will be overwritten
in the next step, so do make a backup before proceeding!
We begin the configuration by wiping out all previous configurations
and resetting the source directory to a pristine state. The main
reason for doing this is that some files do not automatically get
rebuilt, which can lead to failed builds, or at worst, a buggy kernel.
In the 2.4.x series, a few dozen lines of rm -f commands
will appear as all generated files get removed. The 2.6.x process is less noisy and
returns only a few CLEAN messages. Please note that it is generally safe to omit
the make mrproper step during subsequent rebuilds.
As of this writing (December 15, 2003), the 2.4.x kernel is in wide deployment.
The 2.6.0 has just been released to the world.
FIXME -- the previous sentence needs to be updated
Though the configuration and
build procedures are quite similar, there are enough differences to warrant
separate sections for each kernel. If you are building a 2.6.x series kernel,
skip to the Section called Configuring the 2.6.x kernels. Otherwise, proceed to the next section,
the Section called Configuring the 2.4.x kernels.
Configuring the 2.4.x kernels Our next step is to run the configuration utility. In the 2.4.x kernels there are
four main frontends: config, oldconfig, menuconfig, xconfig. We choose one
configuration method and run it, for example:
config is the least user-friendly option as it merely presents
a series of questions that must be answered sequentially. Alas, if an error is made
you must begin the process from the top. Pressing Enter will accept
the default entry, which is in upper case.
oldconfig will read the defaults from an existing
.config and rewrite necessary links and files. Use this option
if you've made minor changes to source files or need to script the rebuild process.
Note that oldconfig will only work within the
same major version of the kernel. You cannot,
for example, use a 2.4.x .config with the
2.6.x kernel.
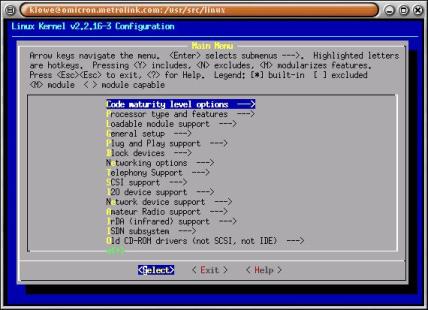
menuconfig is an ncurses-based frontend.
Your system must have the ncurses-devel libraries installed
in order to use this utility. As the help text at the top of the screen indicates,
use the arrow keys to navigate the menu. Press Enter to select
sub-menus. Press the highlighted letter on each option to jump directly to that option.
To build an option directly into the kernel, press Y. To disable an
option entirely, press N. To build an option as a loadable module,
press M. You can also access content-specific help screens by
pressing ? on each page or selecting HELP from
the lower menu. Figure 1 shows an example screen.
[5]
xconfig, as the name suggests, is an X Window
based frontend. It requires the Tcl/Tk and X libraries to work, and of course, an X server.
Figure 2 shows an example screen.
For the purposes of this next section we will assume that make xconfig
is used. The options are identical otherwise. As mentioned, there are literally hundreds
of configuration options and this precludes us from listing every one of them. If you
are unsure of an option use the online help or consult the kernel documentation found
in the ../linux/Documentation directory. We begin by typing:
The main configuration menu will appear. Selecting an item will bring up another window
with further options. These in turn can spawn other sub-menus.
- Code Maturity Level Options
This option allows configuration of alpha-quality software. It is best
to disable this option if the kernel is intended for a stable production
system. If you require an experimental feature in the kernel, such as
a driver for new hardware, then enable this option but be aware that
it "may not meet the normal level of reliability" as tested
code.
- Loadable Module Support
You will almost certainly want to enable module support. If you
will need third-party kernel modules you will also need to
enable Set Version Information on All Module Symbols.
- Processor Type and Features
This is perhaps the most important option to choose. In the Preparation
section we determined our processor type by examining
/proc/cpuinfo and we use that information here to
select the appropriate processor. Included in this submenu are features
such as Low Latency Scheduling which can improve
desktop responsiveness, Symmetric Multi-processing Support
for machines with multiple CPUs, and High Memory Support
for machines with more than 1G of RAM. Laptop users can also benefit from
the CPU Frequency Scaling feature.
- General Setup
Choices for PCI, ISA,
PCMCIA and other architectural support such as
Advanced Power Management are found here.
- Memory Technology Devices
MTD devices include Compact Flash
devices. Some digital cameras will require this support.
- Block Devices
The Block Device section contains options for floppy and hard drives,
including parallel port devices, tape drives and RAID
controllers. Important options include loopback device support, which
allows mounting on disk images, and initrd support, which is needed to
preload drivers necessary to boot the system.
- Multi-Device support (RAID and LVM)
Important for servers, these options include RAID support
for combining multiple disks. Note that this option is not needed for
certain hardware RAID that function below the operating
system level. LVM is a useful subsystem that allows,
among other things, dynamic resizing of filesystems.
- ATA/IDE/MFM/RLL support.
This section includes options for IDE/ATAPI chipsets,
including performance tweaks such as DMA. Most systems
will need this support.
- Cryptography Support (CryptoAPI)
Useful options include Loopback Crypto Support, which allows encrypted
filesystem images to be mounted. Even with full access to the PC,
loopback encryption can help safeguard data.
- Networking Options
Many choices are available for networking. TCP/IP,
IP tunneling, packet filtering, IPv4
and IPv6, routing support and network QoS are among
the most useful. If your kernel is intended for a dedicated firewall or
router device, then the options here can significantly improve performance.
Read the online and kernel documentation.
- SCSI Support
SCSI support is needed for not only true
SCSI devices, but also for IDE
CDR/W drives in SCSI emulation
mode. If your root filesystem is mounted on a SCSI
disk, then you must build support directly into the kernel and not as
a module.
- Character Devices
Dozens of options are available here, including support for many
serial and parallel devices, hardware sensors (for system monitors),
mice, joysticks and DRM. Many of the options can
be safely disabled without problem.
- File Systems
It is a good idea to build support for your root filesystem directly
into the kernel. Though the initrd utilities
can get around the chicken-and-egg boot problem, it is generally safer
and easier to just build the fs modules directly. Many options can also
be safely disabled if you have no use for the feature.
Once all the configuration changes have been made, you can go ahead and save settings.
By defaulti, the configuration is placed in the .config file
in the topmost directory. Because this file is deleted by make mrproper
and is also hidden, it is a good idea to use the Save to Alternate File
before exiting. It will prompt for another save location. Enter something outside of the
source tree and with a useful name such as kernel-2.4.22-lowlatency.config.
Once this is done, exit the configuration menu. You will be prompted to save the
configuration again. Select Yes and continue.
The configuration for the 2.4.x kernel is now complete. You may now skip to
the chapter called Build.
Configuring the 2.6.x kernels Our next step is to run the configuration utility. On the 2.6.x kernels there
are four main frontend programs: config, menuconfig, and xconfig.
config is the least user-friendly option as it merely presents
a series of questions that must be answered sequentially. Alas, if an error is made
you must begin the process from the top. Pressing Enter will accept
the default entry which is in upper case.
oldconfig will read the defaults from an existing
.config and rewrite necessary links and files. Use this option
if you've made minor changes to source files or need to script the rebuild process.
menuconfig is an ncurses based frontend.
Your system must have the ncurses-devel libraries installed
in order to use this utility. As the help text at the top of the screen indicates,
use the arrow keys to navigate the menu. Press Enter to select
sub-menus. Press the highlighted letter on each option to jump directly to that option.
To build an option directly into the kernel, press Y. To disable an
option entirely, press N. To build an option as a loadable module,
press M. You can also access content-specific help screens by
pressing ? on each page or selecting HELP from
the lower menu. Figure 1 in the Section called Configuring the 2.4.x kernels shows an example screen from
the 2.4.x kernel series.
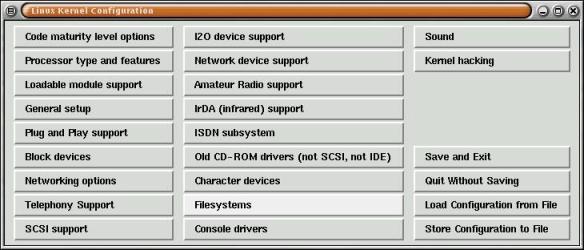
xconfig is a graphical frontend using qconf
by Roman Zippel. It requires the qt and X libraries to
build and use. The interface is intuitive and customizable. Online help is automatically
shown for each kernel configuration option. It also can show dependency information for
each module which can help diagnose build errors. Figure 3 shows an
example of the xconfig screen.
From the online help:
| Foreachoption,ablankboxindicatesthefeatureisdisabled,acheck
indicatesitisenabled,andadotindicatesthatitistobecompiled
asamodule.Clickingontheboxwillcyclethroughthethreestates.
Ifyoudonotseeanoption(e.g.,adevicedriver)thatyoubelieve
shouldbepresent,tryturningonShowAllOptionsundertheOptionsmenu.
Althoughthereisnocrossreferenceyettohelpyoufigureoutwhatother
optionsmustbeenabledtosupporttheoptionyouareinterestedin,youcan
stillviewthehelpofagrayed-outoption.
| | | --qconf help | |
Once you have decided which configuration option to use, start the process with
make followed by either config,
menuconfig, or xconfig. For example:
The system will take a few moments to build the configuration utility. Next you
will be presented with the configuration menus. Though similar to the 2.4.x series,
the 2.6.x menu is more logically organized with better grouping of sub-modules.
Following are some of the top level configuration options in the 2.6 kernel.
- Code Maturity Level Options
This option allows configuration of alpha-quality software or obsoleted
drivers. It is best to disable this option if the kernel is intended for
a stable production system. If you require an experimental feature in the
kernel, such as a driver for new hardware, then enable this option but be
aware that it "may not meet the normal level of reliability"
as more rigorously tested code.
- General Setup
This section contains options for sysctl support,
a feature allowing run-time configuration of the kernel. A new feature,
kernel .config support, allows the complete
kernel configuration to be viewed during run-time. This addresses
many requests to be able to see what features were compiled into
the kernel.
- Loadable Module Support
You will almost certainly want to enable module support. If you
will need third-party kernel modules you will also need to
enable Set Version Information on All Module Symbols.
- Processor Type and Features
This is perhaps the most important configuration choice. In the Preparation
section we determined our processor type by examining
/proc/cpuinfo and we use that information here to
select the appropriate processor. Included in this submenu are features
such as Preemptible Kernel which can improve
desktop responsiveness, Symmetric Multi-processing Support
for machines with multiple CPUs, and High Memory Support
for machines with more than 1G of RAM.
- Power Management Options
Found here are options for ACPI and CPU
Frequency Scaling which can dramatically improve laptop power usage. Read
the Documentation/power file for more information.
- Bus Options ( PCI, PCMCIA, EISA, MCA, ISA)
Here are found options for all system bus devices. On modern machines
the ISA and MCA support can often
be disabled.
- Executable File Formats
Interesting features here include the kernel support for miscellaneous
binaries, which can allow seamless operation of non-Linux binaries
with a little userland help.
- Device Drivers
All the device-driver configuration options that were previously scattered throughout
the 2.4.x menus are now neatly organized under this option. Features
such as SCSI support, graphic card optimizations,
sound, USB and other hardware are configured here.
- File Systems
Found here are options for filesystems which are supported by the
kernel, such as EXT2 and ReiserFS. It is best to
build support for the root filesystems directly into the kernel rather
than as a module.
- Security Options
Interesting options here include support for NSA
Security Enhanced Linux and other, somewhat experimental, features
to increase security.
BuildDependencies The next step is to create the necessary include files and generate dependency information. This
step is only required for the 2.4.x kernel tree.
Lots of messages will scroll by. Depending on the speed of your machine and on
what options you chose, this may take several minutes to complete. Once the dependency
information is created we can clean up some miscellaneous object files. This step
is required for all versions of the kernel.
Build the Kernel We are now (finally) ready to start the actual kernel build. At the prompt type:
As the Kbuild documentation states:
| Somecomputerswon'tworkwith'makebzImage',eitherduetohardware
problemsorveryoldversionsofliloorloadlin.Ifyourkernelimage
issmall,youmayuse'makezImage','makezdisk',or'makezlilo'
onthesesystems.
| | | --Kbuild 2.4 Documentation | |
[6]
On an Athlon 1800XP, building the bzImage took approximately seven
minutes for a moderately configured kernel. On a Pentium 100 used as a
baseline, a similar configuration took almost 45 minutes. If you are not
in a hurry you may want to start the build on a console while you continue to work.
The main difference between the 2.4 and 2.6 trees is the amount of information
presented on the screen. Much less information is displayed with 2.6.x, making
errors and warnings easier to spot.
If everything went correctly then the new kernel should exist in
./arch/$ARCH/boot. For example, on IA32
systems we can verify this with:
Build the Modules
There is one more step needed for the build process, however. You have created the
kernel, but now you need to create all the loadable modules if you have them
configured. Be aware that typical distribution kernels tend to have almost every
feature installed, plus a few others for good measure. These can typically take
an hour or so to build on our Athlon XP1800. The stock kernels are somewhat
leaner by default and take, on average, 25 minutes to compile. To build the modules
we run:
Again, lots of messages will scroll by on the screen. Here also the 2.6.x series
is less talkative, outputting only summary information. Once the modules are built
they can be installed. If you were building as a non-privileged user you will now
need to switch to root to complete this next step:
			$ su
 			password:
 			$ make modules_install
|
The freshly baked modules will be copied into /lib/modules/KERNEL_VERSION.
Create Initial RAMDisk If you have built your main boot drivers as modules (e.g., SCSI host
adapter, filesystem, RAID drivers) then you will need to create an
initial RAMdisk image. The initrd is a way of sidestepping the chicken
and egg problem of booting -- drivers are needed to load the root
filesystem but the filesystem cannot be loaded because the drivers
are on the filesystem. As the manpage for mkinitrd
states:
| mkinitrdcreatesfilesystemimageswhicharesuitableforuseasLinuxinitial
ramdisk(initrd)images.Suchimagesareoftenusedforpreloadingthe
blockdevicemodules(suchasIDE,SCSIorRAID)whichareneededtoaccessthe
rootfilesystem.mkinitrdautomaticallyloadsfilesystemmodules(suchas
ext3andjbd),IDEmodules,allscsi_hostadapterentriesin/etc/modules.conf,
andraidmodulesifthesystemsrootpartitionisonraid,whichmakesit
simpletobuildandusekernelsusingmodulardevicedrivers.
| | | --MKINITRD(8) | |
To create the initrd, do the following:
$ mkinitrd /boot/initrd-2.6.0.img 2.6.0
|
Some versions of mkinitrd may require other options to specify
the location of the new kernel. On SuSe 9.0, for example, the
following syntax is required:
$ mkinitrd -k vmlinux-VERSION -i initrd-VERSION
|
[7]
Troubleshooting Build Failures If your build fails with a signal 11 error it is most likely because of
hardware problems; often the culprit is failing memory. Unfortunately,
the BIOS memory check is close to useless in detecting intermittent
memory failures. Even dedicated memory checkers do not stress memory
as much as gcc running a kernel build. One way to tell if hardware is
at fault is to restart the 'make bzImage' process. If you can get a
little further before failing again then it is a hardware error. There
are several possible ways to try to correct these.
Try changing your memory settings in the BIOS to more conservative
levels. For example, change to SLOW or NORMAL instead of FAST. Verify
that all the fans are working correctly.
[8]
Swap out the memory. One trick is to specify less memory than is
actually installed by passing values to the kernel on boot. This
prevents the kernel from accessing all the memory in the machine,
and could help diagnose bad SIMMs or SDRAMs.
If instead the 'make' fails at the same point each time, then it is a
configuration error. These usually result from not enabling a feature
that is required by another. For example, IP Firewalling requires
TCP/IP. If the prerequisite is not enabled, the build will fail. You
may also get errors if you select the wrong processor or are using
either a very old or development compiler.
Also keep in mind that the kernel is highly sensitive to the versions
of the build tools such as the compiler and linker. The versions listed
are requirements, not suggested.
InstallationCopy the Kernel and System.map Once your kernel is created, you can prepare it for use. From the
./linux directory, copy the kernel and
System.map file to /boot. In the following
examples change KERNEL_VERSION to the version of your kernel.
[9]
 $ cp arch/i386/boot/bzImage /boot/bzImage-KERNEL_VERSION
 $ cp System.map /boot/System.map-KERNEL_VERSION
 $ ln -s /boot/System.map-KERNEL_VERSION /boot/System.map
|
The next step is to configure your bootloader. The bootloader is the
first program that runs when a computer is booted. For this document it is
assumed that you are running an IA32 system with a standard PC BIOS. If
you are running the LiLO
bootloader skip to the the Section called LiLO Configuration otherwise
proceed to the Section called GrUB Configuration.
FIXME: Need information on non-IA32 bootloaders!!
GrUB Configuration GrUB is beginning to supplant LiLO as the bootloader of choice in more
recent Linux distributions. It is generally more flexible and a lot more
forgiving of system errors. For example, LiLO generally requires that an alternate boot
disk is used if the kernel configuration renders the system unbootable
Grub allows "on-the-fly" modification of kernel location,
boot parameters, kernel to boot, etc..
Once you have copied the bzImage and System.map to /boot,
edit the grub configuration file located in /boot/grub/menu.lst.
On some distributions /etc/grub.conf is a symbolic link to
this file.
 # Note that you do not have to rerun grub after making changes to this file
 #boot=/dev/hda
 default=0
 timeout=10
 title Red Hat Linux (2.4.20-24.9)
         root (hd0,1)
         kernel /boot/vmlinuz-2.4.20-24.9 ro root=LABEL=/
         initrd /boot/initrd-2.4.20-24.9.img
 title Red Hat Linux (2.4.20-20.9)
         root (hd0,1)
         kernel /boot/vmlinuz-2.4.20-20.9 ro root=LABEL=/
         initrd /boot/initrd-2.4.20-20.9.img
|
Edit the file to include your new kernel information. Keep in mind that GrUB counts
starting from 0, so (hd0,1) references the first controller, second
partition. If you have created an initial RAMdisk be sure to include it here too.
A typical configuration may look something like this:
		title Test Kernel (2.6.0)
 			root (hd0,1)
 			kernel /boot/bzImage-2.6.0 ro root=LABEL=/
 			initrd /boot/initrd-2.6.0.img
|
LiLO Configuration LiLO is an older bootloader. Its configuration file is located in
/etc/lilo.conf on most systems. Unlike GrUB,
any changes to lilo.conf will not be set until the lilo program is
rerun.
		boot=/dev/hda
 		map=/boot/map
 		install=/boot/boot.b
 		default=test-2.6.0
 		keytable=/boot/us.klt
 		lba32
 		prompt
 		timeout=50
 		message=/boot/message
 		menu-scheme=wb:bw:wb:bw
 		image=/boot/vmlinuz
 			label=linux
 			root=/dev/hda3
 			append=" ide1=autotune ide0=autotune"
 			read-only

 		image=/boot/bzImage-2.6.0
 			label=test-2.6.0
 			root=/dev/hda2
 			read-only
|
The important sections are the image=/boot/bzImage and
the default=test-2.6.0 options. Notice that you can have
several image sections in the lilo.conf, allowing multiple configurations.
Install the new kernel by running the lilo program.
If you are installing and testing the kernel remotely, you can
instead specify to LiLO that the new kernel is loaded only for the next
boot by using the following syntax:
$ /sbin/lilo -R test-2.6.0
|
Messages will appear showing the newly added kernel with an asterisk marking
the default image. If you get errors, consult the lilo documentation for the
correct syntax.
BibliographyBooks[LinuxKernel]Daniel P. Dovet and Marco Cesati, 2003, Edited by FIXME FIXME, 0672325128 , SAMS, Linux Kernel Development.
FeedbackComments and corrections The current maintainer of this HOWTO
is Kwan Lowe. Please send corrections,
additions, comments and criticisms to
<kwan@digitalhermit.com>.
The HOWTO's maintainer is not a
professional writer. If you find some parts of this
HOWTO difficult to comprehend then let the
maintainer know.
Colophon Written in DocBook 4.1 SGML.
Vim was
used to create the SGML source file. The
HTML, PostScript and
PDF output was
generated from the DocBook source by the Linux Documentation
Project.
|
|

 LINUX
LINUX 
 Kernels