2.4 -> 2.6
William von Hagen , TimeSys Corp
Конфигурация ядра - переход от 2.4 к 2.6
Ядро - сердце операционной системы , оно управляет тредами,
процессами , ресурсами .
В отличие от других операционных систем , Линукс позволяет пользователям
конфигурировать ядро ,
при этом можно менять его размер,
включать-выключать поддержку различных устройств.
Выключение лишних устройств особенно полезно при разработке
embedded systems,
ведь маленькое ядро требует меньше памяти.
Код устройства , автоматически подгружаемый в ядро,
находится как правило в модуле.
В этой статье обсуждается как написание новых модулей для 2.6,
так и модификация уже существующих.
Конфигурация ядра выполняется с помощью различных конфиг-редакторов.
Такой редактор позволяет вам получить информацию о какой-то переменной ядра,
выключить-включить ее , вкомпилировать ее в ядро или в отдельный модуль..
Конфигурация ядра - это первый шаг при сборке ядра.
Вам потребуется сконфигурировать и собрать модули , определенные в этой конфигурации.
Для десктопа это не представляет особых проблем,
но все усложняется для других устройств.
Например , если вы собираете ядро для embedded systems,
вы делаете это на своем десктопе ,
но при этом вы используете т.н. cross-compiler.
Cross-compilers генерит бинарник для таких систем для другого процессора-архитектуры..
Cross-compiler настраивается через различные переменные в Makefile,
или можно использовать софт типа TimeSys TimeStorm.
Появились различные графические редакторы для конфигурации 2.6,
которые могут отслеживать зависимости между переменными самого конфига.
Рассмотрим 4 команды: -
make config,
командный интерфейс
make oldconfig,
текстовой интерфейс для устаревшей конфигурации
make menuconfig,
редактор с текстовым гуе-м
make xconfig,
графический редактор
Графические редакторы Kernel Configuration
Графический конфигуратор можно запустить с помощью команды
make xconfig.
Последние версии используют Qt.
Скриншот:
Figure 1: Sample make xconfig Screen for the 2.6 Kernel
(Click for larger view)
Слева - дерево доступных опций.
Вверху справа - выбранное под-дерево.
Снизу справа - хелп.
Следующий скриншот - результат команды
make gconfig для GNOME desktop.
Figure 2: Sample make gconfig Screen
Особенности Kernel Configuration
Ядро 2.6 теперь конфигурируется прозрачнее , чем его предшественники ,
но в то же время самих опций конфигурации стало больше.
Например , клавиатура PS/2 теперь не конфигурится подобно остальным устройствам,
поскольку 2.6 имеет новую модель устройств и рассматривает ее
с точки зрения legacy bus interface.
Эту опцию можно найти в Device Drivers > Input device support
> Keyboards and Device Drivers > Input device support > Mice
> PS/2 Mouse configuration screens.
Проверьте опцию поддержки Graphics support в секции Device Drivers ,
чтобы убедиться , что у вас включен системный , а не графический
console display driver или framebuffer.
Вы можете установить опцию module unloading ,
если вы хотите выгрузить модуль перед его загрузкой.
В графических конфигураторах make xconfig
или make gconfig появились полезные установки:
-
В меню можно выбрать опцию Show all options ,
которая покажет все доступные опции.
- Опция Show debug показывает,
что произойдет при активации той или иной опции.
-
Опция меню Show Name показывает имя переменой ,
ассоциированной с именем опции ядра.
Это может быть полезно при определении зависимостей.
Всегда можно выполнить команду make help ,
которая покажет все доступные опции.
Отпадает необходимость в команде make dep . Уже сама команда "make"
без аргументов автоматом генерит dependency information,
компилирует ядро и драйвера , выбранные при конфигурации.
После конфигурации теперь можно ограничиться 3-мя командами : make ,
make install , make modules_install.
И если вы делаете апгрэйд своей системы с 2.4 -> 2.6 , кроме пересборки самого ядра ,
необходимо будет поменять другой софт , о чем говорится ниже.
Использование существующей Kernel Configurations
Команда make oldconfig генерит новую конфигурацию на основе существующего конфига.
Если конфига вообще нет,
его можно создать путем make defconfig.
Команда make oldconfig
особенно полезна при апдэйте ядра .
Команда make oldconfig будет предлагать вам в интерактивном режиме
выбирать каждую опцию ядра.
При миграции с ядра 2.4 на 2.6
скопируйте файл с расширением named .config ,
расположенный в каталоге 2.4,
в каталог 2.6,затем перейдите в каталог 2.6 и выполните make oldconfig.
Например:
# cd /opt/timesys/linux/4.1/iq80315/src/2.4.21-timesys-4.1/kernel
# cp .config /opt/timesys/linux/5.0/iq80315/src/2.6-timesys-5.0/kernel
# cd /opt/timesys/linux/5.0/iq80315/src/2.6-timesys-5.0/kernel
# make oldconfig
Заключение
Можно сказать , что управление сборкой ядра при переходе с 2.4 на 2.6 упрощается.
Графические конфигураторы заметно облегчают эту задачу.
Обзор устройств и модулей
Device drivers - это интерфейс между железом и ядром.
Это низкоуровневая прослойка , работающая с высокоуровневым API.
Поддержка SCSI, USB, PCMCIA различна в зависимости
от конкретного устройства.
Добавление нового устройства в ядро сводится к написанию нового драйвера.
Устройства могут быть интегрированы в ядро 2 путями:
компиляция в ядро и компиляция в подгружаемый модуль.
При настройке конфигурации вы можете указать тип загрузки устройства.
Компиляция модуля в ядро несет в себе то преимущество,что драйвер всегда доступен,
но при этом размер ядра увеличивается.
Компиляция отдельного модуля увеличивает время его загрузки ,
но это ничто по сравнению с увеличением размера ядра и увеличения его потребляемой памяти.
Компиляция отдельного модуля заметно ускоряет/облегчает процесс компиляции и отладки,
вместо того чтобы компилировать все ядро.
Конфигурация ядра для поддержки загружаемых модулей
сделана в секции Loadable module support.
Опция автоматической загрузки - Automatic kernel module loading -
позволяет ядру автоматом грузить модуль при необходимости.
Опция выгрузки модуля - Module unloading - появилась в 2.6.
Ядро может выгрузить само какой-то модуль,если в нем нет более необходимости.
Опция форсированной выгрузки - Forced module unloading -
позволяет форсированно выгружать модуль независимо от того,
хочет этого ядро или нет.
Загружаемые модули традиционно находятся в каталоге /lib/modules -
в нем находятся подкаталоги с соответсвующими версиями номера ядра.
В 2.6 появился новый фреймворк для устройств,
в котором появилась модель т.н. custom device drivers,
которые вы могли разрабатывать для более ранних версий.
Эта модель поддерживает Plug and Play , power management .
Произошло разделение между шинами и собственно устройствами.
Появилась файловая система sysfs filesystem ,
в которой возможна древовидная иерархия для каждого устройства.
В 2.6 появилась новая конвенция имен для загружаемых модулей ,
использование расширения .ko.
Изменения в базовой структуре Device Driver
Стандартный шаблон для устройства в 2.4 kernel следующий:#define MODULE
#include < linux/module.h>
#include < linux/config.h>
#include < linux/init.h>
static int __init name_of_initialization_routine(void) {
/*
* code here
*/
}
static void __exit name_of_cleanup_routine(void) {
/*
* code here
*/
}
module_init(name_of_initialization_routine);
module_exit(name_of_cleanup_routine);
Основной проблемой в 2.4 было то , что имена всех функций инициализации
и деактивации всех модулей устройств были как
init_module() and cleanup_module() , что порождало проблемы.
В 2.6 вы должны использовать макросы module_init() и module_exit()
для регистрации имен этих функций.
Далее,
в 2.6 отпала необходимость в макросе #define MODULE .
Его функцию выполняет само ядро в момент компиляции.
В самой структуре устройства произошли базовые изменения.
При загрузке старой структуры начинают сыпаться ошибки в
system log (/var/log/messages).
Вам нужно добавить определение макроса MODULE_LICENSE():
MODULE_LICENSE("GPL");
Этот макрос определяет модуль под лицензией GPL Version 2.
Возможны другие лицензии: "GPL v2", "GPL and additional rights", "Dual
BSD/GPL" , "Dual MPL/GPL","Proprietary".
Минимальный стандартный шаблон для 2.6 device driver :
 #include < img src="/files/misc/lt.gif">linux/module.h>

#include < img src="/files/misc/lt.gif">linux/config.h>

#include < img src="/files/misc/lt.gif">linux/init.h>
MODULE_LICENSE("GPL");
static int __init name_of_initialization_routine(void) {
    /* code goes here */
    return 0;
}
static void __exit name_of_cleanup_routine(void) {
    /* code goes here */
}
module_init(name_of_initialization_routine);
module_exit(name_of_cleanup_routine);
Различия в версиях рассмотрены в следующей секции.
Изменения в сборке модулей
Базовое изменение в 2.6 в том , что теперь код загружаемого модуля
компилится отдельно от ядра.
В 2.4 при компиляции модуля нужно было передать кучу параметров
в командной строке или в Makefile , например:
gcc -D__KERNEL__ -DMODULE -I/usr/src/linux-2.4.21/include -O2 -c testmod.c
В 2.6 все по-другому.
Теперь при сборке модуля ему не нужно указывать MODULE, __KERNEL__, KBUILD_BASENAME
или KBUILD_MODNAME, -O2.
Сам Makefiles стал проще, например для модуля testmod.ko:
obj-m := testmod.o
Нужно указывать путь к исходникам ядра .
Команда :
# make -C /usr/src/linux-2.6.1 SUBDIRS=$PWD modules
Подразумевается,что исходники и Makefile лежат в текущем каталоге.
Протокол вывода:make: Entering directory `/usr/src/linux-2.6.1'
*** Warning: Overriding SUBDIRS on the command line can cause
*** inconsistencies
make[1]: `arch/i386/kernel/asm-offsets.s' is up to date.
Building modules, stage 2.
MODPOST
CC /home/wvh/timesys/2.6/testmod/testmod.mod.o
LD [M] /home/wvh/timesys/2.6/testmod/testmod.ko
make: Leaving directory `/usr/src/linux-2.6.1'
Генерится обьектный файл для модуля.
Команда LD проверяет загрузку модуля под 2.6.
В результате будет сгенерирован обьектный файл
testmod.ko ("kernel object").
Изменения в 2.6
В 2.6 произошло много внутренних изменений ,
которые отразились на драйверах :
асинхронный механизм I/O , поддержка DMA, механизм выделения памяти и страниц,
block device driver, новый дисковый интерфейс.
Механизм выделения памяти и страниц стал использовать новый интерфейс - mempool.
Изменился механизм подсчета Module reference counts.
Очередь задач переехала в work queues.
Старый макрос MODULE_PARM() был заменен на новый module_param() ,
это коснулось интерфейса использования модулей с параметрами.
Концепции preemptibility и SMP-awareness в 2.6
создали новые возможности для драйверо-писателей.
Апгрэйд драйверов
При переходе на 2.6 у драйвера может возникнуть необходимость в модификации.
Речь идет о поддержке файловой системы devfs.
Ее нужно включить в разделе настроек конфигурации
File systems-> Pseudo filesystems .
При использовании devfs ,
драйвер регистрирует устройство с помощью функций register_blkdev() или
register_chrdev(),при этом нужно знать т.н. major и minor device numbers.
Новый механизм udev фактически использует тот же каталог /dev при инициализации устройства.
При использовании devfs драйвера используют системный вызов devfs_register().
Драйвер может использовать major или minor номера,
или же использовать вызов devfs_register() с нужным флагом DEVFS_FL_AUTO_DEVNUM.
Заключение
For general information about writing device
drivers, "Linux Device Drivers, 2nd Edition" by Alessandro Rubini and
Jonathan Corbet (ISBN 0596000081) is an excellent book on developing,
debugging, and using Linux device drivers. The version of this book
associated with the 2.4 kernel is available online at the URL
http://www.xml.com/ldd/chapter/book/. A new version of this book is in
progress to discuss 2.6 issues. Until a new edition is available, Mr.
Corbet has written an excellent series of articles on writing device
drivers for the 2.6 kernel. These are available at the
Linux Weekly News.
Similarly, the documentation provided with TimeSys' Linux Development
Suite (LDS) provides detailed examples of writing device drivers,
focusing on high-performance drivers for embedded use.
Конвертация системы под 2.6 kernel
The
white papers in this series highlight primary issues in migrating your
existing drivers, development systems, applications, and custom Linux
deployments to the 2.6 Linux kernel. The previous white paper in this
series, "Migrating Device Drivers to 2.6",
provided an overview of 2.6-related changes to device drivers,
explained the new device driver compilation process, and discussed the
implications of some of the new features of the 2.6 kernel to existing
device drivers. This installment in the series provides an overview of
converting an existing development system to use a 2.6 kernel.
Причина изменений при переходе под 2.6 kernel?
The
kernel is the heart of the Linux operating system, managing all system
threads, processes, resources, and resource allocation. Unlike most
other operating systems, Linux enables users to reconfigure the kernel,
which is usually done to reduce its size, activate or deactivate
support for specific devices or subsystems. Reconfiguring the kernel to
remove support for unused devices and subsystems is quite common when
developing embedded systems, because a smaller kernel requires less
memory, increasing the resources available to your applications.
Many
of the new capabilities present in the Linux 2.6 kernel, especially at
the device driver and system software levels, require parallel changes
in the administrative utilities that interact with them. 2.6-based
systems require new startup scripts that must understand new module
naming conventions, use new configuration files, and use new 2.6
features such as the sysfs filesystem. The sysfs filesystem is a
virtual filesystem that maintains a hierarchical view of all of the
devices in use on your system, much as the proc filesystem provides for
processes and status information. The sysfs filesystem is designed to
be used internally by your Linux system, but the 2.6 kernel also
provides integrated support for new types of filesystems for storing
user data. New journaling filesystems such as JFS (introduced late in
the 2.4 kernel series) and XFS, and new networked filesystems such as
OpenAFS all require up-to-date, filesystem-specific utilities.
You
only need to install the utilities associated with new 2.6 features
that you are using. For example, if you are not using the JFS
filesystem, you can reduce the size of your kernel by disabling JFS
support. Similarly, you can reduce the size of the root filesystem used
with your kernel by removing (or simply not installing) JFS-related
utilities, because you will not need them.
If you are not using
an off-the-shelf Linux distribution based on the 2.6 Linux kernel, you
will need to verify that the versions of various packages installed on
your Linux system have all of the features required for use with the
Linux 2.6 kernel. If sufficiently recent versions of these packages are
not installed on your system, you will have to update your system to
newer versions of these packages.
Апгрэйд критических пакетов
A
package is a set of related utilities that are provided and installed
together, either by building them from source code or by installing
binaries that someone else has prepared. Different Linux distributions
provide package and dependency management software that verifies that
any other software that a package depends on is installed on your
system and is of a sufficiently recent version. These package managers
also typically maintain a system-wide database of installed
applications and their versions. The most common package formats that
provide and use dependency information are the RPM (Red Hat Package
Manager, also used by the Fedora, Mandrake, SuSE, and Turbolinux
distributions) and DEB (Debian Linux, also used by the Knoppix and
Xandros distributions) package formats. Other package formats, such as
the standard gzipped tar file TGZ format used by the Slackware Linux
distribution, do not include dependency information in the package
itself.
Table 1 lists various Linux
software packages that are present in most standard 2.4-based Linux
systems, and certainly on all desktop Linux installations used for
software development. Specialized distributions targeted for markets
such as embedded computing may not require or use all of these packages
in the root filesystems that they deploy. However, if you are upgrading
a specialized system such as one used for embedded computing, it is
critical to understand where these packages must be updated.
If
you are upgrading a desktop Linux system to the 2.6 kernel, the only
place to update and verify these packages is on your desktop system.
However, if you are migrating a specialized system such as an embedded
Linux distribution, you must first update any cross-compilers and
related software that you are using on your desktop Linux systems to
build software for the embedded system. You must then update any of the
packages identified in this white paper that are used in your embedded
system's filesystems. The next white paper in this series, "Migrating
Custom Linux Installations to the 2.6 Kernel", provides an overview of
upgrading these types of specialized systems.
| Software Package | Minimum Version | Command to Show Version |
|---|
| binutils | 2.12 | ld -v | | e2fsprogs | 1.29 | tune2fs | | gcc (GNU C Compiler) | 2.95.3 | gcc --version | | make (GNU make) | 3.78 | make --version | | module-init-tools | 0.9.10 | depmod -V | | procps | 3.1.13 | ps --version | | util-linux | 2.10o | fdformat --version |
Table 1: Standard Software Package Versions Required for a 2.6 Kernel
When preparing to use a 2.6 kernel with an existing system, you must verify the versions of any of the packages listed in Table 1
that are installed on the system that you are migrating, and update
them to appropriate versions if necessary. The first column in this
table gives the name of a software package that may require updating
for use with the 2.6 kernel. The second column identifies the minimum
version required for compatibility with the 2.6 kernel - any version
newer than the specified minimum version should also be fine. The third
column provides a sample command that you can execute in order to
determine the version of the software that is currently installed on
your system.
In addition to the packages listed in Table 1,
you might also need to update additional packages if you plan to use
specific filesystems, hardware, or administrative mechanisms on your
2.6-based system. These additional package updates are discussed later
in this white paper.
Апгрэйд module-init-tools
Of the packages listed in Table 1,
the module-init-tools package requires some special care during an
upgrade if you want to be able to dual-boot your system with either a
2.6 or a 2.4-based kernel. The module-init-tools package provides the
system applications for module loading (insmod and modprobe), unloading (rmmod), listing (lsmod), and dependency analysis (depmod).
Due to changes in module naming and loading mechanisms, you can't
simply overwrite the existing versions of these utilities. If you do
so, you will not be able to manage 2.4-style kernel modules correctly.
Therefore, part of the process of upgrading the module-init-tools
package is to rename the existing 2.4 versions of these utilities as
utility.old, which preserves the versions necessary for 2.4 kernels. If
the module-init-tools package has been compiled with support for
backward compatibility (which is the default), the utilities in the
package will automatically execute the 2.4 versions of these utilities
whenever you boot a 2.4 kernel.
If you are updating your
module-init-tools binaries using a prebuilt package file such as a DEB
or RPM package and need to be able to dual-boot your system using a 2.4
or 2.6 kernel, you should check that the package file includes a
pre-install script that renames your existing module-related binaries
before installing the new version. A simpler approach is to build the
module-init-tools package for your system from source code. One of the make targets when building this package from source is moveold,
which copies your existing module-related binaries so that they are not
lost when the new versions are installed. A suggested sequence for
configuring, building, and installing module-init-tools from scratch is
the following:./configure --prefix=/
make moveold
make
make install The
first command configures the module-init-tools package so that it
installs in the same location as the original module-init-tools package
(as opposed to subdirectories of /usr/local). The second
command renames the existing binaries from a previous installation of
the module-init-tools package, as explained in the previous paragraph.
The third command builds the applications in the module-init-tools
package, and the fourth line installs them.
Of course, building
and installing this package from source will not update any database of
installed applications that is maintained by your package manager, but
it is safest unless you are a true package wizard and know how to
extract and examine pre-install scripts from existing packages.
A
final step when installing the new version of the module-init-tools
package is to run a shell script that converts the entries in the
module configuration file used by 2.4-series kernels (/etc/modules.conf) to equivalent entries in the module configuration file used by the 2.6 kernel (/etc/modprobe.conf). This script is the aptly-named generate-modprobe.conf script, and takes a single argument, which is the full pathname of your existing modules.conf
file. After running this script, you may also need to examine the new
file and update it to reflect changes in device naming between the 2.4
and 2.6 kernels.
Дополнительный апгрэйд пакетов
Table 1
listed packages that are used on most Linux systems and which must be a
specified version or newer on a system that is running the 2.6 kernel.
You might need to update additional packages if you happen to be using
the features that these packages support on your systems. Table 2
shows packages that you will need to verify or update if you are using
associated features, but which are not used by default on all Linux
distributions. These packages are specific to optional subsystems or
drivers such as ISDN (isdn4k), PCMCIA cards (pcmcia-cs), kernel
profiling analysis (oprofile), filesystem quotas (quota-tools), and
specific types of networking or journaled filesystems (nfs-utils,
jfsutils, reiserfsprogs, and xfsprogs).
| Software Package | Minimum Version | Command to Show Version |
|---|
| isdn4k-utils | 3.1pre1 | isdnctrl 2>&1|grep version | | jfsutils | 1.1.3 | fsck.jfs -V | | nfs-utils | 1.0.5 | showmount --version | | oprofile | 0.5.3 | oprofiled --version | | pcmcia-cs | 3.1.21 | cardmgr -V | | ppp | 2.4.0 | pppd --version | | quota-tools | 3.09 | quota -V | | reiserfsprogs | 3.6.3 | reiserfsck -V 2>&1|grep progs | | xfsprogs | 2.6.0 | xfs_db -V |
Table 2: Additional Software Package Versions Required by a 2.6 Kernel
As
mentioned earlier, you only need to upgrade or install the specified
packages and versions if you are using the software functionality that
they are relevant to. We suggest that you install or upgrade packages
that you are likely to use at some point, such as the nfs-utils
package. You must simply remember that you will need to install or
upgrade the other packages listed in this section if you activate
related kernel features.
Изменения в ALSA
If
you use any of the audio capabilities of your system beyond its
built-in speaker and associated beep, one of the key changes present in
the 2.6 Linux kernel is its adoption of the Advanced Linux Sound
Architecture (ALSA). ALSA is now the default digital audio architecture
for playing and managing audio recording and playback. ALSA has been
available for quite a while, and replaces the Open Sound System (OSS),
the default in stable kernels prior to 2.6. Even in the 2.6 kernel,
ALSA provides an OSS emulation mode to support legacy applications, but
switching your system to use ALSA is certainly the right long-term
solution.
Discussing all of the nuances of converting your
system to use ALSA is outside the scope of this white paper and would
largely duplicate the excellent documentation available on the ALSA Project web site.
TimeSys has found that it is generally wise to convert your existing
2.4-based system to ALSA before upgrading your system to the 2.6
kernel. This eliminates several variables in your 2.6 Linux upgrade,
because it ensures that ALSA works on your hardware. Any problems with
sound that you encounter during the upgrade are therefore related to
the upgrade rather than to ALSA itself. Upgrading a 2.4 system to ALSA
before upgrading to the 2.6 kernel also ensures that the ALSA module
configuration commands are present and correct in your /etc/modules.conf file before you generate the 2.6 equivalent /etc/modprobe.conf file (as described earlier in this white paper).
The highlights of the ALSA upgrade process are the following:- Get
the latest versions of the ALSA drivers, library, and utilities in
source format or as pre-prepared packages that you can install on your
system. ALSA drivers are also included in the 2.6 kernel source, but we
suggest getting the drivers package so that you can upgrade your 2.4
system to ALSA first, as suggested previously. If you want to use
ALSA's OSS emulation mode, you will also need to get its source code
and build and install this package as well.
- Configure, compile, and build these packages (if necessary) or install the binaries on your system.
- Configure the ALSA software using the
alsaconf
application, which probes for your sound hardware, generates the
correct module loading information, and optionally updates your /etc/modules.conf file.
- Enable ALSA using the
alsamixer application, which un-mutes your ALSA configuration. (ALSA is always initially muted.)
- Link the
/etc/rc.d/init.d/alsasound startup file into the sequence of command files executed when your system starts up.
- Execute the
generate-modprobe.conf script to migrate your ALSA module configuration to the /etc/modprobe.conf file used with the module utilities required for a 2.6 kernel.
ALSA
has many advantages over OSS, ranging from support for more audio
interfaces and soundcards, modularized drivers that are SMP and
thread-safe, and a good separation between kernel and user space that
simplifies writing and maintaining drivers and audio applications. For
more complete information, see the ALSA project's Web site.
Изменения в конфигах системы
In
addition to updating packages or verifying that you have sufficiently
recent versions installed, you will usually need to manually update
some of your system startup and configuration scripts in order to mount
and use the new filesystems and to take into account the kernel module
naming scheme used by the 2.6 kernel. This section provides an overview
of the primary system configuration files that you must update; the
next section provides an overview of upgrading system startup scripts.
The
new sysfs filesystem is designed as an in-memory repository for system
and device status information, providing a hierarchical view of the
system's device tree. The system information that is dynamically
maintained in the sysfs filesystem is analogous to the process status
information that is dynamically maintained in the proc filesystem.
When
upgrading to use the 2.6 kernel, you must therefore add a line for the
sysfs filesystem to your system's filesystem table file, /etc/fstab. This entry should look something like the following: none /sys sysfs noauto 0 0 This
entry gives your system the information that it needs to identify and
mount the sysfs filesystem on the /sys directory (which you must create
using a command such as mkdir /sys). If your system will only boot the 2.6 kernel, you can specify the defaults mount option rather than noauto, so that your system will mount the sysfs filesystem whenever your system executes the mount -a command, which is usually run during system startup.
If you want your system to boot either a 2.4 or 2.6 kernel, the noauto
mount option in the example entry prevents your system from trying to
automatically mount the sysfs filesystem when booting a 2.4 kernel. You
would then add an explicit mount for this filesystem to your system's
startup scripts, as discussed in the next section.
For detailed information about the organization of the /etc/fstab
file and the meaning of each of the fields in an entry, consult the
online reference information for this file by executing the man fstab command on your Linux system.
Изменения в загрузочных скриптах
As
mentioned earlier, 2.6-related changes such as different file names,
module names, and new features, make it necessary to update your
system's startup scripts when adding a 2.6 kernel as a boot option on
an existing 2.4-based system. This section provides an overview of the
sorts of changes necessary on standard desktop systems such as Red Hat
Linux systems.
The files that you need to change depend on your
system's boot sequence and the startup and shutdown scripts that it
executes. The specific files used during the boot process differ across
Linux distributions, though most are based on the SysVinit and
initscripts packages. Enhanced versions of these packages that handle
both 2.4 and 2.6 startup procedures may be available from the vendor
(if any) who supports your Linux distribution. If they are not
available, this section and the subsequent white paper in this series
("Migrating Custom Linux Installations to 2.6") will help you identify
the changes that you need to make.
If you are creating a system
that can boot and run both 2.4 and 2.6-based kernels, and your Linux
vendor does not provide updated and flexible startup and shutdown
scripts, conditionalizing your startup scripts based on the version of
the kernel that is booting is an excellent solution. The easiest way to
do this is to set an environment variable based on the identity of the
running kernel, as in the following example:VERSION=`uname -a | sed -e 's;.* \(2\.6\).*;\1;'`
if [ "x$VERSION" = "x" ] ; then
VERSION="2.4"
fi This
sets the environment variable VERSION to 2.6 for a 2.6 kernel and to
2.4 otherwise. You can then subsequently check the value of this
variable and execute the commands appropriate for your kernel version,
as in the following example:if [ "x$VERSION" = "x2.6" ] ; then
action $"Mounting sysfs filesystem: " mount -n -t sysfs /sys /sys
fi
One
of the first changes that you should make to your startup scripts when
using a 2.6 kernel is to add commands that mount the sysfs filesystem
(as shown in the previous example). One of your system's startup
scripts, probably /etc/rc.sysint or /etc/rc.d/rc.sysinit, contains an entry that mounts the proc filesystem on the directory /proc when your system boots. You will need to add a parallel entry for mounting the sysfs filesystem on the mount point /sys (which you may also need to create using the mkdir /sys command) at a similar location in the file to where the /proc filesystem is mounted.
Similarly,
the name of the file in the proc filesystem that contains kernel symbol
information has changed in the 2.6 kernel. To guarantee that your
startup scripts have access to kernel symbols, you should change or
conditionalize any instances of /proc/ksyms in your system startup files to /proc/kallsyms, the name of the file used by the Linux 2.6 kernel.
Next,
some files that were located in the proc filesystem for the 2.4 kernel
have migrated to the sysfs filesystem for the 2.6 kernel. As an
example, the USB device list that was stored in the file /proc/bus/usb/devices when using a 2.4 kernel is now stored in the file /sys/bus/usb/devices under the 2.6 kernel.
Finally,
you should also make equivalent changes to any scripts invoked during
your system's shutdown procedure. For example, on Red Hat systems, the
shutdown process invokes the script /etc/init.d/halt during system shutdown, which references the proc filesystem but not the equivalent sysfs filesystem.
The
items listed in this section are the primary system startup and
shutdown changes that most people will need to make to use a 2.6 kernel
with a 2.4 Linux root filesystem. Depending on the extent to which you
have customized your system's startup process and installed additional
utilities or drivers, you might find that other changes are required. A
sample rc.sysinit file that has been conditionalized to work with both
the 2.4 and 2.6 kernels is available online in the TimeSys Resource Center.
The sample file was created for use on a system running Red Hat 9, but
shows the types of changes that you will need to make regardless of
which Linux distribution you are running.
Пересборка ядра
The first white paper in this series, "Customizing a 2.6-Based Kernel",
provided an overview of configuring the 2.6 Linux kernel. If you are
installing the 2.6 Linux kernel on an existing system and are building
the kernel yourself, the easiest way to correctly configure your 2.6
kernel is to reuse the kernel configuration file from your current
system. You can do this through the kernel's make oldconfig make
target, which is a text-mode interface that takes an existing
configuration file and queries you for settings for any configuration
variables found in the kernel source but not in that configuration
file. Using this make target to migrate an existing configuration file
was explained in the first white paper in this series. Using the make oldconfig
kernel configuration target gets you most of the way towards building a
2.6 kernel that will boot successfully on your system, but note that
simply running make oldconfig may not create a kernel configuration
that has all of the features that you want.
A good suggestion
for smoothly migrating an existing system to the 2.6 kernel is to
change as few things as possible at the same time. The packages, system
configuration files, and startup scripts discussed earlier in this
white paper are necessary changes for using a 2.6 kernel. However, if
you are also adding ALSA support and followed our suggestion to upgrade
your 2.4 system to ALSA before moving to 2.6, keep ALSA support as a
loadable kernel module until you're sure that your 2.6 system is
working correctly. At that point, you can always rebuild your 2.6
kernel with integrated ALSA support - but at least you know that ALSA
worked correctly with your 2.6 system. Similarly, if you're interested
in experimenting with devfs, don't switch to devfs during your initial
migration to 2.6. You can always add it in later by rebuilding your
kernel, once you have a 2.6 kernel working correctly on your system.
Migrating an off-the-shelf system to the 2.6 kernel
If
you're migrating a system running an off-the-shelf distribution to the
2.6 kernel, you might never have had to worry about the exact hardware
details of your system. One of the advantages of off-the-shelf desktop
distributions such as Red Hat or SuSE or an off-the-shelf embedded
distribution such as TimeSys Linux is that they are built with
integrated or loadable kernel module support for almost anything that
you would encounter on a random PC or on a specific embedded board.
If
you are migrating an off-the-shelf system and have the source code and
configuration file for the kernel that you are running, you can migrate
this configuration file to the 2.6 kernel by following the instructions
given in the previous section and activating support for any new
features that you are interested in, such as ALSA. You should then be
able to build and install your 2.6 kernel, any associated modules, and
reboot to test your system with the 2.6 kernel. If this is the case,
skip to the next section of this white paper.
If you do not have
a configuration file for the kernel that your system is running, you
can generate a default configuration file by executing the make
defconfig command in the 2.6 kernel source directory. The list of
available kernel configuration variables differs for each architecture
and often across different types of processors. If you are migrating a
PowerPC (PPC) Linux system to the 2.6 kernel, you may want to start
with kernel source code such as TimeSys Linux 2.6 Reference PPC
Distribution which includes verified support for selected PPC
processors. TimeSys' enhancements to the 2.6 kernel for the PPC
processor are actively being submitted to the Open Source community and
should be available in the main kernel source tree soon. Alternately,
you can see the configuration options available for different
architectures in any kernel source tree by specifying your target on
the command line for your configuration command, as in the following
example for a PowerPC (PPC) system:make defconfig ARCH=ppc Once
you have generated a default 2.6 kernel configuration file, you must
then configure the kernel to provide drivers for the hardware in your
system, either built-in or as loadable kernel modules.
Discussing
all of the details of hardware identification on any platform is
outside the scope of this white paper, but two of the most useful
utilities for identifying your hardware are the lspci and lsusb
utilities found in most Linux distributions. The lspci
utility displays information about all of the PCI buses detected on
your system, listing the devices that are connected to them. This
utility is especially useful for x86 motherboards with integrated sound
or graphics adapters, because it helps identify the actual chipsets
used in the onboard PCI circuitry. The lsusb utility provides the same sort of information for the USB buses and attached devices in your systems.
If
you are creating your own kernel configuration file, some other
hardware information that you might want to supply is information about
the specific type of CPU used in your system. You can configure this
information using the make xconfig configuration editor's Processor or Processor type and features pane. Information about the type of processor in your system is available in the file /proc/cpuinfo, which you can simply display by executing the cat /proc/cpuinfo command.
Finally,
you might still need to make changes to your new kernel configuration
file based on custom kernel features that your existing system is
using. For example, you should check the filesystems that are used or
supported by the kernel that you are currently using. Information about
the types of filesystems available on your system is available in the
file /proc/filesystems, which you can simply display by executing the cat /proc/filesystems
command. For example, the root filesystems used by SuSE Linux systems
are typically reiserfs filesystems, but the reiserfs filesystem is not
active in the 2.6 kernel by default. Similarly, using an initial RAM
disk is not active by default in the 2.6 kernel, and neither is support
for accessing SMB or CIFS filesystems.
Заключение
Once
you've migrated or created your kernel configuration file and
configured it as described in the previous section and in the first
white paper in this series, you're ready to build and install the
kernel and any modules that you have specified. Building the kernel is
is done by executing the make command from the top-level kernel source directory, and requires the versions of the gcc, make, and binutils
packages that were discussed earlier in this white paper. Once the make
command completes successfully, how you install the kernel and modules
depends on the type of system for which you are building the kernel. If
you are updating a desktop x86 system, you can install the kernel and
associated modules using the make install and make modules_install
commands. If you are cross-compiling a 2.6 kernel for a target embedded
system, the make targets that you will want to use for installation
depend on where and how your kernel binaries are installed for use by
the target system.
As described in this white paper, migrating a
desktop system to the 2.6 kernel has a fair number of steps, but is
actually quite easy to do even if you are relatively new to Linux.
Migrating specialized Linux systems, such as those used in embedded
computing, is somewhat more complex, but is also manageable. TimeSys's TimeStorm Linux Development Suite (LDS) makes it easier to migrate specialized systems to new kernels and new hardware. TimeSys's TimeStorm Linux Verification Suite
(LVS) makes it easy to verify that your updated system and applications
are working correctly and will satisfy your requirements. The next
white paper in this series, "Migrating Custom Linux Installations to
the 2.6 Kernel", provides an overview of upgrading these types of
specialized systems and provides insights into how powerful but
easy-to-use software can simplify and expedite the migration and update
process.
Миграция на 2.6
is commonly used for a wide range of technical and commercial reasons
today. Linux runs on a tremendous range of supported architectures,
processors, buses, and devices, and combines the power of inherent
multi-tasking with the attractive notion of an open, royalty-free
operating system. At the high and medium ends, Linux systems support
enterprise infrastructure such as file, mail, and web servers, and
business-unit infrastructure such as firewalls, VPN servers, routers,
and gateways. In its smallest incarnations, Linux is commonly used in
embedded systems such as process control systems, PDAs, home gateways,
and set-top boxes.
Linux systems used for enterprise and
business-unit infrastructure are often very similar to desktop Linux
systems from a startup and system administration point of view. They
typically also use the same startup mechanism to determine the
processes that should be started at boot time, as described in the next
section. The previous whitepaper in this series, "Using the 2.6 Kernel
with Your Current System", provided an overview of the types of changes
you might need to make to the command files (scripts) that are executed
when booting 2.6-based systems of these types.
Embedded systems
must typically boot quickly, start a limited number of processes, and
operate under resource constraints not found on larger Linux systems.
The hardware used for storage in embedded systems, such as flash,
compact flash, and Disk-on-Chip hardware, limits the amount of
available storage for the system, your applications, and your data.
These types of storage introduce specialized types of filesystem and
hardware issues, such as wear-leveling, that are not relevant to larger
systems. For example, wear-leveling is only implemented in filesystems
targeted for devices that can only be written to a certain number of
times, because its goal is to guarantee that all of the target storage
is written to an approximately equal number of times.
Embedded System Components and Terminology
All
Linux distributions consist of the same core building blocks: a kernel
and a root filesystem. The latter contains software and libraries used
by the system itself, any infrastructure required to support users on
the system, and the applications that users execute to do their work.
In standard development systems, many of the applications in the root
filesystem are the compilers and related software used for application
development (known as toolchains).
Linux distributions targeted
for embedded use typically include these same core building blocks, but
with some twists. For example, because embedded development is
typically done on a desktop system but is targeted for a specific
embedded development board, embedded Linux distributions such as
TimeSys Linux provide a kernel for the embedded board, a root
filesystem for the embedded board, and multiple toolchains. One set of
toolchains is included in the filesystem for the embedded board itself,
while another is installed in your desktop system's filesystem. The
latter is known as a cross-compiler, and produces binaries on your
desktop system that will execute on your embedded board. TimeSys Linux
also includes a third toolchain that you can execute on a Windows
system to produce binaries that will run on your embedded board.
"Host"
and "target" systems are a key concept for most embedded development.
Cross-compilers are typically used for embedded development because
embedded boards often do not have the resources required to compile and
optimize the applications that will run on them. Similarly, they may
not have the storage required for a full development and debugging
environment. A common solution for storage limitations is for the
embedded board to use a mechanism such as NFS (the Network File System)
to access a filesystem that is actually stored on your desktop
development system. Because a desktop development system provides both
the cross-compiler and the storage used by the embedded board during
development, it is usually referred to as the "host" machine. Because
the embedded development board is where applications will eventually be
stored and execute, the embedded development board is usually referred
to as the "target" machine.
As a final wrinkle, host systems are
used to build the filesystem that will eventually be deployed on an
embedded system. For most embedded systems, these are typically
compressed, in-memory filesystems known as initial RAM disks, or other
compressed filesystem images that are stored in flash or compact flash
and are either loaded into memory or used directly.
The
multiple toolchains and filesystem components associated with embedded
Linux distributions increases the complexity of migrating an embedded
Linux system to the 2.6 kernel. For example, in order to compile the
2.6 kernel for your embedded board, you might have to first update any
cross-compiler that you are using. However, before you can do that, you
might first have to update the compiler that you are using on your
desktop system to build the cross-compiler that you will be using. The
next section highlights the key components of an embedded system that
you must consider upgrading when moving to the 2.6 kernel, and the
sequence in which you should upgrade them, if necessary.
Updating an Embedded System
If
you install an off-the-shelf, 2.6-based distribution such as a TimeSys
Linux 2.6 reference distribution, it provides a set of core Linux
components that have already been certified to work together. However,
even in this case, any changes that you have made to your existing
installation or deployment can not be migrated to the new SDK
automatically. Possible migration issues when moving to a 2.6-based
distribution from any existing Linux deployment are the following:- Perform
any mandatory package updates to the compilers and build environment on
any desktop system that you use in conjunction with your embedded
system. (Explained in the third whitepaper in this series, "Using the 2.6 Kernel with Your Current System".)
- Perform
any mandatory package updates to any cross-compilers that you are using
to build applications for the target system. (Described in third
whitepaper in this series, "Using the 2.6 Kernel with Your Current System".)
- Migrate
any customized kernel configuration to the 2.6 kernel provided with
your 2.6-based distribution. (See the first whitepaper in this series, "Customizing a 2.6-Based Kernel".)
- Convert
any device drivers that you have written to the new device driver model
used by the 2.6 kernel (Explained in the second whitepaper in this
series, "Migrating Device Drivers to 2.6".)
- Perform
any mandatory package updates to the applications and utilities used in
your existing root filesystem or initial RAM disk.
- Migrate
any administrative or configuration changes that you have made from
your existing root filesystem to the new root filesystem provided with
your 2.6-based Linux distribution
- Convert your custom
applications from your existing root filesystem to the new root
filesystem that you will use with your 2.6-based distribution.
The
next few sections focus on points 5 and 6. The final whitepaper in this
series, "Migrating Applications to the 2.6 Kernel and NPTL" (Native
POSIX Threading Library), provides an overview of the most common
issues that you might encounter in step 7, as you migrate your existing
applications. All of the white papers in this series can be found in
the TimeSys online Linux resource center.
Initial RAM Disks and Root Filesystems
A
filesystem is a section of some storage medium from which your system
can read (and usually write) data. Linux uses filesystems for a variety
of purposes, ranging from storing system and user files and directories
to serving as swap space that can be used to support virtual memory.
The primary filesystem on any Linux system is known as the root
filesystem, and is always made available to users ("mounted") through
the / directory.
The first step in the Linux boot process is to
load the kernel into memory. When many Linux systems boot, the kernel
uses an in-memory filesystem, known as an initial RAM disk, that is
uncompressed, loaded into memory, and used as a temporary root
filesystem during the boot process. Using an initial RAM disk enables
you to execute commands and pre-load modules that you might need during
the remainder of the boot process or before your system's hardware is
available to users. On desktop systems, the initial RAM disk is almost
always a transient part of the boot process. On embedded Linux systems
with sufficient memory, the initial RAM disk might be the actual root
filesystem used when Linux is running.
Tools such as TimeSys'
Target Configurator, a component of the TimeStorm Linux Development
Suite, make it easy to create an initial RAM disk that contains the
system software that you need at boot time or run time. The Target
Configurator also simplifies adding your applications to an initial RAM
disk if that is going to serve as your root filesystem, or to
filesystems such as JFFS2 or EXT3 used on different types of storage
devices. The remainder of this section focuses on migrating initial RAM
disks to systems using the 2.6 kernel.
The TimeSys Linux 2.6
Reference Distributions include pre-assembled initial RAM disks for all
supported platforms and architectures. Most Linux distributions provide
scripts (such as the mkinitrd script used with Red Hat Linux)
that enable you to build your own initial RAM disk. However, if you are
migrating to a 2.6-based kernel and want to continue using an initial
RAM disk that you have already assembled, you should examine the
contents of the RAM disk to ensure that it is compatible with your new
kernel.
Examining an existing initial RAM disk is done by
mounting it as a loopback device on your Linux system. A loopback
device is a virtual device that your Linux system can access in the
same way as any physical device. In order to mount an initial RAM disk
(or to have created an initial RAM disk in the first place), your
current kernel must have been compiled with support for loopback
devices. For the 2.6 Linux kernel, support for loopback devices is
enabled through the Device Drivers > Block Devices > Loopback device support option in the kernel configuration editor. For the 2.4 kernel, this option is located in Block Devices > Loopback device support.
On
desktop Linux systems that use the GRUB (Grand Unified Boot Loader)
boot loader, the system's initial RAM disk is usually stored as a
separate file external to the kernel. This file is typically located in
the /boot directory and is identified in the GRUB configuration file (/etc/grub.conf).
On most embedded systems, the initial RAM disk is created as a file
external to the kernel, but is bundled with the kernel as a final step
in the kernel build process. The following figure shows an initial RAM
disk being created in TimeSys's Target Configurator, which simplifies
building and maintaining root filesystems of various types.
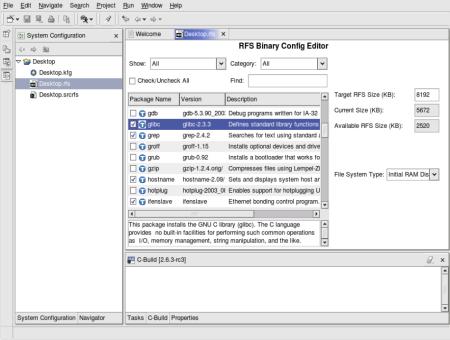
(Click to enlarge)
Desktop
Linux systems typically use the EXT2 filesystem in their initial RAM
disks, but many embedded Linux systems use smaller, more simple types
of filesystems such as CRAMFS, ROMFS, or even the Minix filesystem.
Regardless of the type of filesystem contained in an initial RAM disk,
an initial RAM disk is typically compressed using gzip to save even
more space. The Linux initial RAM disk loader recognizes compressed
files and automatically uncompresses them before mounting them.
If
you have an existing initial RAM disk that you want to migrate to the
2.6 kernel, you will need to uncompress it, mount it, and examine it.
Initial RAM disks are always compressed, even if the filename does not
have the traditional ".gz" extension, so you may need to rename the
file in order to uncompress it successfully. Typical commands to
uncompress and mount an initial RAM disk are the following:# gunzip initrd.img.gz
# mount -t ext2 -o loop initrd.img /mnt/initrd To
mount any filesystem, the directory that you are using as a mountpoint
(/mnt/initrd in this example) must already exist. The mount command's
-t option specifies the filesystem type, and is actually optional
unless your initial RAM disk is not in EXT2 format. Once an initial RAM
disk is mounted, it appears in a disk listing (done using the "df"
command) just like any other disk:Filesystem 1K-blocks Used Available Use% Mounted on
/tmp/initrd.img 2948 510 2288 19% /mnt/initrd Once mounted, an initial RAM disk can be explored like any other filesystem, as in the following example:# cd /mnt/initrd
# ls -al
total 13
drwxr-xr-x 9 root root 1024 Feb 16 13:31 .
drwxr-xr-x 16 root root 4096 Mar 3 08:58 ..
drwxr-xr-x 2 root root 1024 Feb 16 13:31 bin
drwxr-xr-x 2 root root 1024 Feb 16 13:31 dev
drwxr-xr-x 2 root root 1024 Feb 16 13:31 etc
drwxr-xr-x 2 root root 1024 Feb 16 13:31 lib
-rwxr-xr-x 1 root root 340 Feb 16 13:31 linuxrc
drwxr-xr-x 2 root root 1024 Feb 16 13:31 loopfs
drwxr-xr-x 2 root root 1024 Feb 16 13:31 proc
lrwxrwxrwx 1 root root 3 Feb 16 13:31 sbin -> bin
drwxr-xr-x 2 root root 1024 Feb 16 13:31 sysroot The
next section of this whitepaper discusses the sequence of events that
occur and the commands that are executed when a Linux system boots.
When migrating a custom Linux deployment to the 2.6 kernel, it is
important to understand which command files specify the commands that
are executed when your system boots, to ensure that they are compatible
with the 2.6 kernel. The next few sections of this whitepaper discuss
the Linux boot sequence and the command files and process that it
executes in various scenarios.
The Linux Boot Sequence
After
loading the kernel, traditional Unix and Linux systems execute a system
application known as the init (initialization) process, which is
typically found in /sbin/init on Linux systems. Typically, the init
process is process number 1 on the system, as shown in a process status
listing produced using the ps command, and is therefore the ancestor of all other processes on your system. The init process reads the file /etc/inittab
to identify the way in which the system should boot and lists all other
processes and programs that it should start. The init process and the /etc/inittab file are discussed in detail later in this whitepaper.
If your system uses an initial RAM disk, the boot sequence is slightly different, as explained in the next section.
The Linux Boot Sequence for Initial RAM Disks
If
your system uses an initial RAM disk, the boot sequence includes one
extra step. Instead of initially executing the init process, the system
uncompresses and mounts the initial RAM disk, and then executes the
file /linuxrc. This file must therefore be executable, but can
be a command file that lists other commands to execute, can be a
multi-call binary such as BusyBox, or can simply be a symbolic link to
a multi-call binary or to the /sbin/init process itself.
Executing the file /linuxrc is done as a step in the initial RAM disk's mount process, as specified in the kernel source file init/do_mounts_initrd.c. A sample /linuxrc file, where the /linuxrc
file in your initial RAM disk is actually a command script (taken from
a Red Hat 9 system that does not use the devfs filesystem or udev) is
the following:#!/bin/nash
echo Mounting /proc filesystem
mount -t proc /proc /proc
echo Creating block devices
mkdevices /dev
echo Creating root device
mkrootdev /dev/root
echo 0x0100 > /proc/sys/kernel/real-root-dev
echo Mounting root filesystem
mount -o defaults --ro -t ext3 /dev/root /sysroot
pivot_root /sysroot /sysroot/initrd
umount /initrd/proc As you can see from this example, the default /linuxrc file on a Red Hat system that uses an initial RAM disk executes a number of commands that help initialize the system.
If
you are migrating a Linux system that provides local storage and
therefore is not limited to the initial RAM disk, the last commands in
this command file mount the root filesystem on your storage device and
use the pivot_root command to change the system's idea of the /
directory. The pivot_root command, included in the linux-utils package,
is used to change the system's root directory from the initial RAM disk
to the device that actually provides your long-term storage. If you are
using GRUB, this device is identified via one of your boot arguments,
the root=value parameter.
When upgrading a custom Linux system that uses an inital RAM disk to the 2.6 kernel, you will need to do several things:mount and examine the initial RAM disk to verify how it uses the /linuxrc file.
if the /linuxrc
file is a command script, you will need to check the commands that it
executes in order to ensure that they are compliant with your 2.6
kernel. If it specifically references commands such as modprobe or
insmod, you will have to make sure that you have installed
2.6-compatible versions of these utilities in your initial RAM disk and
any other filesystems that you use. Your initial RAM disk must also
contain kernel modules that have been built for the 2.6 kernel, and
therefore follow the naming convention required by the 2.6 kernel -
using the ".ko" extension rather than the classic ".o" extension.
if the /linuxrc
file is a symbolic or hard link to the /sbin/init program, you will
need to make sure that the command file used by the init program is not
2.4-specific. If it specifically references commands such as modprobe
or insmod, you will have to make sure that you have installed
2.6-compatible versions of these utilities in your initial RAM disk and
any other filesystems that you use. Your initial RAM disk must also
contain kernel modules that have been built for the 2.6 kernel, and
therefore follow the naming convention required by the 2.6 kernel -
using the ".ko" extension rather than the classic ".o" extension. The
files and execution sequence used by the init process are discussed in
the next section of this white paper. Assuming that your system executes the /linuxrc
file correctly, the system typically either changes the root of your
filesystem to a new / directory, or manually executes the /sbin/init
process. The Linux kernel performs a sequential search for the init
process (as specified in the kernel source file init/main.c).
Some older kernels required that you specify the name of the file that
you executed as part of the boot process, using the initrd=value
parameter in the boot loader. This is not necessarily a bad idea, but
is extraneous if you are using an initial RAM disk and use the exec
command in your /linuxrc file to automatically start the init process.
The
next section of this white paper discusses the standard Linux init
process and identifies the files and system applications that it
automatically executes.
The Standard Linux Init Sequence
On
desktop and larger systems, most Linux systems use a package of
applications known as the SysVInit package, and a package of related
scripts known as the initscripts package, to identify the processes
that are started when a system boots and the order in which they are
started.
Most desktop and larger Linux systems use the concept
of "run levels" to identify the applications that the system executes
and the order in which they are executed. Different "run levels" are
simply a way of defining a set of applications that the system
administrator believes should be run when the system is being used in a
certain way. for example, run level 1 is usually known as single-user
mode, and is used for system maintenance. Only the core set of
applications required for a system administrator to contact the system
and perform maintenance tasks are running when the system is in run
level 1.
Systems that use both the SysVInit and initscripts
packages boot in the following sequence: once the kernel is loaded and
begins executing, it invokes a process known as the init
(initialization) process, which reads the file /etc/inittab to identify the basic processes and programs that it should start.
In the /etc/inittab file, the default run level is identified with a line containing the string "initdefault", as in the following example:id:2:initdefault: In
this case, the default run level is 2. An additional entry in the
/etc/inittab file identifies a command script that is run to initialize
the system itself, as in the following example:si::sysinit:/etc/rc.d/rc.sysinit After
the system initialization script is run, Linux distributions that use
the SysVInit and initscripts packages then define what occurs when the
system enters a specific run level. For example, a few lines later in
the /etc/inittab file, you might see additional information about run
level 2 in an entry like the following:l2:2:wait:/etc/init.d/rc 2 This line specifies that when the system enters run level 2, the /etc/init.d/rc
command will be executed with an argument of "2". This causes the "rc"
(run command) command to execute all of the appropriate files located
in the directory /etc/rc2.d. The files in this directory have
names of the form SNNname or KNNname, and are usually executable shell
scripts (or are links to a common set of scripts) that contain lists of
other system commands to execute. Files beginning with the letter 'S'
are executed when the system starts a specified run level. Entries
beginning with the letter 'K' are executed when the system leaves a
specified run level. Commands are executed in the numerical order
specified by the number NN. The "name" portion of an entry is
user-defined, but should generally be evocative of the program or
subsystem that the file starts.
Checking for Customizations in Your Boot Sequence
The
previous sections of this whitepaper discussed the boot mechanisms used
on Linux system that use an initial RAM disk and those that booted
using local storage that provides a root filesystem.
When
migrating to the 2.6 kernel, a capsule summary of the changes that you
may need to make (or should verify) are the following:- you
must copy any mandatory loadable kernel modules (LKMs) to any initial
RAM disk that you are using. To work with a 2.6 kernel, these must all
use the new ".ko" naming convention (and must have been compiled
against a 2.6 kernel).
- the /linuxrc file in an
initial RAM disk or any of the files in the generic boot sequence
(/etc/inittab) should not contain any explicit module load references
that include the old module conventions (i.e., the ".o" vs ".ko" naming
conventions.
One
of the advantages of a kernel-aware tool such as TimeSys' Target
Configurator is that it automatically creates an initial RAM disk (if
required) and therefore creates a 2.6-compliant root filesystem. If you
are manually creating a root filesystem or initial RAM disk, you will
need to verify that your root filesystem contains the appropriate
initialization commands.
Generic 2.4 to 2.6 Differences
If
you are migrating a TimeSys Linux system based on the 2.4 kernel to one
based on the 2.6 kernel and have customized your system's boot sequence
or the applications that it executes, you will have to make parallel
modifications to your system's boot sequence. As discussed previously,
if your 2.4 system explicitly loaded kernel modules for specific
drivers or subsystems, you will have to make sure that you have
installed 2.6-compatible versions of the utilities. Your initial RAM
disk and filesystems must also contain kernel modules that have been
built for the 2.6 kernel, and therefore follow the naming convention
required by the 2.6 kernel - using the ".ko" extension rather than the
classic ".o" extension.
If your 2.6 system uses the devfs
filesystem rather than the standard Linux filesystem or udev, you may
need to upgrade any device or filesystem references to the appropriate
filenames for your target filesystem. For example, if you were using
the standard dev filesystem for your 2.4 kernel and need to update your
system to devfs for 2.6, you would need to change references to devices
such as /dev/md0 to the appropriate devfs device names such as /dev/md/0.
Verifying Library Requirements
Another
significant change between the 2.4 and 2.6 kernel is that many
applications have been updated to link against updated GLIBC or uClibc
libraries. If this is the case, you will also have to make sure that
your initial RAM disk or, where appropriate, root filesystem contains
the right versions of any shared libraries that your application
requires. This is generally not an issue if you are building your
initial RAM disk or root filesystem as part of the upgrade process, but
is definitely an issue if you are adapting an existing initial RAM disk
or root filesystem for use with the 2.6 Linux kernel.
Conclusion
The
Linux boot process has not changed across the 2.4 and 2.6 kernels, but
it is important to understand how your system is initialized when
migrating an existing system to the 2.6 kernel. Though the boot process
itself has not changed, kernel conventions for modules have changed, so
it important to verify that existing boot commands still function
correctly. It is also generally important to understand the files and
applications that a Linux system executed when it boots in order to
determine where you may need to make 2.6-related changes. Using a
certified 2.6-based distribution such as one of TimeSys' 2.6 deference
distributions is an easy solution to this issue, but migrating any
custom Linux implementation is feasible as long as you understand the
boot sequence and carefully examine the files executed during your
system's boot process.
Миграция приложений с поддержкой NPTL
most application developers, the majority of the changes made to the
Linux kernel between the 2.4 and 2.6 kernel families have little direct
impact. Most kernel changes only manifest themselves through increased
system performance and capacity. Kernel and system changes that affect
how applications spawn and manage other processes and threads are a
significant exception to this rule.
The 2.6 Linux kernel
introduces a new, improved threading model that is implemented through
the NPTL. The adoption of a new threading model has significant
implications for developers, system run-time libraries such as the GNU
C library (glibc), shared application libraries, and so on. This white
paper provides an overview of basic threading concepts, discusses new
and existing Linux threading models, and then highlights the sorts of
application changes that you might have to make to existing
multi-threaded applications in order to enable them to work correctly
with NPTL under the 2.6 Linux kernel.
Threading 101
On
multi-processing systems such as Linux, the concept of one process
creating another is fundamental. The most obvious example is a shell
such as the Bash shell, the standard Linux command interpreter. The
shell executes applications in response to user commands, and can
either start commands and wait for them to finish or execute them as
separate, concurrent processes (commonly referred to as "running in the
background").
One process typically creates another through a set of fork() and exec() function calls. The initial process calls the fork()
function, creating a clone of itself (known as a child process) that
inherits the entire execution environment of the process that created
it. The fork() call returns the child's process identifier
(PID) in the parent process, and a PID of 0 in the child process. The
child process then uses the exec() call to execute some other
command, which totally replaces its existing execution context with
that of the exec()'d command. At the same time, the parent process
typically either exits immediately or waits until the child process
returns its status. A simple example of this is the following:int pid;
if (pid=fork()) {
/* parent code */
exit(1);
} else {
/* child code */
execl( "command", "arg1", "arg2", ...);
printf("Should never get here...\n");
exit (-1);
} This
model for process creation is simple and easy to use, but requires
substantial system overhead. Child processes inherit a separate copy of
the complete state of their parent, including its address space, global
variables, open file descriptors, and so on. This consumes a fair
amount of system resources, makes it relatively complex for child
processes to share resources or communicate with each other, and is
extremely resource-intensive for use at the operating system level.
Threads
are similar to processes, but with some notable exceptions that make
them far more suitable for use in complex, modern systems. Threads are
essentially sub-processes that share the majority of the resources of
their parent process, and thus require a lesser amount of system
resources. A traditional way of thinking about threads is by referring
to them as lightweight processes. All of the threads created by a
process share the same address space, global variables, open file
descriptors, pending alarms, signals and signal handlers, and system
accounting information. Each thread maintains its own program counter,
registers, stack, and state information.
A key differentiator
between different thread implementations is the interaction between
kernel threads, user-space processes, and user-space threads. This will
be discussed in more detail later in this white paper.
Linux Threading Models
The
standard Linux threading library in all stable versions of Linux prior
to 2.6 is known as LinuxThreads. This library has been supported for
use with the GNU C library, glibc, since glibc 2.0, and is largely
POSIX-compliant.
NOTE: The primary libraries produced when
compiling the LinuxThreads and Native POSIX Thread Library source code
are libpthread.so and libpthread.a (for POSIX thread library). For this
reasons, the terms LinuxThreads and pthreads have historically been
used interchangeably, which confusing in light of the adoption of the
NPTL. This whitepaper uses the term LinuxThreads and NPTL to clearly
differentiate between the two threading libraries and their
capabilities. The actual library names were preserved to minimize
changes to existing Makefiles and linking commands.
LinuxThreads
has a variety of performance, scalability, and usability limitations.
It uses a compile-time setting for the number of threads that a single
process can create, and uses a per-process manager thread to create and
coordinate between all threads owned by each process. This
significantly increases the overhead of creating and destroying
threads. Signal handling is done on a per-process, rather than a
per-thread, basis, though each thread has a separate process ID. Issues
such as these, in combination with design issues such as an asymmetric
relationship between kernel and user-space threads, and the lack of
per-thread synchronization primitives for inter-thread communication
and resource sharing, places some fundamental limitations on the number
of threads that can simultaneously be created and do meaningful work in
a LinuxThreads implementation.
The next threading model
introduced for Linux was IBM's Next Generation POSIX Threads (NGPT)
project. This was an external threading library that worked in
conjunction with the LinuxThreads package, but provided additional
POSIX compliance and better performance than the standard LinuxThreads
package. This threading package is still available for use with 2.4 and
earlier Linux kernels, but is no longer actively being worked on due to
the new threading model introduced with the 2.5 and kernel series and
made publicly available in the 2.6 kernel tree.
The Native
POSIX Threading Library replaces LinuxThreads and NGPT in the 2.5 and
later kernels. NPTL brings high-performance threading support to Linux,
and provides the foundation required by multi-threaded enterprise
applications such as database systems, high-capacity and high-load web
and mail servers, and so on. NPTL was developed as part of the 2.5
kernel development process and was integrated with Linux run-time
elements such as glibc at that time. NPTL is the strategic direction
for Linux threading in the future.
Some Linux vendors, such as
later versions of Red Hat Linux, have backported NPTL to earlier
kernels and have even made the threading environment for specific
processes selectable through an environment variable (LD_ASSUME_KERNEL). On systems that support this feature, the variable is set via a command such as the following:# export LD_ASSUME_KERNEL=2.4.1 This
is a clever way to enable some existing applications that rely on
LinuxThreads to continue to work in an NPTL environment, but is a
short-term solution. To make the most of the design and performance
benefits provided by NPTL, you should update the code for any existing
applications that use threading.
The next sections discuss the
implications of the changes between the LinuxThreads and NPTL threading
implementations as far as your applications are concerned. The first
section discusses development changes related to the updated toolchains
used with the 2.6 kernel highlights. A subsequent section highlights
aspects of your applications that you must change due to differences
between the LinuxThreads and NPTL implementations, in order to make the
most of the increased power and performance of NPTL.
Recompiling Applications for 2.6 and NPTL
Though
many applications will migrate from Linux 2.4 to 2.6 without
recompilation, the addition of Native POSIX Thread Library technology
will require minor modifications in most threaded applications. A
subsequent section of this whitepaper, "Updating Applications for
NPTL", discusses the primary situations where recompilation may be
required.
Those applications that do require recompilation may
be affected by the updated compilers included with distributions such
as TimeSys Linux that are based around a 2.6-based kernel. TimeSys
ships its 2.6 Reference Distributions with version 3.3.2 of the C and
C++ compilers from the GNU Compiler Collection (GCC), and uses an
updated version of the binutils package that makes up the remainder of
a standard Linux toolchain (providing the assembler, linker, library
archiver, and so).
Simply using a 2.6 based kernel does not mean
that you are automatically using the NPTL. To determine the threading
library that a system uses, you can execute the getconf command (part
of the glibc package), to examine the GNU_LIBPTHREAD_VERSION
environment variable, as in the following command example:# getconf GNU_LIBPTHREAD_VERSION
linuxthreads-0.10 If
your system uses the NPTL, the command would return the value of NPTL
that your system was using, as in the following example:# getconf GNU_LIBPTHREAD_VERSION
nptl-0.60
If
you are building your own toolchain to work with a 2.6 system you must,
of course, make sure that you've built the toolchain on a 2.6 system,
and that you have enabled NPTL support in the version of the C library
used by your toolchain. You will also need recent source codeyou're
your C library. For example, if you are building glibc with NPTL
support, version 2.3.3 or better of the glibc source is recommended.
Enabling NPTL support when building a C library, such as glibc, is
analogous to the mechanism used for enabling LinuxThreads support for
glibc. This is done by using the configuration option --enable-add-ons=nptl when configuring glibc, rather than --enable-add-ons=linuxthreads. The latest NPTL source code is available here.
You will also need a recent version of GCC (3.3.2 or better suggested
for x86 platforms, 3.4 suggested for PPC platforms), and a version of
binutils that supports the Call Frame Information (CFI) directive
(2.14.90.0.7 or better suggested; available here).
In
general, if your applications were compiled with earlier versions of
GCC, you may notice changes in warning messages, code size, and changes
to the options provided by the GCC compiler and the rest of the
toolchain. It is especially important to be aware of the potential for
increased code size when you are recompiling embedded applications. You
may need to take advantage of additional or new optimization options in
order to continue to fit your existing applications in
resource-constrained environments. Newer versions of GCC are also
increasingly conformant to various C and C++ specifications, and are
therefore likely to complain about aspects of your application code
that earlier versions of these compilers ignored. In general, new
warnings from updated compilers should be seen as an opportunity to
weed out latent defects.
Newer versions of GCC have also
deprecated some machine-specific options (specified using -m) in favor
of more general optimization options (specified using -f). This may
require that you update values such as the CFLAGS options specified in
application Makefiles.
Finally, newer versions of GCC implement
optimizations that require them to notice possible alias situations
that may have been ignored by earlier compilers. The aliasing issues
can be resolved (at some performance cost) by using the no strict
aliasing compiler option (-fno-strict-aliasing).
Updating Applications for NPTL
The
changes between 2.4's threading support and NPTL provide significant
design and performance improvements. NPTL is far more compliant with
the POSIX specification than the LinuxThreads package was under 2.4.
NPTL also supports useful features such as mutexes that are shared
among threads, simplifying resource sharing, conflict prevention, and
increasing parallelism. Finally, NPTL is vastly more efficient than
2.4's threading support. Some of the standard performance metrics used
at TimeSys have shown NPTL implementations to be up to three orders of
magnitude faster than the same code using LinuxThreads.
Some of
the more complex changes that you may have to make in your application
logic when moving to NPTL are changes related to NPTL's improved
support for POSIX signals and signal handling. LinuxThreads implemented
generic Unix-style threads, but were limited by various implementation
details. NPTL is a POSIX-compliant threading implementation, and
therefore handles signals better both between processes and between all
threads within those processes. With the NPTL, signals can now be sent
from one thread to another, rather than simply on a per-process basis.
Signals can also use arguments to transfer information from one thread
to another.
Using the NPTL also requires that you make changes
to existing code that needs to be able to uniquely identify specific
threads. Under LinuxThreads, each thread had a unique process ID (PID).
Each thread now shares the PID of its parent process, and the getpid()
function therefore returns the same process ID for all threads in a
process. With NPTL, a thread's Thread ID must be used to uniquely
identify individual threads.
Changes to thread and process IDs
also mean that the processes that are traditionally used to spawn
processes must now be thread-aware. For example, the exec()
functions are now thread-aware, so that a thread inherits the PID of
its caller. However, any application that depended on having all
threads survive an exec() will need some modification. The
parent of a multi-threaded process is notified of a child's termination
only when the entire process terminates. Thread-related changes have
also been made to the behavior of related fork() calls. For example, functions registered with the pthread_at_fork() function are no longer run when a vfork() occurs.
In
addition to changing the internals of thread identification, NPTL does
away with the LinuxThreads notion of a manager thread, simplifying the
process/thread relationship and eliminating what was essentially
administrative overhead under LinuxThreads. This may require
application changes if, for example, your application kept track of the
number of threads running on its behalf or looked for the manager
thread as a signal target.
Finally, using a new threading
library means that certain threading functions that were available
under LinuxThreads are no longer supported under the NPTL. For example,
the pthread_kill_other_threads_np() function is no longer available. This function was used to simulate POSIX-conformant exec() functions. Since the exec() functions themselves are now POSIX conformant, the helper function is not necessary.
For
additional information about the design and implementation of the NPTL,
a general design and philosophy document is available here.
Conclusion
Changing
the kernel that your computer system runs is not necessarily an easy
task, but is eminently doable. The white papers in this series have
highlighted the issue in configuring the 2.6 kernel, updating device
drivers, migrating desktop and custom systems, and updating
applications. Certified 2.6-based distributions targeted for embedded
use are already available from vendors such as TimeSys, whose 2.6
reference distribution was the first 2.6-based distribution for PPC
systems. High-quality commercial software such as TimeSys TimeStorm IDE
and TimeStorm Linux Developers Suite (LDS) is designed to help you
migrate any Linux kernel, device driver, application, or deployed
system to take advantage of the power of the 2.6 kernel and updated
packages, threading methodology, and so on.
Linux is a shining
example of the power of the Open Source movement as a positive force
for change in the software industry. The Linux kernel, the core of any
Linux distribution, is constantly evolving to incorporate new
technologies and improve performance, scalability, support, and
usability. The 2.6 kernel increases the spectrum of systems for which
Linux is well-suited, from PDAs, process control systems, and set-top
boxes all the way to enterprise servers. The cost, power, and
supportability advantages by Linux are more obvious than ever in
today's business market and fast-paced technical environment.
|

 LINUX
LINUX 
 Kernels


